background image

US Blaster Black Reference Series User Guide

8

It is important to connect this equipment correctly. There is a diagram below to show how you can
connect your Black Label Reference Series to various equipment. You can then adjust the sound
setting with the remote control or the buttons on the control panel on the front of the center unit. More
on this later.

6.1 Connecting a DVD player

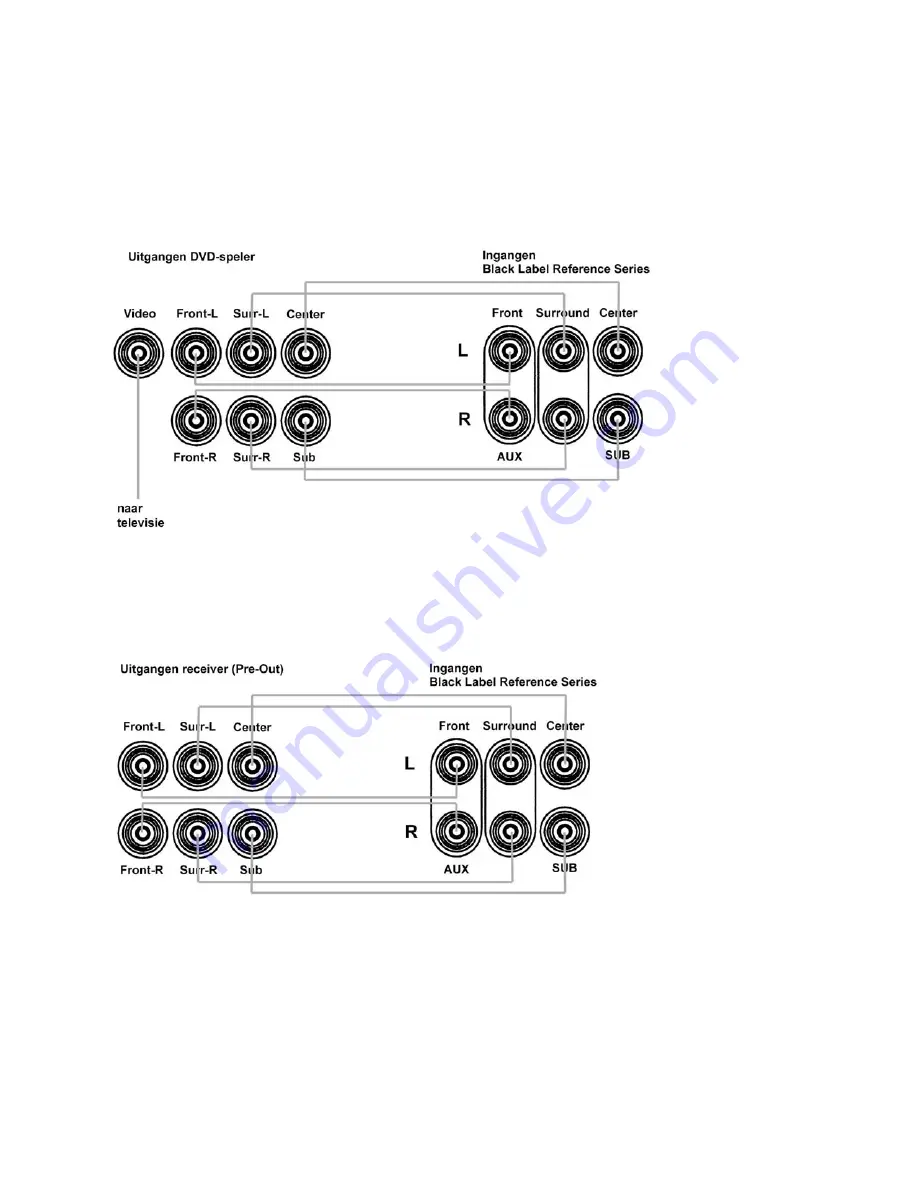
You can connect the line outputs from your DVD player directly to the USB 4022 inputs. You can use
the supplied stereo cinch cables for this. This means you can make optimal use of the audio decoders
for DTS, Dolby Digital and Dolby Surround built in to the DVD player.

Connection diagram 5.1 DVD player output to Black Label Reference Series

6.2 Connecting a receiver to the Black Label Reference Series

You can connect the line outputs (Pre-Out) from your receiver directly to the corresponding USB 4022
inputs. You can use the supplied stereo cinch cables for this.

Connection diagram 5.1 Receiver outputs to Black Label Reference Series

Summary of Contents for USB 4022

Page 1: ......

Page 2: ...up the speakers 6 4 1 Front speakers 6 4 2 Center speaker 6 4 3 Bass speaker 6 4 4 Rear speakers 7 5 Connecting speakers 7 6 Connecting media sources 8 6 1 Connecting a DVD player 8 6 2 Connecting a receiver 8 6 3 Using as a subwoofer 9 6 4 Connecting a computer 9 7 Operation 10 8 Solving problems 11 9 Technical specifications 12 ...

Page 3: ...TS Dolby Digital etc so the media to be connected must have similar decoders and outputs for the different sound channels If you want to connect a receiver to the Black Label Reference Series it must have pre amplifier line outputs Pre Out US Blaster recommends that you read this manual before you start using the Black Label Reference Series If you have questions please contact Package contents We...

Page 4: ...a dry cloth 4 Moisture and sunlight Do not use the USB 4022 in a humid environment and put it in a place where there is no direct sunlight 5 Setting up and ventilation Put the USB 4022 on a stable base Make sure there is sufficient space around the center unit for warm air to be discharged from the cooling profile 6 Power supply Make sure that the power level that is set on the rear of the center ...

Page 5: ...tion the center unit will switch to a standby position if there is no signal on any of the line inputs for 20 minutes The unit will automatically switch itself back on when there is a signal again You switch the center unit off when it is in the Off position 4 Line inputs connect the corresponding outputs of your media player to these inputs 5 Speaker connections see Connecting speakers 6 On off s...

Page 6: ... an equal distance to the left and right of the center speaker and at least 1 5 metres apart Furthermore the speakers must also be in a straight line with the center speaker This is shown clearly on the diagram If you don t do this the sound will go out of phase which can mean a considerable distortion of the total sound Finally the front speakers must also be directed towards the listener Speaker...

Page 7: ...set up to the left and right of the listener but behind 5 Connecting speakers You will find one and one on the connecting sockets of the speakers and of the center unit Thirty metres of speaker cable is supplied with your USB 4022 It is a twin vein cable one of the veins is marked Once you have stripped off about 1 cm of the insulation from the vein use the market vein of the speaker cable to conn...

Page 8: ...e outputs from your DVD player directly to the USB 4022 inputs You can use the supplied stereo cinch cables for this This means you can make optimal use of the audio decoders for DTS Dolby Digital and Dolby Surround built in to the DVD player Connection diagram 5 1 DVD player output to Black Label Reference Series 6 2 Connecting a receiver to the Black Label Reference Series You can connect the li...

Page 9: ...for this Interlinks Connection diagram for use a subwoofer 6 4 Connecting a PC sound card to the USB 4022 You can connect your computer to the USB 4022 if your sound card has suitable outputs for the various sound channels Most computer sound cards have combined line outputs for the left and right channel in one Jack output In this case you will therefore have to use connecting cables where the co...

Page 10: ...her the remote control or the CH SEL switch 5 This LED lights up when you adjust the sound from the rear surround speakers with either the remote control or the CH SEL switch 6 This LED lights up when you adjust the center speaker volume with either the remote control or the CH SEL switch 7 This LED lights up when you adjust the bass speaker volume with either the remote control or the CH SEL swit...

Page 11: ...ough If the USB 4022 is still not working please contact your supplier The Power LED is not lit If the USB 4022 is connected to the mains power supply the switches are on and the Power LED is not lit check the fuse The fuse is below the input for the mains power cable You can open the fuse holder with a screwdriver Let you supplier check the fuse they will be able to give you the correct replaceme...

Page 12: ...nd 15 Watt 4 Ohm Bass 100 Watt 4 Ohm Distortion 0 2 1 full capacity Signal noise ratio 95 dB Frequency range Front 20 Hz 20 kHz 3 dB Center 20 Hz 20 kHz 3 dB Surround 20 Hz 20 kHz 3 dB Bass 20 140 Hz 3 dB Dimensions H x B x D Center unit 380 x 275 x 420 mm Center 246 x 90 x 84 mm Front Surround 120 x 90 x 104 mm Power consumption Weight ...

Reviews: