22
3 months / 500 hrs of operation:
• Change petroleum lubricant while crankcase
is warm.
• Drain compressor oil and clean oil sight glass.
6 months / 1000 hrs of operation:
• Replace oil filter and change lubricant (if nec-
essary) on pressure lubricated modles.
12 months / 2000 hrs of operation:
• Change synthetic lubricant while crankcase
is warm.
• Replace filter element.
FILTER INSPECTION & CLEANING
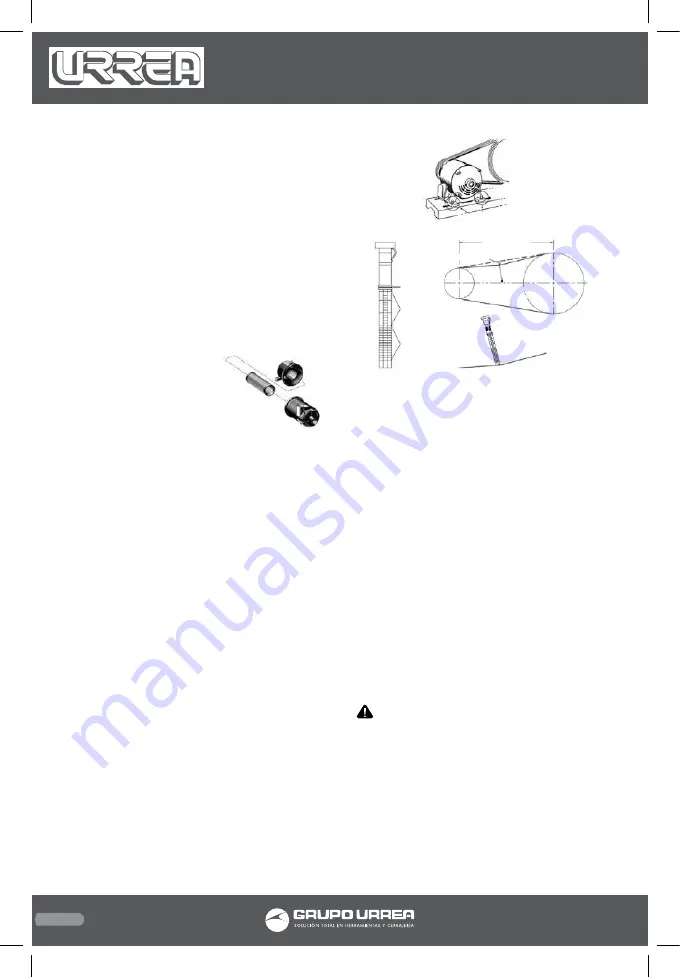
1. Loosen the clamps se-
curing the filter housing
to its base.
2. Remove the filter hous-
ing and withdraw the old
filter element.
Clean the element with a jet of air or vacuum.
3. Replace the filter element and housing.
OIL CHANGE
1. Remove the oil drain plug and allow the lu-
bricant to drain into a suitable container.
2. Replace the oil drain plug.
3. Follow the filling procedures in INSTALLA-
TION section.
BELT ADJUSTMENT
CHECKING BELT TENSION. Check belt tension
should be occasionally, especially if looseness
is suspected. New belts must also be properly
tensioned upon installation.
TENSIONING BELTS
Belt tensioning can be achieved by loosening
the motor anchor screws, pushing the motor
away from the pump, and retightening the
motor anchor screws. Some units are equipped
with a belt tensioning bolt that, when turned,
pulls the motor away from the pump.
Otherwise, the motor can be easily moved by
placing a prying tool beneath it. A commer-
cially available spreader or other belt tension-
ing device can also be helpful.
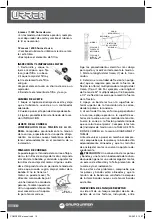
Follow the procedures outlined below to cor-
rectly set and measure tension.
1. Measure the span length (t) of the drive.
2. Determine the amount of deflection (in
inches) required to measure deflection force
(in pounds) by multiplying the span length (t)
by 1/64. For example, a 32” span length multi-
plied by 1/64 equals 1/2” of deflection required
to measure deflection force.
3. Lay a straight edge across the top outer sur-
face of the belt drive from pulley to sheave.
4. At the center of the span, perpendicular to
the belt, apply pressure to the outer surface of
the belt with a tension gauge. Force the belt
to the predetermined deflection calculated in
step 2. Compare the reading on the tension
gauge to the BELT TENSION TABLE in the DIA-
GRAMS & TABLES section.
Ensure the pulley and sheave are properly
aligned and the motor anchor screws are ad-
equately retightened prior to restarting the
compressor.
CAUTION: Improper pulley/sheave align-
ment and belt tension can result in motor over-
load, excessive vibration, and premature belt
and/or bearing failure.
TANK INSPECTION
The life of an air receiver tank is dependent
upon several factors including, but not limited
to, operating conditions, ambient environ-
ments, and the level of maintenance. The exact
effect of these factors on tank life is difficult
ANCHOR BOLTS
BELT SPAN (t)
DIRECTION OF
FORCE APPLIED
DEFLECTION
O-RINGS
DEFLECTION
FORCE SCALE
DEFLECTION
DISTANCE
SCALE
COMP95XX manual.indd 22
23/06/15 14:27

