background image

Page 6

WC-1 W

IRELESS

C

ONTROLLER

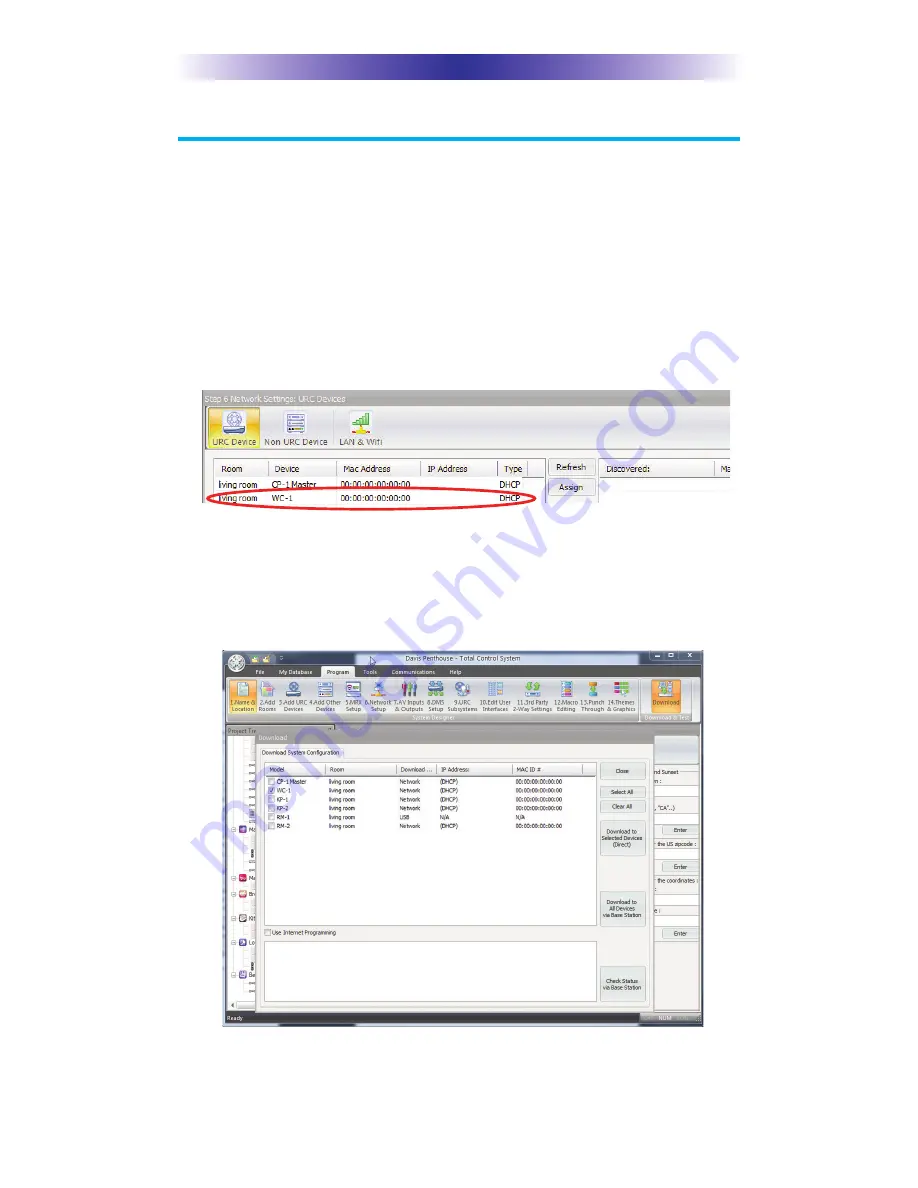
Network Discovery & Download

WARNING!! Before proceeding, a Custom Professional is required
to install and configure your WC-1.

1. Open a new or current project. In 

Step 3: Add URC Devices

, add

an 

WC-1

to a room included in your project which represents the

physical location of the unit.

2. In 

Step 6: Network Setup, 

discover the WC-1 using the same

process used for other Total Control network products in the
project.

3. Press the 

Download

button within the Program menu.

4. Make sure to check the WC-1 checkbox, then press the

Download to Selected Devices (Direct)

button.

Summary of Contents for ccGEN2 WC-1

Page 1: ...Owner s Manual WC 1 Wireless Controller ...

Page 2: ... Universal Remote Control Inc UNIVERSAL REMOTE CONTROL INC SHALL NOT BE LIABLE FOR OPERATIONAL TECHNICAL OR EDITORIAL ERRORS OMISSIONS MADE IN THIS MANUAL The information in this Owner s Manual may be subject to change without prior notice ccGEN2 is a registered trademark of Universal Remote Control Inc URC Control the Experience is a registered trademark of Universal Remote Control Inc All other ...

Page 3: ...ttom Panel Descriptions 2 Network Installation 5 Network Discovery Download 6 Optimizing IR Flasher Levels 7 Overview of IR Routing 8 Limited Warranty Statement 9 End User Agreement 11 Specifications 12 Federal Communication Commission Interference Statement 13 Declaration of Conformity 14 ...

Page 4: ...enefits IR Flasher Outputs Control up to four components without ever getting up from your seat Front IR Blaster Control IR devices where an IR emitter cannot reach the device s location like a TV over a fireplace Network Connectivity Receives commands over the network from an CP 1 Central Processor and then sends IR signals to control your components Compact Size The small size of the WC 1 allows...

Page 5: ...atus LED When the WC 1 powers up both the Status and Data LEDs blink When a network connection is made the Status LED color will vary depending upon its connected state Good wireless signal Green Poor wireless signal Orange No Connection OFF Data LED The Data LED flashes as the WC 1 transmits IR data IR Blaster The front IR Blaster sends IR signals to one or more components placed in direct line o...

Page 6: ...uts Ports 1 4 Connect an included 3 5mm IR emitter to each of the four IR outputs Adjust the IR output signal strength for port 1 using the attenuator located on the bottom of the unit LAN Connection If a wired connection is needed this port uses a standard Ethernet RJ 45 plug to communicate via the local area network Page 3 ...

Page 7: ...then plugging it back in also performs the same function Pressing and holding the Reset button for 15 seconds will factory default the WC 1 and return the unit back to its original unprogrammed state Mac Address Sticker The MAC Address 12 numbers identifies this wireless device when connected to the network IR Attenuator Use the included adjustment tool or a flathead screwdriver to increase or dec...

Page 8: ... the use of ccGEN2 Central Processor and compatible interfaces Once installed on the network and a button is pressed on an interface a command is transferred over the customer s network to the CP 1 Central Processor which in turn is routed to the WC 1 and then sends IR commands to the components you specify 1 Connect the WC 1 to the network wired or wireless 2 Connect your laptop to the same netwo...

Page 9: ...p 3 Add URC Devices add an WC 1 to a room included in your project which represents the physical location of the unit 2 In Step 6 Network Setup discover the WC 1 using the same process used for other Total Control network products in the project 3 Press the Download button within the Program menu 4 Make sure to check the WC 1 checkbox then press the Download to Selected Devices Direct button ...

Page 10: ...you can have difficulty adjusting the IR Output Program ccGEN2 to send IR commands only via a specific IR port 1 4 then readjust the IR Line Output level Connect an IR emitter to each IR output and run the emitter wire to the IR receiver of each component DO NOT STICK the emitter in place yet Adjust the LEVEL on IR port 1 or adjust the emitter PLACEMENT for ports 2 4 until the component responds t...

Page 11: ...the WC 1 to your component make sure to notate the IR outputs being used Program the same port designations into the ccGEN2 program 2 Assigning each component with its own individualized port number helps to control multiple components eliminating inter ference 3 Identical components must receive IR commands ONLY from a dedicated flasher affixed to its front panel or a rear panel direct IR input W...

Page 12: ...nd or the URC software fails to so comply URC shall at its own expense take all reasonable measures to promptly cause such to comply URC equipment purchases from other than an authorized URC dealer or distributor are without warranty THIS LIMITED WARRANTY DOES NOT COVER TECHNICAL ASSISTANCE FOR HARDWARE OR SOFTWARE USAGE EXCEPT AS EXPRESSLY PROVIDED FOR HEREIN THE EQUIPMENT SOFTWARE AND DOCUMENTAT...

Page 13: ...a NY 10595 It is end user s responsibility to backup any macro programming artwork software or other materials that may have been programmed into the unit It is likely that such data software or other materials will be lost during service and URC will not be responsible for any such damage or loss A dated purchase receipt bill of sale installation contract or other verifiable proof of purchase is ...

Page 14: ...HE URC EQUIPMENT IN NO EVENT SHALL URC BE LIABLE FOR ANY EVENTS BEYOND ITS CONTROL INCLUDING ANY INSTANCE OF FORCE MAJEURE IN NO EVENT SHALL URC BE LIABLE FOR THE ACTS OR OMISSIONS OF END USER OR ANY THIRD PARTY THE LIMITATIONS OF LIABILITY MAY NOT APPLY TO END USER IN WHOLE OR IN PART WHERE SUCH ARE RESTRICTED LIMITED OR EXCLUDED BY APPLICABLE LAW AND SUCH SHALL APPLY TO THE MAXIMUM EXTENT PERMIT...

Page 15: ...8Kbyte SRAM 768Kbyte Flash Macro Capability Up to 255 steps each IR Range Line of Sight via Infrared 30 to 50 feet depending on the environment RF Range radio frequency 50 to 100 feet depending upon the environment Wi Fi IEEE 802 11 b g n Weight 3 0 oz Size 3 74 X 2 7 X 1 1 Power 12V DC 1A ...

Page 16: ...ect the equipment into an outlet on a circuit different from that to which the receiver is connected u Consult the dealer or an experienced radio TV technician for help Warning Changes or modifications not expressly approved by the manufacturer could void the user s authority to operate the equipment Note The manufacturer is not responsible for any Radio or TV interference caused by unauthorized m...

Page 17: ...h these directives implies conformity to the following European Community n EMC Directive l EN 55022 2010 l EN 55024 2010 l EN 61000 3 2 2006 A1 2009 A2 2009 l EN 61000 3 3 2008 n R TTE Directive l EN 60950 1 2006 A11 2009 A1 2010 A12 2011 l ETSI EN 301 489 1 V1 9 2 2011 l ETSI EN 301 489 17 V2 1 1 2009 l ETSI EN 300 328 V1 7 1 2006 EN 50385 2002 List of test reports and or certificate verified co...

Page 18: ...Page 15 NOTE ...

Page 19: ......

Page 20: ...500 Mamaroneck Avenue Harrison NY 10528 Phone 914 835 4484 Fax 914 835 4532 www universalremote com OCE 0132D Rev 01 ...

Reviews: