background image

12

US


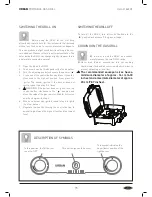
ASSEMBLY SEQUENCE


The cap nuts have left-hand thread

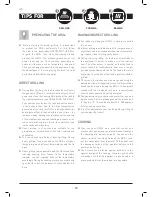
1.  Screw the gas cartridge onto the pressure regulator 

and tighten it by hand. Push propane cylinder into 
regulator and turn clockwise until tight.

2.  Disconect the gas cylinder when the GRILL is not 

in use. To disconect the gas cylinder turn counter-
clockwise.


SAFETY INSTRUCTIONS


RISK OF FIRE AND EXPLOSION


The GRILL may only be used with a pressure regulator. 
The pressure regulator included is correctly set by 
the manufacturer for use with liquid gas. Please read 
and observe the enclosed separate assembly and 
application instructions for the pressure regulator.


The gas GRILL and pressure regulator have only been 
approved for certain countries. (See TECHNICAL 
DATA chapter or the ID label on the gas GRILL under 
countries.)


The pressure regulator must be replaced periodically. 
(See CLEANING/MAINTENANCE chapter.)


Get advice from a specialist store when you buy or 
rent the gas canister. 


WARNING: Do not use a wrench to tighten 

the connection.


Make sure that there are no sources of ignition, such 
as open fires, in the vicinity when you  connect or 
replace the gas canister.


Make sure that the gas hose is not kinked or worn.


After assembling the gas canister, check that all 
connection points are sealed using either a standard 
leak locating spray or soapy water. If no leaks are 
present, clean the terminals after testing them with 
water.


Checking the sealants using a naked flame is strictly 
forbidden!


Caution: The burner opening must be 

positioned properly over the valve orifices.


CAUTION: Use cylinders that are marked 

“Propane fuel” only.


The gas GRILL is equipped with a cylinder supply 
system designed for vapor withdrawal.


Do not store a spare LP-gas cylinder 

under or near this appliance. Never fill 

the cylinder beyond 80 percent full. If the 

instructions are not followed exactly, a fire 

causing death or serious injury may occur.


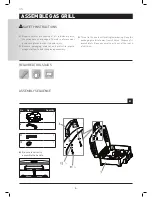
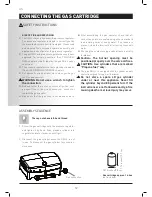
CONNECTING THE GAS CARTRIDGE

Gas connection

Gas cartridge approx. 16.4 oz 

(not included)

3.875 inches/9.8 cm

7.75 

inches/19.7 cm

Summary of Contents for 62409

Page 1: ...r fire department Do not attempt to extinguish an oil or grease fire with water Failure to follow these instructions could result in fire explosion or burn hazard which could cause property damage per sonal injury or death THIS GAS APPLIANCE IS INTENDED FOR OUTDOOR USE ONLY Thisinstructionmanualcontainsimportantinformationnecessaryfortheproperassembly and safe use of the appliance Read and follow ...

Page 2: ... proper ty as well as damage to the device Useful tips and information In order to prevent injury we recom mend wearing safety gloves during assembly Tools are required Do not use a knife or similar sharp object when opening the package in order to avoid scratching the device Place a soft mat under the compo nents in order to prevent scratches and damage SYMBOLS IN THESE INSTRUCTIONS OPERATING THE...

Page 3: ...ooking gas appliance is not intended to be installed in or on boats This appliance is not intended to be installed in or on recreational vehicles The use and installation of this product must conform with local codes or in their absence of local codes with either the Na tional Fuel Gas Code ANSI Z223 1 NFPA 54 Natural Gas and Propane Installation Code CSA B149 1 or Propane Storage and Hand ling Co...

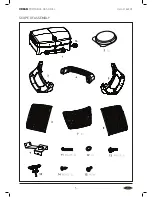
Page 4: ...y Keep any small parts out of the reach of children REQUIRED TOOLS AIDS PARTS DESCRIPTION No Description Quantity 1 Body 1 2 Grease dripping tray 2 3 Plastic frame with carrying handle 1 4 Cover handle 1 5 Plastic frame with carrying handle 1 6 Left iron grating 1 7 Side storage shelf 2 8 Right iron grating 1 9 Holder for gas pressure regulator 1 10 Thermometer 1 11 Screw M6 x 45 2 12 Washer 2 13 ...

Page 5: ...5 URBAN PORTABLE GAS GRILL Item 62409 SCOPE OF ASSEMBLY 16 ...

Page 6: ...ay have sharp edges Therefore always wear protective gloves in order to avoid injury Remove packaging material and protective plastic wraps of all parts before beginning assembly REQUIRED TOOLS AIDS ASSEMBLY SEQUENCE Threat to life due to suffocating swallowing Keep the packaging material away from children Dispose of it immediately Keep any small parts out of the reach of children ...

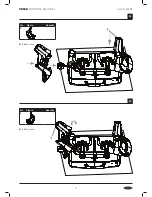
Page 7: ...7 URBAN PORTABLE GAS GRILL Item 62409 03 02 No Figure Quantity 3 1 Attach loose No Figure Quantity 5 1 Attach loose ...

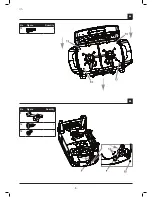
Page 8: ...8 US 04 05 No Figure Quantity 9 1 14 2 15 1 No Figure Quantity 13 4 ...

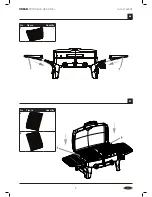
Page 9: ...9 URBAN PORTABLE GAS GRILL Item 62409 06 07 No Figure Quantity 7 2 No Figure Quantity 6 1 8 1 ...

Page 10: ...10 US 08 No Figure Quantity 2 2 ...

Page 11: ...11 URBAN PORTABLE GAS GRILL Item 62409 09 No Figure Quantity 10 1 ...

Page 12: ...ou buy or rent the gas canister WARNING Do not use a wrench to tighten the connection Make sure that there are no sources of ignition such as open fires in the vicinity when you connect or replace the gas canister Make sure that the gas hose is not kinked or worn After assembling the gas canister check that all connection points are sealed using either a standard leak locating spray or soapy water...

Page 13: ...E CHECK FOR GAS LEAKS 1 Spray all sealing points with conventional leak detection spray or apply soapy water with a brush ratio 1 part soap 3 parts water 2 Open the valve on the gas canister 3 Bubbles appear at any leaking points WARNING You should check for gas leaks every time you disconnect and reconnect a gas fitting WARNING Perform these leak checks even if your GRILL was dealer or store asse...

Page 14: ...must not exceed 120 F Before each use check the the pressure regulator for rips or damage Do not use the GRILL if either the pressure regulator or gas cartridge is defective or leaks WARNING Keep any electrical supply cord away from any heated surface WARNING Keep the cooking area clear of flammablevaporsandliquidssuchasgasoline alcohol etc and combustible materials WARNING Never store an extra pr...

Page 15: ...ARNING If the burner does not ignite turn the control button clockwise to the position and close the valve of the gas canister Wait for 5 minutes and then begin with step 4 6 When one burner has ignited repeat step 4 to ignite the other burner 7 Regulate the heat by turning the control button to any setting between the highest level and the lowest level SWITCHINGTHEGRILLOFF To turn off the GRILL t...

Page 16: ...y services Perform artificial respiration if the patient stops breathing ACTIONS TO BE TAKEN IN THE EVENT OF LARGE BURNS OR SCALDS There is an acute risk of hypothermia and shock Call the emergency services immediately If clothes are ignited extinguish the flames with water or smother them with a thick blanket In case of scalds Remove clothing immediately In case of burns Leave clothes on Cool for...

Page 17: ...e may become clogged in exceptional cases for example because insects or insect nests A clogged tube can lead to a fire beneath the appliance Make sure it is not clogged Remove excess grease marinade before grilling food This does not affect the taste of the food and is simply required to prevent grease fires Clean the GRILL after each use Do not use any abrasive and chlorous cleaning agents Pull ...

Page 18: ...ere leaking gas could collect Protect the gas cartridge from direct sunlight and other sources of heat Store the gas cartridge in a well ventilated shady place that is below 120 F and protected from the elements Store the gas cartridge in an upright position and secure it against falling The storage tips also apply to empty gas cartridges as they always contain a residual amount of liquid gas Wher...

Page 19: ...Handling Code B149 2 CAUTION Use cylinders that are marked Propane fuel only Gas cartridge approx 16 4 oz not included The product packaging consists of recyclable materials which can be submitted to a recycling facility Please separate them appropriately and dispose of them in the collection bins provided If you wish to dispose of the appliance please do not do so with the household waste Ask you...

Page 20: ... process you should only open the lid to turn the food over or check whether it is done BAKING INDIRECT GRILLING For indirect grilling your GRILL is simply converted into an oven Indirect grilling is suitable above all for larger pieces of meat that need to be cooked at moderate temperature e g roasts ribs or whole poultry items During indirect grilling the food is positioned above the switched of...

Page 21: ...WARNINGS AND OPERATIONAL INSTRUCTIONS CONTAINED IN THIS MANUAL CAN RESULT IN SEVERE PROPERTY DAMAGE AND OR PERSONAL INJURY IN NO EVENT WILL WELL TRAVELED LIVING OR ITS DIRECTORS OFFICERS OR AGENTS BE LIABLE TO THE PURCHASER OR ANY THIRD PARTY WHETHER IN CONTRACT IN TORT OR ON ANY OTHER BASIS FOR ANY INDIRECT SPECIAL PUNITIVE EXEMPLARY CONSEQUENTIAL OR INCIDENTAL LOSS COST OR DAMAGE ARISING OUT OF ...

Page 22: ...22 US ...
Page 23: ...23 URBAN PORTABLE GAS GRILL Item 62409 ...

Page 24: ... com 20 04 2017 Well Traveled Living 716 South 8th Street Amelia Island Florida 32034 USA As part of product improvements we reserve the right to carry out technical and optical changes to the appliance DISTRIBUTED ...

Reviews: