background image

3of5

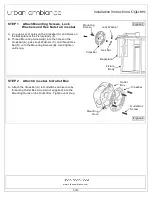
STEP 2

-

Attach Crossbar to Outlet Box

A. Attach the Crossbar (A) to Outlet Box and secure by

threading Outlet Box Screws (not supplied) into the
Mounting Holes on the Outlet Box. Tighten until snug.

Crossbar

Outlet
Box

Outlet Box
Screw

Mounting

Hole

Figure 2

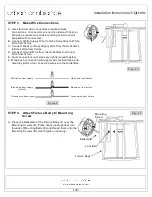
STEP 1

-

Attach Mounting Screws, Lock

Washers and Hex Nuts to Crossbar

A. Line up a set of holes on the Crossbar (A) and Holes on

the Backplate of the Fixture Body (F).

B. Thread Mounting Screws (B) into the holes on the

Crossbar (A), pass Lock Washers (C) and thread Hex

Nut (D) onto the Mounting Screws (B). Hand tighten
until snug.

Figure 1

Crossbar

Mounting
Screw

Lock Washer

Hex Nut

Backplate

Fixture

Body

Installation Instructions:


UQL

10

91

www.urbanambiance.com

Summary of Contents for UQL1091

Page 1: ...ing may result 1of5 Tools Required Flathead screwdriver Phillipsscrewdriver pliers wire cutters wire strippers electrical tape safety glasses Bulb Recommended 1 MediumBase 100W Maximum EstimatedAssembly Time 20 30 minutes Preparation Identifyand inspect all partsbefore beginning installation Check package content list and diagrams below to be sure all parts are present If anyparts are missing or d...

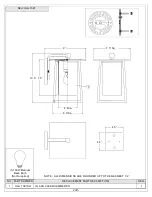
Page 2: ...13Ga QUOIZEL R 10 5 7 5 7 5 Sq 9 6 5 Sq 4 Dia 4 5 4 5 1 PART NUMBER NOTE ALL DIMENSIONS ARE ROUNDED UP TO THE NEAREST 1 2 REPLACEMENT PART DESCRIPTION REQ NO 1 100W Medium Base Bulb Not Supplied UQL1091SH GLASS CLEAR HAMMERED 1 1 ...

Page 3: ...gure 2 STEP 1 Attach Mounting Screws Lock Washers and Hex Nuts to Crossbar A Line up a set of holes on the Crossbar A and Holes on the Backplate of the Fixture Body F B Thread Mounting Screws B into the holes on the Crossbar A pass Lock Washers C and thread Hex Nut D onto the Mounting Screws B Hand tighten until snug Figure 1 Crossbar Mounting Screw Lock Washer Hex Nut Backplate Fixture Body Insta...

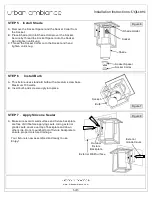
Page 4: ...res are tightly joined together F Wrap each connection with approved electrical tape and carefully stuff all the connected wires into the Outlet Box Figure 4 White wire from supply White wire from fixture Black wire from supply or Red Black wire from fixture Ground wire from supply Ground wire from fixture Figure 5 Figure 3 Mounting Screw Lock Ball Backplate Fixture Body STEP 4 Attach Fixture Body...

Page 5: ...the Socket Collar onto the Socket and hand tighten until snug Figure 6 Shade Shade Holder Socket Spacer Socket Socket Collar STEP 7 Apply Silicone Sealer A Make sure exterior wall surface and fixture backplate are free of dirt before applying caulk Using exterior grade caulk caulk over top of backplate and down other side Do not caulk bottom of fixture backplate to ensure proper moisture drainage ...

Reviews: