background image

Chapter 5 – Gauges and Displays

18

SB47JRT – 0075522

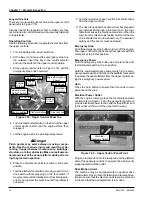
Fluid Level and Temperature Gauge

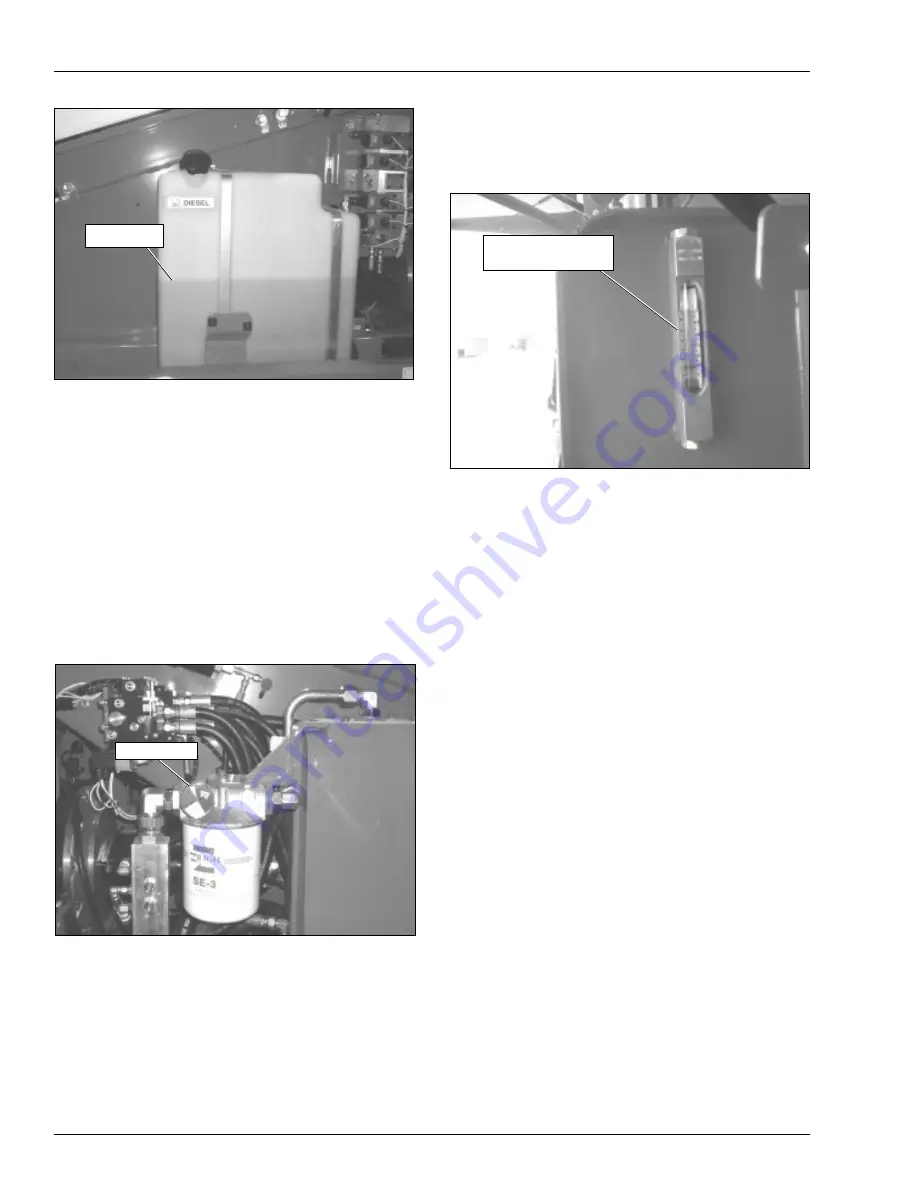
A gauge on the right end of the reservoir displays the

level and temperature of the hydraulic fluid (refer to Fig-

ure 5.6).

Figure 5.6 – Hydraulic Fluid Gauge

If the temperature rises above 93°C (200°F) stop machine

operation and let the fluid cool before resuming opera-

tion.

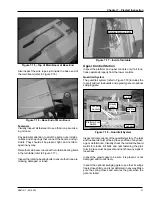
Figure 5.4 – Fuel Tank

Engine Oil

The engine oil level is measured with a dipstick. The dip-

stick is the only way to accurately determine the engine

oil level. The engine oil level should always be between

the add and full marks on the dipstick.

Hydraulic Fluid Filter Gauge

The fluid filter gauge (refer to Figure 5.5) is located on the

return line filter on the left side of the reservoir. The reser-

voir is behind the door on the left side of the turntable.

During high pump flow situations, the gauge indicates

the condition of the filter. When the needle on the gauge

is in the red zone, it is time to change the filter.

Figure 5.5 – Hydraulic Fluid Filter Gauge

Fuel Level

Filter Gauge

Fluid Level and

Temperature Gauge

Summary of Contents for SB47JRT

Page 1: ...SB47JRT Operator Manual Jan 08 PN 508361 000 SB47JRT ...

Page 2: ......

Page 3: ... not part of the aerial platform Such contact could make your body a conductor to the other object creating an electrical shock hazard resulting in death or serious injury If an aerial platform is in contact with an energized conductor the platform operator must warn ground personnel in the vicinity to stay away Their bodies can conduct electricity creating an electrical shock hazard resulting in ...

Page 4: ...chors 14 TiltAlarm 14 Platform Overload Sensing System 15 Engine Protection Systems 15 High Engine TemperatureAlarm 15 Low Oil Pressure Alarm 15 Horn 16 Drive MotionAlarm 16 Flashing Light 16 Driving Lights 16 Platform Work Lights 16 Chapter 5 Gauges and Displays Hour Meter 17 Engine Temperature Gauge 17 Ammeter 17 EngineAir Filter Gauge 17 Fuel 17 Engine Oil 18 Hydraulic Fluid Filter Gauge 18 Flu...

Page 5: ... Stop 32 Emergency Power 32 Horn 32 Electrical Power Outlet 32 Drive MotionAlarm 32 Driving and Work Lights 32 Platform Control Cover 32 Tow Kit 32 Placards and Decals 33 Prestart Inspection Checklist 37 Chapter 8 Operation Cold Weather Start Up 39 Engine Cold Weather Start Kit 39 Cummins Block Heater 39 Deutz Manifold Preheater 39 Hydraulic System Cold Weather Warm Up 39 Preparing for Operation 4...

Page 6: ......

Page 7: ...26 kg 500 lb capacityplatform 76 cm x 152 cm 30 x 60 aluminum 272 kg 600 lb capacityplatform Operator s Manual This manual provides information for safe and proper op eration of the aerial platform Read and understand the information in this Operator s Manual before operating the aerial platform on the job Additional copies of this manual may be ordered from UpRight Supply the model and manual par...

Page 8: ...ral law Maintenance Every person who maintains inspects tests or repairs the aerial platform must be qualified to do so Following the daily prestart inspection in this Operator s Manual will help keep the aerial platform in optimum working con dition Other maintenance functions must be performed by maintenance personnel who are qualified to work on the aerial platform Do not modify this aerial pla...

Page 9: ...Lower Controls Upper Controls Fuel Tank Wiring Box Operator s Manual LP Fuel Tank Steer Wheels Left Side Platform Main Boom Tip Boom Hydraulic Fluid Tank And Filter Battery Disconnect Switch Batteries Engine Steer Wheels Platform Foot Switch Emergency Lowering Valve Intermediate Boom Jib ...

Page 10: ...Chapter 2 Specifications 4 SB47JRT 0075522 Working Envelope Meters Feet 9 1 30 6 1 20 3 0 10 0 3 0 10 12 2 40 0 3 0 10 6 1 20 9 1 30 12 2 40 15 2 50 75 18 70 70 ...

Page 11: ...VAC Function Speed Turntable rotation 360 degrees 108 to 113 seconds Main boom Up 65 to 70 seconds Down 65 to 70 seconds Extend 40 to 45 seconds Retract 25 to 30 seconds Jib Up 25 to 35 seconds Down 25 to 35 seconds Platform rotation 170 degrees 8 to 15 seconds Drive High booms stowed 4 8 km h 3 0 mph Low booms elevated 1 6 km h 1 0 mph Drive System Standard Four wheel drive Optional Two wheel dri...

Page 12: ...z F3L 2011F Diesel CID Fuel Grade Coolant Operating Temperature Oil Capacity 2 0 liter 125 cu in 3 26 liter 199 cu in Oil Grade Engine ASTM No 2D fuel with a minimum Cetane number of 40 1 For operating tempera tures below 0 C 32 F use winterized No 2D DIN 51 601 February 1986 1 BS 2869 A1 and A2 with A2 refer to Deutz manual about sulfur content 1 ASTM D 975 88 1 D and 2 D CEN EN 590 or DIN EN 590...

Page 13: ...Chapter 2 Specifications SB47JRT 0075522 7 Engine Oil Viscosity Cummins B3 3 Deutz F3L 2011F ...

Page 14: ...Chapter 2 Specifications 8 SB47JRT 0075522 ...

Page 15: ...and is not insulated Regard all conductors as energized Do not operate outside during a thunderstorm Minimum Safe Approach Distance Minimum safe approach distances to energized power lines and their associated parts must be observed while operating the aerial platform ADanger The aerial platform is not electrically insulated Death or serious injury will result from contact with or inadequate clear...

Page 16: ...or other hazards Always look in the direction of movement Drive with care and at speeds compatible with the work place conditions Use caution when driving over rough ground on slopes and when turning Do not engage in any form of horse play or permit riders any place other than in the platform Secure all accessories containers tools and other ma terials in the platform to prevent them from accident...

Page 17: ...orm evacuate the platform before attempting to free it Electrical System Charge the batteries in a well ventilated area free of flame sparks or other hazards that might cause fire or explo sion Do not operate any of the aerial platform functions while the battery charger is plugged in AWarning Batteries give off hydrogen and oxygen that can combine explosively Death or serious injury could result ...

Page 18: ...proved cap from UpRight Use of a non approved cap without proper venting may result in pressurization of the tank Never use fuel for cleaning purposes For diesel engines use the correct fuel grade for the operating season ACaution Engine coolant escaping under pressure can cause serious burns Shut the engine off and let it cool before removing the radiator cap Let the engine and radiator cool befo...

Page 19: ...ton is engaged the lower controls can still be used to operate the aerial platform At the upper controls the emergency stop is a two posi tion push button refer to Figure 4 2 Figure 4 2 Upper Controls Push the emergency stop button in to disconnect power to the upper control circuits Pull the button out to re store power Emergency Power System The emergency power system includes a back up pump mot...

Page 20: ...rive or position the aerial platform for elevated use near any drop off hole slope soft or uneven ground or other tip over haz ard Retract and lower the main boom and then drive to a level surface when the tilt alarm sounds The tilt alarm is for added protection and does not justify operating on anything other than firm flat level surfaces Ground Operation Switch The ground operation switch refer ...

Page 21: ...Cummins engine exceeds the engine operating temperature an alarm will sound and the en gine will shut off If the oil in a Deutz engine exceeds 110 C 230 F an alarm will sound and the engine will shut off Any time there is no alternator current being produced an alarm will sound and the engine will shut off This prevents high engine temperature if the fan belt breaks Do not restart the engine until...

Page 22: ... work lights to drive on public roadways Figure 4 10 Platform Work Lights If the engine oil pressure falls below a safe operating value the engine will shut off The engine can be restarted with low oil pressure but it will only run a few seconds before it shuts off again Horn The horn may be used to warn personnel on the ground The horn button is on the right side of the upper control box The horn...

Page 23: ...ies After the engine has been running for a few minutes un der normal operating conditions the ammeter gauge in dicator should read 0 Engine Air Filter Gauge The air filter gauge refer to Figure 5 3 is located above the lower control panel The gauge measures the air pres sure between the intake manifold and the air filter Figure 5 3 Air Filter Gauge The yellow indicator disk inside the sight glass...

Page 24: ...ck The dip stick is the only way to accurately determine the engine oil level The engine oil level should always be between the add and full marks on the dipstick Hydraulic Fluid Filter Gauge The fluid filter gauge refer to Figure 5 5 is located on the return line filter on the left side of the reservoir The reser voir is behind the door on the left side of the turntable During high pump flow situ...

Page 25: ...se of the aerial platform Lower Controls The lower controls refer to Figure 6 2 are located on the right side of the turntable Boom and platform functions can be operated from the lower controls The following are located on the lower control panel Emergency stop button Control selector switch Start switch Ground operation switch Rotation switch Boom elevation switch Boom extend retract switch Jib ...

Page 26: ...h up to tilt the platform floor upward or away from the ground Hold the switch down to tilt the platform floor downward or toward the ground Platform Rotation Switch The platform rotation switch refer to Figure 6 2 is used to rotate the platform relative to the end of the tip boom The switch is spring returned to the center off position Hold the switch to the right to rotate the platform counter c...

Page 27: ... Use the boom speed control knob refer to Figure 6 5 to control the speed of the following boom functions Boom extend retract Jib up down Platform rotate clockwise counterclockwise The upper control panel has a circuit breaker for the swing turntable rotation lift drive and main control circuits The circuit breakers are on the front of the upper control panel refer to Figure 6 4 Figure 6 4 Upper C...

Page 28: ...orque operation LO low speed and high torque operation Jib Articulation Switch The jib switch refer to Figure 6 5 is used to raise or lower the jib The switch is spring returned to the center off position Hold the switch up to raise the jib Hold the switch down to lower the jib Note The jib and platform rotate functions can not be oper ated at the same time The platform rotate function will overri...

Page 29: ...oot Switch The upper controls are interlocked through the platform foot switch refer to Figure 6 6 Step down on and hold the platform foot switch to activate the drive and boom functions from the upper controls Figure 6 6 Platform Machine Generator Switch The switch for the optionalAC generator is located on the front of the upper control panel With the engine running place the switch in the gener...

Page 30: ...Chapter 6 Controls 24 SB47JRT 0075522 ...

Page 31: ...both sides of the machine and visually inspect the engine and its compo nents with the engine off Oil Level Check the engine oil level before starting the engine so the oil has drained to the pan The proper oil level is be tween the add and full marks on the dipstick The distance between the top and bottom dipstick marks corresponds to about 1 l 1 quart US Add oil if neces sary before starting the...

Page 32: ... Lower Controls To inspect the air filter 1 Turn the battery disconnect switch on and close the cowling door 2 At the lower controls pull the emergency stop but ton outward 3 Insert the key into the control switch and press the start button to turn the engine on 4 Check the clear zone after running the engine for 30 seconds If the indicator is in the red area replace the filter If the indicator is...

Page 33: ... ends refer to Figure 7 6 They should be clean and free of corrosion Clean the top of the batteries if necessary Clean the terminals and cable ends with a wire brush or terminal cleaning tool All cable ends must be securely fastened to the terminals Cables and Wiring Harness Inspect all cables and wiring for wear and or physical damage such as loose connections broken wires and frayedinsulation Ch...

Page 34: ...Make sure all hoses and tubes are held firmly in their support brackets Figure 7 8 Hoses Tubes and Fittings Hydraulic fluid leaks are easily visible on the ground Check under the chassis for fluid that has leaked Tires and Wheels Visually inspect the tires and wheels refer to Figure 7 9 to make sure they are suitable for service Check the wheel lug nuts to see that none are missing damaged or loos...

Page 35: ... gency power position and the ground operation switch in the on position to operate the aerial platform from the lower controls using the emergency power system Emergency Lowering The main boom can be lowered in an emergency using the emergency lowering knob The emergency lowering knob is at the base of the main boom lift cylinder refer to Figure 7 11 Use the following procedure to test the emerge...

Page 36: ... Visually inspect all weldments and related components It is important to inspect the fasteners that connect the components Weldments Visually inspect all weldments for abnormal wear abra sion or deformation that could cause interference be tween moving parts Inspect the welds on the structural components Pay particular attention to boom welds The area to be in spected should be clean and free of ...

Page 37: ...is not damaged and moves freely Inspect the optional swinging gate to see that it swings freely closes firmly and is not deformed in any way Make sure the spring closes and secures the gate when the gate is closed Figure 7 15 Top of Main Boom at Base End Also inspect the wire ropes just inside the base end of the main boom refer to Figure 7 16 Figure 7 16 Base End of Main Boom Fasteners Visually i...

Page 38: ...rward and reverse direc tions to ensure that the alarm sounds to warn personnel in the area that the aerial platform is in motion Lanyard Anchors There are two lanyard anchors below the upper control panel refer to Figure 7 18 Visually inspect the lanyard anchors to make sure they are in place are not deformed and are securely fastened to the platform Operating Controls Use the following procedure...

Page 39: ...fety and operational placards and decals Make certain they are in place in good condition and are legible The placards and decals may be cleaned with soap and water and a soft cloth if the words or pictures cannot be seen ACaution Solvents may contain hazardous ingredients Fol low the manufacturer s label for proper use and dis posal Wear protective gloves and splash proof safety glasses when usin...

Page 40: ...SB47JRT 0075522 0323897 0162366 0162366 This machine is not electrically insulated Do not operate in proximity to high voltage power lines and parts 0162336E 0162336E 0070901 Right Side 0162366 0162336E 0323897 0070901 0162366 0162336E ...

Page 41: ...ption Only 0162366 0162336E 0082164 Tow Option Only Right Side 0073298 0082160 Tow Option Only 0082164 0082203 0073298 0082160 0162366 0162366 This machine is not electrically insulated Do not operate in proximity to high voltage power lines and parts 0162336E 0162336E ...

Page 42: ...sulated Do not operate in proximity to high voltage power lines and parts 0162336E 0162336E 0162366 0162366 KEEP CLEAR Rotating Engine Parts Serious Injury Can Result 0151410E 0151410E Radiator 0151410E Cummins Engines Only Left Side 0162366 0162336E 0073298 0072531 Platform Upper Control Panel Front 0072530 ...

Page 43: ...ration Tires and Wheels Foam filled Good condition Lower Control Station Operating controls Proper operation Emergency stop and emergency power Shuts off lower controls proper operation Emergency Lowering Proper operation Level Sensor Sounds tilt alarm Flashing Light Proper operation Sandblast Protection Kit In place and proper operation Structures Weldments Welds intact no damage or deformation S...

Page 44: ...Chapter 7 Prestart Inspection 38 SB47JRT 0075522 ...

Page 45: ...hick hydraulic oil does not flow well and may cause delay in response to control movement and improper volt age output of theAC generator Cold oil may also cause cavitation and pump damage The hydraulic system may be equipped with an optional cold weather warm up kit Engine Cold Weather Start Kit The optional engine cold weather start kit may be an engine block heater or a manifold air pre heater ...

Page 46: ...ds or longer before starting the engine The control selector switch must be turned back to off before the engine will start 3 Let the engine warm to operating temperature 4 Hold the ground operation switch up while operating the control toggle switches 5 Hold the appropriate toggle switch in the desired di rection 6 Release the function toggle switch to stop movement 7 Place the ground operation s...

Page 47: ...he overload exceeds rated platform capacity by more than 20 percent the system will error out stopping all boom and drive functions The horn will then sound con tinuously and the red light will stay illuminated at the upper and lower controls refer to Figure 8 2 The horn will sound and the light will stay on until the excess load is removed from the platform and the start switch is turned off and ...

Page 48: ... work area the booms may be positioned to the side or the front of the chassis for final positioning Always look in the direction of move ment as indicated by the directional arrows on the chas sis Use the following procedure to operate the drive and steer functions 1 Determine the desired drive range for the specific driv ing conditions Use high range when traveling across firm flat level surface...

Page 49: ... of the chassis and the output connector is at the platform on the rotator guard The maximum working pres sure of the line is 1 723 kPa 250 psi The air line may be used to conduct fluids such as water or antifreeze Contact your local distributor or UpRight for compatibility information before using the air line to con duct other fluids ACaution Fluid in the air line can damage some air tools or fr...

Page 50: ...Chapter 8 Operation 44 SB47JRT 0075522 Figure 8 6 Platform Work Lights ...

Page 51: ...ended period of time or for transporting The tucked stow position is shown in Figure 9 2 Figure 9 2 Tucked Stowed Position Use the following procedure to stow the platform in the tucked position using the lower controls 1 Rotate the platform so it is perpendicular to the end of the boom 2 Fully retract the tip boom and then raise the main boom slightly above horizontal 3 Operate the platform level...

Page 52: ...from the platform 4 Drive the machine to the foot of the loading ramp with the front wheels nearest the ramp Make sure the machine is centered with the ramps and that the steer ing wheels are straight 5 Rotate the platform so it is perpendicular to the boom 6 Retract the tip boom and raise the main boom so it is horizontal 7 Rotate the turntable slightly to the side so you can see the front wheels...

Page 53: ...ns and warnings regulations and safety rules of their employer and or any state or federal law are followed Use the following procedure to hoist the aerial platform onto the transport vehicle 1 Properly stow the aerial platform Note The lifting lugs at the rear of the chassis are farther apart than those at the front Rotating the turntable 180 will place the counterweight at the rear of the chassi...

Page 54: ...p button in ward Turn the control selector switch off and remove the key 7 Turn the battery disconnect switch off 8 Close and latch the cowling doors 9 Use wire ties to fasten the platform gate to the guard rails to prevent the gate from bouncing Also use wire ties to fasten the platform foot switch to the plat form floor 10 Use a nylon strap to securely fasten the platform against the wood block ...

Page 55: ...m fails Refer to Emergency Power System Emergency Lowering or Towing for the appropriate pro cedure Emergency Power System The emergency power system can be used to operate the machine from the lower or upper controls ACaution The emergency power system is for emergency low ering and stowing only The length of time the pump can be operated depends on the capacity of the battery Do not use this sys...

Page 56: ...lowing procedure to manually lower the main boom 1 Slowly turn the knob refer to Figure 10 5 to open the bleed down valve Control the rate of descent by turning the knob Figure 10 5 Emergency Lowering Knob AWarning The potential for an accident increases when safety devices do not function properly Death or serious injury can result from such accidents Fully close the emergency lowering knob befor...

Page 57: ...eath or serious injury can re sult Securely fasten the tow vehicle to the aerial platform before disabling the drive hubs Use the following procedure to manually disengage the drive hubs and tow the machine 1 With the machine in the stowed position remove the tow bar from the storage cradles at the rear of the chassis and lay the tow bar near the front of the chas sis ADanger Pinch points may exis...

Page 58: ...Chapter 10 Emergency Operation 52 SB47JRT 0075522 ...

Page 59: ... 20 seconds and then let the starter motor cool for 60 sec onds Repeat as necessary Cummins engine plug the block heater in eight hours before starting the engine Deutz engine hold the manifold heater switch on for about a minute before starting the engine Hold the switch on until the engine starts Let engine cool Do not restart the engine until the cause of overheat ing has been corrected Do not ...

Page 60: ...lace the control selector switch in the upper control position From the upper controls Turn the start switch off Pull the emergency stop button outward Place the start switch in the on position for 5 seconds and the then turn the switch to start Do not step on foot switch while start ing the engine Turn the start switch back to off then to start within 30 seconds Push the main system circuit break...

Page 61: ...he off position Corrective Action Let the engine cool Do not restart the engine until the cause of overheat ing has been corrected Do not restart the engine until the cause of low oil pressure has been corrected The engine can be re started with low oil pressure but it will only run a few seconds before it shuts off again Remove load from the platform until the alarms stop Remove load until at or ...

Page 62: ...speed knob set too slow Theemergencyloweringvalveisopen Hydraulic system malfunction Corrective Action Place the switch in the lower control position Hold the ground operation switch in the on position while operating the control toggle switches If horn is sounding and red overload light is on or blinking remove weight from the platform until the load is at or below rated capacity Place switch in ...

Page 63: ...e Failure of hose tube fitting seal etc Corrective Action Place the switch in the drive position Lower the booms and drive to a level surface Turn drive wheel disconnect plates around so nipples point outward Stow the machine and do not oper ate until repairs are made If horn is sounding and red overload light is on or blinking remove weight from the platform until the load is at or below rated ca...

Page 64: ...Chapter 11 Troubleshooting 58 SB47JRT 0075522 ...

Page 65: ...the manufacturer maximum wheel load the load or weight that can be transmitted through a single wheel to the floor or ground Minimum Safe Approach Distance the minimum safe distance that electrical conductors may be approached when using the aerial plat form Also called M S A D operation the performance of any aerial platform functions within the scope of its specifications and in accordance with ...

Page 66: ...Appendix A Glossary SB47JRT 0075522 ...

Page 67: ......

Page 68: ... 443 6600 FAX 1 559 268 2433 www upright com PN 508361 000 Europe TEL 44 0 845 1550 058 FAX 44 0 195 2299 948 Local Distributor Lokaler Vertiebshändler Distributeur local El Distribuidor local Il Distributore locale ...

Reviews: