


11
Section 4 – making the propex® connection
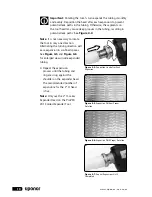
5. immediately remove the ProPeX
201 corded expander tool.
as you slide the tubing over the
fitting, you should feel some
resistance. if the tubing reaches
the shoulder of the fitting
without any resistance, the
tubing could be over-expanded
and may require additional time
to completely shrink over the fitting. the tubing and ProPeX ring
should seat against the shoulder of the fitting for a proper connection.
See
Figure 4-8
.
important tips for a proper propex connection
• if the fitting does not slide into
the tubing all the way to the
stop, immediately remove it
from the tubing and expand the
tubing one final time.
note:
to avoid over-expanding the
tubing, do not hold the tubing in
the expanded position.
• experience, technique and weather conditions influence the actual
number of expansions. Fewer expansions may be necessary under
certain conditions. the correct number of expansions is the amount
necessary for the tubing and the shoulder of the fitting to fit
snugly together.
• When the ProPeX ring rests snugly against the stop of the ProPeX
fitting shoulder, the connection is good.
note:
you will need to make another connection if there is more than
1
⁄
8
" between the ring and the shoulder of the fitting. Square-cut the tubing
2" away from the fitting; then make another connection using a new
ProPeX ring.
Figure 4-8:
remove the expander tool
Summary of Contents for ProPEX 201
Page 4: ...ii www uponor usa com...
Page 6: ...vi www uponor usa com...
Page 8: ...2 www uponor usa com...
Page 10: ...4 www uponor usa com...
Page 21: ...15 Uponor ProPEX 201 Corded Expander Tool Operation Manual Notes...
Page 22: ...16 www uponor usa com Notes 16 www uponor usa com...
Page 23: ...17 Uponor ProPEX 201 Corded Expander Tool Operation Manual...


