background image

TEC00-014

Pico2000 User Manual (Rev. 3.0)

Page 46 of 51

Setup and the default
values

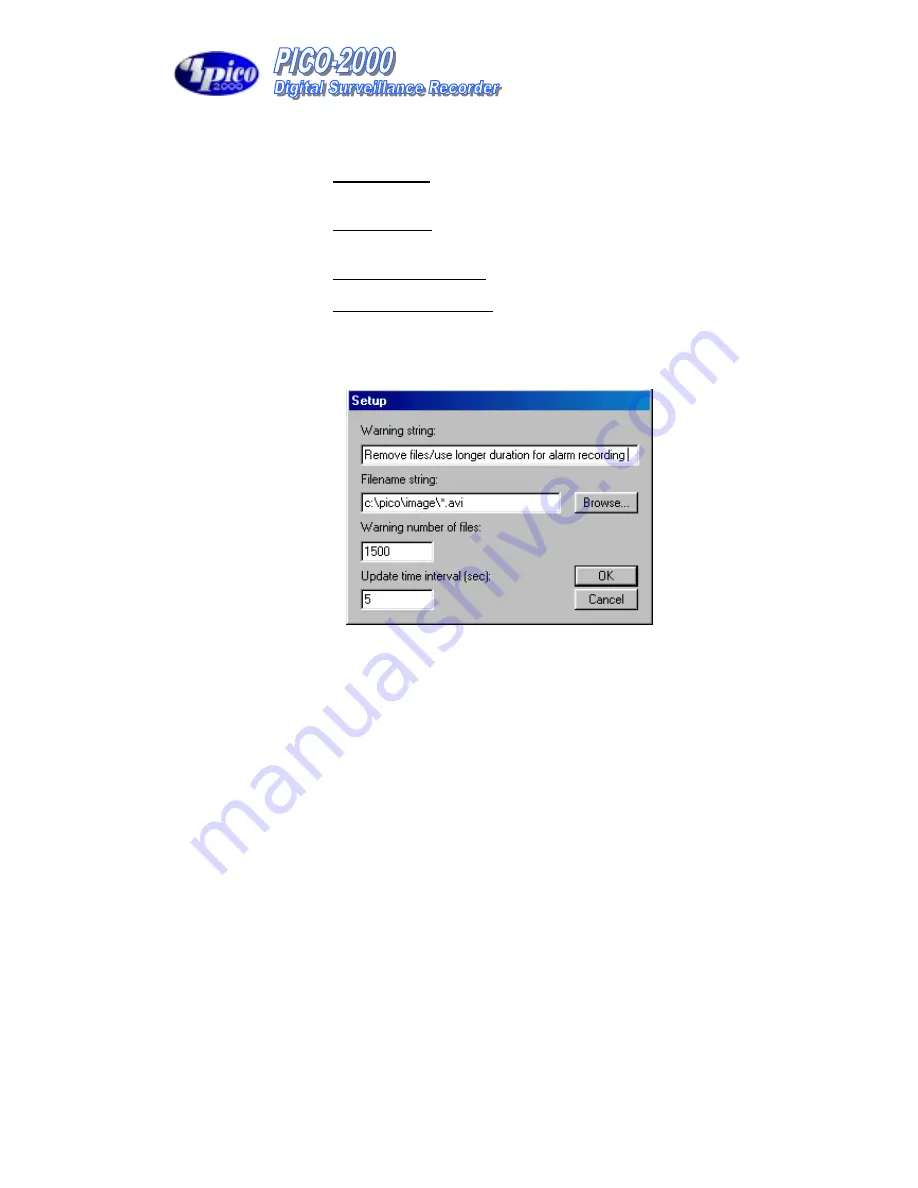
User can adjust the default value of the “Too Many Files Warning” signal.
Right click the mouse button inside the dialog box, and then click “Setting”, a
setup dialog box will be displayed.

Warning string:

The default warning string is “Remove files/use longer duration for alarm
recording”.

Filename string:

The default value is “c:pico\image\*.avi”
Don’t change this default or the warning message will not work properly.

Warning number of files:

The default value is 1500.

Update time interval (sec):

The default value is 5 seconds.
Click “OK” to confirm input or “Cancel” to cancel the change.

Summary of Contents for PICO-2000

Page 1: ...PICO 2000 User Manual UniVision Canada Limited ...

Page 2: ...s 104 309A 413A 416 10 For Models 205A 208 11 1 SCREEN MODE 11 4 SCREEN MODE 11 For Model 104 11 For Model 205A 208 309A 413A 416 12 MULTI SCREEN MODE 13 8 SCREEN MODE 13 16 SCREEN MODE 14 RAPID ZOOM 14 FULL SCREEN DISPLAY 14 SEQUENCE 14 REMOTE ONLINE VIEWING AND PLAYBACK RECORDED VIDEO 14 THE INTELLIGENT REMOTE PLAYER 14 PICO SERVER BUTTON 14 RECORDING 15 STORAGE DRIVE 15 RECORDING MODES 15 MULTI...

Page 3: ...OL 26 PAN TILT ZOOM 26 DRIVER MODE SETTING 26 PORT SETTING 27 CAMERA SELECTION 27 MONITOR SELECTION 27 SPEED CONTROL 27 PAN TILT ZOOM CONTROL 27 PRE POSITION 27 UTILITY FUNCTIONS 28 ACCESS TO UTILITY FUNCTIONS 28 RE ACTIVATE THE DISABLED HOUSEKEEPING FUNCTIONS 28 CAMERA CONFIGURATION 29 CAMERA TITLE ASSIGNMENT 29 MAXIMUM NO OF CAMERA IMPOSED BY SOFTWARE 29 CHECK THE ACTIVE CONNECTED CAMERAS 29 APP...

Page 4: ...SYSTEM INFORMATION 44 TOO MANY FILES WARNING 45 TOO MANY FILES WARNING MESSAGE 45 INVOKE THE MESSAGE BOX 45 REMOVE THE MESSAGE BOX 45 SETUP AND THE DEFAULT VALUES 46 WORKING AT LOGOFF 47 LOG OFF 47 RECORDING DURING LOG OFF 47 SHUT DOWN THE UNIT 47 EXIT 47 SYSTEM MAINTENANCE 48 SCHEDULE BACKUP AND REMOVE THE VIDEO FILE 48 COMPACT DATABASE SYSTEM 48 TYPICAL CONFIGURATION 49 ALARM INPUT CONNECTION 50...

Page 5: ...ntegration Multilingual Capability Intelligent remote player with telephone dial up and LAN connectivity to access on line and recorder videos Optional Features Video displays on SVGA monitor and support a secondary display unit Audio Recording attachable to selected video input Pan Tilt Zoom Control optionally selected Codec Fast Video Compression decompression optionally selected Codec Tamper pr...

Page 6: ...entiates whether the unit is supplied as a Demo DM or as a package PG The next two numbers signify the language to which the version of the software supports i e 00 for English 01 for Chinese and 02 for French etc Example 1 To order a package system of PICO2000 digital recorder from UniVision Canada for 9 camera inputs 3 real time video display and with additional audio recording feature The syste...

Page 7: ...verall system operation The normal backup mode is set by default To switched to the Archive mode please refer to the Backup Function of the Options Setting Menu You will need to have two 2 removable IDE drives configured in the PICO2000 Digital Surveillance Recorder to support this mode of system operation The PICO2000 application needs to be closed and restart to apply the mode switching from eac...

Page 8: ...00 014 Pico2000 User Manual Rev 3 0 Page 7 of 51 FRONT PANEL Hard drive indicator Power indicator Power switch Mouse PICO Unit SVGA monitor Optional Keyboard CD ROM drive Optional Floppy drive Reset Switch ...

Page 9: ... Assign camera title inside the Camera Title message box within the Utility menu Go to Utility Function chapter for detail of camera title assignment Tip Make sure that the Active box is unchecked for the non connected camera s in order to perform the optimum video quality Alarm Connector 1 Alarm Connector 2 Power Camera inputs 9 10 11 12 5 6 7 8 1 2 3 4 13 14 15 16 SVGA monitor Composite output O...

Page 10: ...ico or NULL for either case When you logon as SUPER you can click on the Utility button to change the logon password to be discussed in more detail later on page 37 However if you logon as OPERATOR the Utility button will be disabled to prevent the password and some other system and recording settings from being modified by the operator Figure 1 The main screen Two control panels and various commo...

Page 11: ...ual built in indicator lights Once the button is pressed it toggles on and off with the indicator light on and off to indicate its status correspondingly Tip You are able to know which camera s is are being displayed by the DISPLAY panel indicator lights and you can press the buttons on the DISPLAY panel to enter your display input right away For Models 104 309A 413A 416 Figure 2 1 Models 416 104 ...

Page 12: ...in yellow 4 Screen mode Click the 4 Screen mode button to select this mode Four cameras can be selected for display simultaneously Click the camera buttons to select camera s to display in this mode The down buttons will light up in yellow to indicate the display status The camera display in 4 Screen mode is assigned as the following figure for easy operation For Model 104 Figure 3 1 Multi Screen ...

Page 13: ...ras to the inputs of the unit in a horizontal arrangement instead of in a vertical arrangement Example Two possible horizontal arrangements of the grouped cameras are shown in Figure 4 Figure 4 Shown as the standard version of PICO2000 system product for packaged products the actual location of camera assigned will vary with the motherboard and slots being used Group 1 10 6 2 14 9 5 1 13 12 8 4 16...

Page 14: ... first time entry to this mode Click the camera buttons to select or de select camera s to display in this mode The down buttons will light up in yellow to indicate the display status Click on the surrounding small screen will cause the camera on display to be swapped with the one at the center Large screen Keep doing the swapping until the designed cameras is assigned to the respective screen The...

Page 15: ...of the button lights up in yellow to indicate the sequence function The function of sequencing is effective for all display modes except for the 16 Screen mode The user can select individual camera s for sequencing display For the sequence parameter setup and the implementation example please see the Display Sequencing under Option Setting section of this manual Note When the unit is in sequence m...

Page 16: ...l be logged with database management The recorder control panel Pico2000 has a RECORDER panel see Figure 7 to let the user interact with the unit for recording control with enough indication There are sixteen camera buttons in the RECORDER panel all of which can be toggled on or off Each button has four built in indicators with different colors to indicate different recording modes and statuses Th...

Page 17: ...cording parameters of each camera can be programmed Please see the section of Recorder Setting for parameter setup Tip Instant recording is expected to work in a real frame rate for short time recording while scheduled recording is expected to work in a lower frame rate for longer time recording For quick instant recording of all installed cameras the user can click on the REC button in the RECORD...

Page 18: ...capture images before the alarm event is happened Pre alarm allows images to be temporarily recorded for a short period of time 1 to 60 second at normal situation Once an alarm is actually being triggered the pre alarm images become permanent files which can be retrieved and played back Using Play Search function can playback the pre alarm images The pre alarm function is setup in the Alarm Record...

Page 19: ...instant recording mode by pressing down the camera button The indicator will change to yellow to indicate that the camera is under instant recording However it will automatically resume scheduled recording once you click the camera button again to turn off instant recording of that camera The indicator will then resume to green Please see the section of Recording Setting for the setup and implemen...

Page 20: ...d video in all hard disk s and removable disk s can be retrieved for playback Click the Play Back button in the main screen to activate the Select Drive dialog box as shown in Figure 9 Figure 9 Select Drive Click the Downward arrow and select desired drive no C D E from the pull down list ...

Page 21: ...t and Click Open File Button to start the playback The File List will change as the video search engine is manipulated to match with only those files appear on the video bar window Click the Reset Button to resume the List of all files on Selected Camera title Figure 10 Open Multiple Files Snap Shot Video Mode Zoom In Zoom Out Print Save Camera Title Absolute Date Time and length of the video Spee...

Page 22: ...e right side to increase the playing speed Drag it left to decrease the playing speed The normal playback speed is indicated in the speed control box when the control button is put in the middle Rewind and replay Using the Begin end Marker can select a portion of the current video file to be replay in a loop Drag the scroll bar Scroll bar for manual search to the desired beginning position click t...

Page 23: ... Open Single file icon button to open the marked video for viewing Once the button is pressed down the video will be playback until the end of the file is reached Open the video files and playback continuously Click the Open Multiple files icon button to open the marked video for viewing Once the icon button is pressed down the videos will playback one by one continuously Or user can click the Ope...

Page 24: ... automatically detect any activities within a selected detection area s and to start recording of that camera when activity is detected inside the detection area s Set up the motion detection Right click the mouse button on the video screen of the camera you want to set motion detection A Motion detection setting dialog box will pop up for motion detection setting Selected area for motion detectio...

Page 25: ...een to determine that the sensitivity is adjusted to an optimal condition for motion detection and without false alarm User can check the Show within detection area button to confine the activity blocks only to display within the detection areas you have selected Detection interval The occurrence of motion is detected by correlating the successive frames of the video The Detection interval control...

Page 26: ...on detection function When display at QUAD mode use High resolution mode for motion detection recording When display at 16 screen mode use Low resolution mode for motion detection recording When display at one screen mode use Supper mode for motion detection recording Without displaying the motion detection camera Yellow grid indicator indicates that the motion detection is enabled ...

Page 27: ...d be set up correctly with the same camera number as the camera attached to it Driver Mode Setting Right click the mouse on anywhere of the PTZ Panel a menu will appear which can select the MODE PORT SETTING or EXIT Select the MODE item a sub menu will show up the item MV912RS Old OSRD Code PTZ Receiver Driver and or other available Custom s option After your selection a tick will appear left to t...

Page 28: ...a through the MV900 switcher you should select the monitor number and the camera number accordingly prior to do so Speed control The speed of movement of the pan tilt head can be controlled The slide bar is to control the speed of movement Pan tilt zoom control Once the camera is selected click the arrow buttons for corresponding direction movement the focus and zoom control Pre position The posit...

Page 29: ...m and recording settings from being modified by the operator Click on the Utility button on the main screen and the Utility menu will then pop up as shown in Figure 12 Re activate the disabled Housekeeping Functions The Housekeeping Function of the Utility Menu is disabled in case the PICO2000 is operated in the Archive Backup mode To activate those build in housekeeping functions from PICO2000 sw...

Page 30: ...gn no of cameras shown in the corresponding part of the generic model no The camera assignment check box es will turn to Grey color and no manual assignment is possible Check the active connected cameras The Active check box should be unchecked for the non connected camera inputs When the Active check box is unchecked to the Cam ID then the corresponding buttons in the Display and Recorder panels ...

Page 31: ...ames per second frame rate selection means the recording of one frame every 60 seconds Note The actual frame rate of recording will be same as this setting if the system resource at the condition taken care of other system setting permits However the PICO2000 may regard this setting as the target maximum frame rate The start and end times for scheduled recording The start time and end time is need...

Page 32: ...eras The default frame rate is 25 frames per second Click OK to confirm the input and close the dialog box or click the X box in the upper right corner to close the dialog box after use Tip Eight frames per second or above is recommended for instant recording to capture real time video Figure 14 Use scroll bar to see more selections Click this arrow to show the list Recording setting for instant r...

Page 33: ...eck the ON box in the pre alarm column to enable the pre alarm function of the corresponding camera s Input the pre alarm duration from one to 60 seconds Every time when the alarm is triggered the pre alarm recording image will be saved into a permanent file which can be retrieved for playback Click OK to confirm the input Tip Pre alarm lets you review images prior to the actual happening of the a...

Page 34: ...ding Setting menu Check the camera you want to record Input the start time and the end time for scheduled weekday recording Input the frame per second for individual cameras The default frame rate is 1 frame per second Figure 16 Use scroll bar to see more selections Click this arrow to show the list Check the cameras for weekday recording ...

Page 35: ...nput the frame per second for individual cameras The default frame rate is 1 frame per second Tip Scheduled recording is a background recording activity of the recorder A lower frame rate for scheduled recording will much prolong the recording time It is recommended to use frame rates of four frames per second or lower for scheduled recording Figure 17 Use scroll bar to see more selections Click t...

Page 36: ...camera at 18 00 and stop at 6 00 the next day for everyday from Monday to Friday You should go to the schedule weekday recording menu check on the desired camera enter 18 00 in the start time input 6 00 in the end time input then enter the frame rate you want and finally click OK to confirm In this case the recorder will start at Monday 18 00 and then stop at Tuesday 6 00 and the schedule continue...

Page 37: ...ant to display during sequencing Click Apply to apply the input parameters right away Click OK to confirm and close the dialog box For sequencing operation please see the Display section of this manual Example The cameras 3 4 5 7 8 9 12 13 14 15 16 are checked in Figure 18 Figure 18 While in the 1 Screen mode the sequence will be performed as follows While in the 4 Screen mode the sequence will be...

Page 38: ...s selected for recording the recording alarm pre alarm instance and schedule will stop automatically when the storage device s is all used Circular recording mode When circular mode is selected the recording will keep on by automatically over writing the oldest files once the storage device s is full However the alarm image file s will be protected in this mode Attach Audio to Camera For Models wi...

Page 39: ...rive or a removable IDE hard drive The user can choose to keep copies on hard disk after backup or not Click Apply to confirm and click OK to close the dialog box Archive Mode The system is set to Normal backup mode as system default To switch to Archive mode check the bullet option next to Archive then Apply and OK The PICO2000 application should closed and restarted to effect the change At the s...

Page 40: ... drive can be back up Archive to other long term storage media such as the DAT or equivalent device with huge storage capacity but may not work as fast This operation on a dismounted drive can be down off line while the PICO2000 is closed or in a separate PC workstation Re insertion of Removable Drive Click the Swap Drive button in the Main Screen and then the Swap drive message box will appear as...

Page 41: ... use during the logon session The users should input the correct password to logon to the system You can select the date time display format to 12 hour or 24 hour format Click Apply to confirm the input click OK to confirm and exit or click Cancel to exit without any changes Check the Logout continue display recording box if you want the image to continue to be displayed and instant recording stil...

Page 42: ... backup all files box You can keep copies on the hard disk after backup by checking the Keep copies on hard disk box If you want to clean up old files in the backup device prior to do backup check the Delete all files in the backup device box The free storage capacity of the backup device is also shown in the dialog box Click the Start button to start the backup process Figure 24 Backup progress I...

Page 43: ...ete all files Click Start button to execute the file delete function The video files will be deleted to spare storage space and the database will be updated accordingly Figure 25 Note Camera The camera column displays the corresponding camera titles Date Time The date time column displays the record starting date and time Event SCH REC and ALM represents schedule instant and alarm recording events...

Page 44: ...f 51 Housekeeping tools Click on the Tools tab to enter the tools utility Figure 26 Users are recommended to use the Run Scan Disk and Run Disk Defragmenter functions on a frequent basis to optimize and debug the storage device s being used Figure 26 ...

Page 45: ...Pico2000 User Manual Rev 3 0 Page 44 of 51 System Information Click the System Information button to display the About Pico2000 message box which shows relevant information about the PICO 2000 Figure 27 Figure 27 ...

Page 46: ... Ctrl Alt and 1 in the keyboard do not use the 1 key located on the Numeric Keypad to show the message box at any time to check the number of file in the unit Remove the message box User can close the message box by clicking the X icon at the upper right hand corner To permanently disable the message box user can check the Do not appear in the future box and then click the X icon to close the mess...

Page 47: ...ng a setup dialog box will be displayed Warning string The default warning string is Remove files use longer duration for alarm recording Filename string The default value is c pico image avi Don t change this default or the warning message will not work properly Warning number of files The default value is 1500 Update time interval sec The default value is 5 seconds Click OK to confirm input or C...

Page 48: ... after logoff Recording during log off The alarm and scheduled recording functions of the unit will keep on working during the logged off period PICO 2000 will continue recording even if the unit is under the logged off condition Note In the System menu of Option Settings check the Logout continue display recording box if you want the instant recording function to be continually functioning after ...

Page 49: ...the performance of the Pico2000 unit is working under its optimum condition It is also a vital procedure to prevent from data lose due to out of storage space of the hard drive Compact Database system As a normal operation it is recommended that user should log off and turn off the Pico2000 unit in a monthly basis This will allow the database to close and then do some optimization and compacting o...

Page 50: ...TEC00 014 Pico2000 User Manual Rev 3 0 Page 49 of 51 TYPICAL CONFIGURATION Alarm tester box Optional accessory Alarm input connector 1 Alarm input connector 2 ...

Page 51: ...larm input 3 3 Alarm input 15 4 Alarm input 4 4 Alarm input 16 5 Alarm input 5 5 Alarm output 1 6 Alarm input 6 6 Alarm output 2 7 Alarm input 7 7 Alarm output 3 8 Alarm input 8 8 N C 9 Alarm input 9 9 Gnd 10 Alarm input 10 10 Gnd 11 Alarm input 11 11 Gnd 12 Alarm input 12 12 Gnd 13 N C 13 Gnd 14 Gnd 14 Gnd 15 Gnd 15 Gnd 16 Gnd 17 Gnd 18 Gnd 19 Gnd 20 Gnd 21 Gnd 22 Gnd 23 Gnd 24 Gnd 25 Gnd 25 24 2...

Page 52: ...round R Wh Pin 10 Alarm 10 input Or Pin 23 Alarm 10 ground Bk Wh Pin 11 Alarm 11 input Wh R Bk Pin 24 Alarm 11 ground G Pin 12 Alarm 12 input Bk R Wh Pin 25 Alarm 12 ground Wh Bk Pin 13 Not Used 2 8 core cable Blue ring to connector 2 DB15 female connector Alarm Inputs 13 to 16 Color Code for 8 core cable Blue Ring Pin 1 Alarm 13 input R Pin 9 Alarm 13 ground Bk Pin 2 Alarm 14 input Y Pin 10 Alarm...

Reviews: