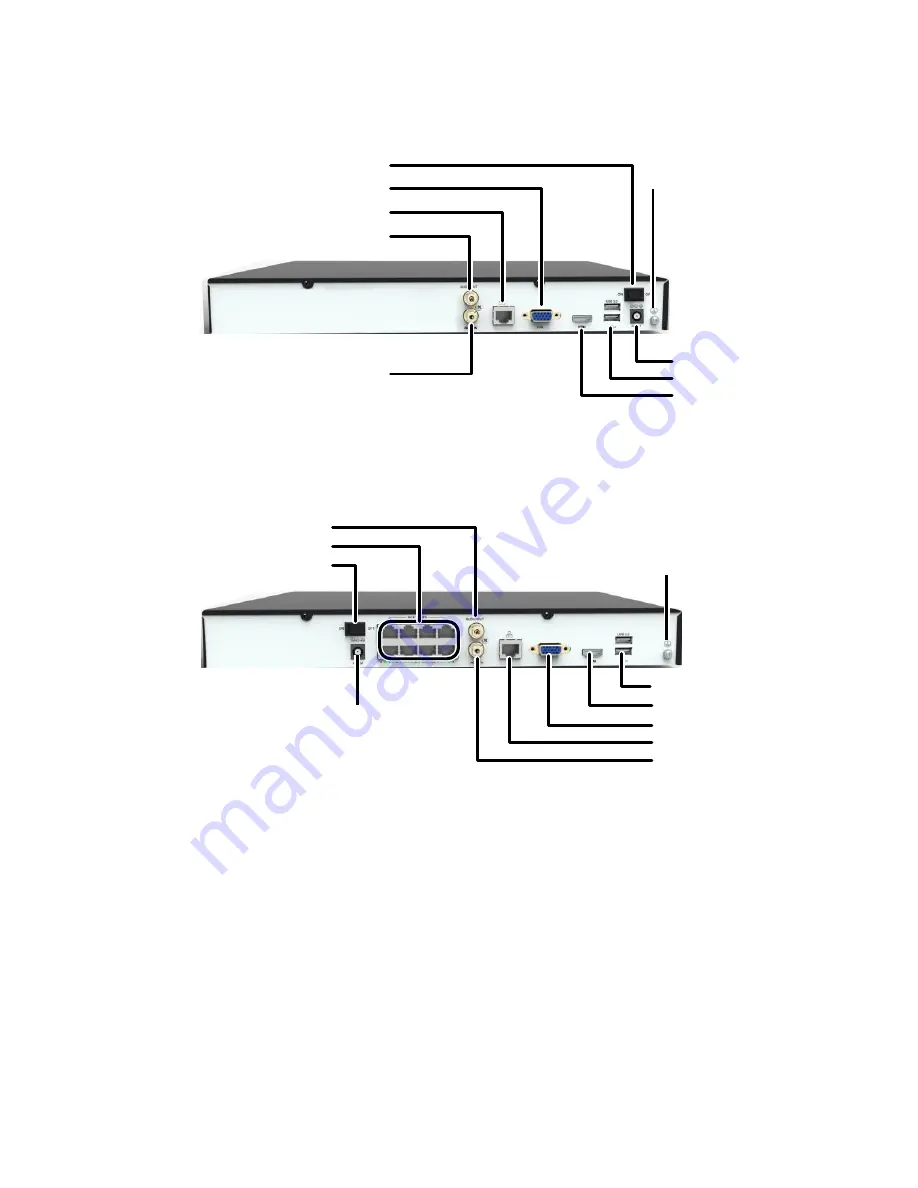
UNIVIEW NVR201 Quick Manual Download Page 22


14 

Figure 2-4


NVR with 1 or 2 Disks 


Figure 2-5


NVR with PoE Ports and 1 or 2 Disks 


Grounding 

terminal

Power on/off

VGA output

Ethernet

Audio output

Audio input

DC power

USB

HDMI output

Power on/off

Audio output

DC power

PoE port

Audio input

Ethernet

VGA output

HDMI output

USB

Grounding terminal

Summary of Contents for NVR201

Page 1: ...Network Video Recorders Quick Guide Manual Version V1 00 ...

Page 2: ...s manual are the property of their respective owners Disclaimer CAUTION The default password is used for your first login To ensure account security please change the password after your first login You are recommended to set a strong password no less than eight characters To the maximum extent permitted by applicable law the product described with its hardware software firmware and documents is p...

Page 3: ...urposes We shall not be held responsible for any consequences resulting from illegal operations of the device The illustrations in this manual are for reference only and may vary depending on the version or model The screenshots in this manual may have been customized to meet specific requirements and user preferences As a result some of the examples and functions featured may differ from those di...

Page 4: ...he following table may be found in this manual Carefully follow the instructions indicated by the symbols to avoid hazardous situations and use the product properly Symbol Description WARNING Indicates a hazardous situation which if not avoided could result in bodily injury or death CAUTION Indicates a situation which if not avoided could result in damage data loss or malfunction to product NOTE I...

Page 5: ...perly grounded and the lightning protection meets requirements Keep the device from moisture dust strong electromagnetic radiation and vibration Power down the device before connecting and disconnecting accessories and peripherals Protect the power cable from being stepped on or pressed particularly at the plug receptacle and the part leading out of the device Strictly follow the procedure to shut...

Page 6: ...harmful interference when the equipment is operated in a commercial environment This equipment generates uses and can radiate radio frequency energy and if not installed and used in accordance with the instruction manual may cause harmful interference to radio communications Operation of this equipment in a residential area is likely to cause harmful interference in which case the user will be req...

Page 7: ...European Low Voltage Directive 2006 95 EC and EMC Directive 2004 108 EC WEEE Directive 2002 96 EC The product this manual refers to is covered by the Waste Electrical Electronic Equipment WEEE Directive and must be disposed of in a responsible manner ...

Page 8: ...rance and Connection 8 Front Panel 9 Rear Panel 13 Connection 16 3 Startup and Shutdown 16 Before Startup 16 Startup 16 Shutdown 17 4 Setup 17 Wizard 17 Adding an IP Device 18 Preview 18 Preview Window Toolbar 18 Preview Status Icons 19 Shortcut Menu 20 Scheduled Recording 21 Playback 22 Accessing Through the Web 22 5 FAQs 23 6 Technical Specifications 23 ...

Page 9: ...k Installation CAUTION Disconnect power from the device before you start installation Wear antistatic gloves during installation Installation Without a Mounting Plate This section is intended for NVRs with one or two disks The following takes an NVR with two disks as an example 1 Loosen the screws on the rear panel and remove the cover 2 Insert the screws and tighten the screws halfway ...

Page 10: ...2 3 Connect the data cable to the hard disk 4 Connect the power cable to the hard disk 5 Align the screws on the hard disk with the screw holes on the bottom plate and then attach the hard disk ...

Page 11: ...lide the hard disk into position on the bottom plate as indicated in the figure below 7 Secure the hard disk by fixing the screws on the bottom plate 8 Connect data cables and power cables to the motherboard ...

Page 12: ... screws Do not place cables on the hard disk s Installation with a Mounting Plate This section is intended for NVRs with four or eight disks A mounting plate is delivered with the device The following takes an NVR with four disks as an example 1 Loosen the two screws on the rear panel ...

Page 13: ...ove the two screws that secure the hard disk mounting plate on both sides and then take out the mounting plate 4 Install the hard disks one by one on the mounting plate 5 Put the mounting plate back into the device and secure it ...

Page 14: ...6 6 Connect the hard disks and motherboard with data cables and power cables and arrange the cables appropriately 7 Replace the cover 8 Fix the two screws on the rear panel ...

Page 15: ... and back sides and at least 10 cm at the left and right sides of the NVR for heat dissipation If the NVR is mounted in a cabinet allow at least one rack unit RU of space 1 75 inches or 4 45 cm on top and bottom Workbench mount Place the NVR on a clean and solid workbench If protection pads are delivered with your NVR use the protection pads to minimize vibration and improve heat dissipation Disk ...

Page 16: ...et has slide rails or a tray installed to hold the NVR Do not use only mounting ears to hold the NVR 1 Attach a rack mounting ear to the NVR and secure it with two M4 6 screws 2 Install the other rack mounting ear in the same way 1 Screw 4 pcs 2 Ellipse hole 3 Rack mounting ear 3 Place the NVR on the slide rails and then push it into place Secure the rack mounting ears to the cabinet with nuts and...

Page 17: ... Blinking The NVR is starting up Off The NVR is shut down NET Network Blue Steady on The NVR is connected to network Off The NVR is not connected to network HD Hard disk Red Steady on No hard disk is installed or at least one disk is in abnormal condition Blinking Data is being read or written Off The disk is in normal status but no data is being read or written or the NVR is shut down ...

Page 18: ...w Switch windows or menu items or control rotation directions of a PTZ camera when the PTZ toolbar is closed Rewind or forward 30 seconds in full screen mode Variable speed forward or rewind Confirm an operation or start or pause the playback When logged in press and hold this button for around 3 seconds till a confirmation message appears on the monitor Click Yes to shut down the NVR ...

Page 19: ... NET Network Blue Steady on The NVR is connected to network Off The NVR is not connected to network GUARD Arming Blue Steady on Arming is enabled Off Arming is disabled or the NVR is shut down IR Blue Steady on The NVR is selected and is ready for remote control Blinking Device code is being authenticated Off The NVR is not selected and cannot be controlled remotely HD Hard disk Red Steady on No h...

Page 20: ...iption When logged in press and hold this button for around 3 seconds till a confirmation message appears on the monitor Click Yes to shut down the NVR Enter 1 or display the main menu Enter 2 A B or C or start instant playback Enter 3 D E or F or start manual recording Enter 4 G H or I or enter the PTZ control interface Enter 5 J K or L or switch the screen layout in preview or playback mode Ente...

Page 21: ...tems or control rotation direction of a PTZ camera when the PTZ toolbar is closed Rewind or forward 30 seconds in full screen mode Variable speed forward or rewind Confirm an operation or start or pause playback Rear Panel The interfaces on the rear panel may vary with device model The following figures are for reference only and may be different from the actual device ...

Page 22: ...NVR with PoE Ports and 1 or 2 Disks Grounding terminal Power on off VGA output Ethernet Audio output Audio input DC power USB HDMI output Power on off Audio output DC power PoE port Audio input Ethernet VGA output HDMI output USB Grounding terminal ...

Page 23: ...interface is for network connection Please use these interfaces properly HDMI output Ethernet Audio output Audio input VGA output USB DC power Power on off Grounding terminal Alarm input Alarm output RS485 Alarm input Power input USB Alarm output Power on off Grounding terminal Ethernet HDMI output VGA output Audio output input RS485 RS232 ...

Page 24: ...e Startup To avoid the risks of personal injury and device damage make sure the following requirements are met before connecting your NVR to power The NVR is properly mounted Nothing is placed on the NVR All cables are correctly connected The power conforms to specifications Startup Connect the NVR to power and then turn on the power switch Audio input Audio output Analog monitor Mouse IPC IP netw...

Page 25: ... front panel for at least three seconds till a confirmation message appears on the monitor Click Yes to shut down the system Shut down through the system interface Click Menu Shutdown Shutdown and then click Yes to confirm the operation 4 Setup Wizard The wizard can guide you to complete the most basic configuration After the NVR starts up choose a system language and then follow the wizard to com...

Page 26: ...ired IP device to add it NOTE To search a specified network segment click Search Normally all the IP devices discovered can be added and appears in the Status column to indicate that a device is added successfully In the case of a failure check network connection and verify that the username and password for the IP device are correct To modify the username and password for an IP device click Previ...

Page 27: ...ge Image Config Click to change the mode and adjust image settings Image parameters can also be configured under Menu Camera Image Manual Capture Click to take a snapshot To view or back up a snapshot click Menu Backup Image Camera Info Place the mouse cursor on it for live video information Start Talk Click to start two way audio with a remote device connected to the NVR To stop click Switch Came...

Page 28: ...rtcut Menu Description Menu Description Screenshot Single Screen Select the desired camera for live video in full screen Multi Screen Select the desired screen layout Corridor Click to view video in corridor mode in a variety of windows Previous Screen Next Screen Switch to the previous or next screen Start Auto Switch Stop Auto Switch Start or stop auto switching one or multiple preview windows P...

Page 29: ...Enable Schedule and then click Edit 2 Set recording period s and select a recording type Review the settings and then click OK NOTE If you select a recording type under Event you need to first enable the corresponding alarm function and configure alarm triggered recording 3 Click OK to complete the configuration ...

Page 30: ...VR are connected through network 1 Open a Web browser on your PC and visit the IP address of your NVR 192 168 0 30 by default For your first login you may need to install a plug in as prompted Close all Web browsers when the installation starts 2 In the login dialog box enter the correct username and password and then click Login The default username is admin and password is 123456 3 Configure you...

Page 31: ...nd then try again 2 How to export diagnostic information from the NVR Log in to the Web interface click Settings Maintenance Maintenance click Export next to Diagnostic Info and then follow the steps to download the diagnostic information 6 Technical Specifications Refer to the datasheets for more technical specifications Table 6 1 Specifications for NVR with 1 Hard Disk Item Description Dimension...

Page 32: ...ft to 16 404 2 ft Table 6 2 Specifications for NVR with 2 Hard Disks Item Description Dimensions W D H Height 1U 360 0 mm 254 3 mm 43 6 mm with front panel 14 2 10 0 1 7 Weight without disk 1 5 kg 3 31 lb Power PoE models 52 V DC 1 8 A Other models 12 V DC 2 A Maximum power consumption with disks PoE models 93 6 W Other models 24 W Operating temperature 10 C to 55 C 14 F to 131 F Operating humidit...

Page 33: ...Operating temperature 10 C to 55 C 14 F to 131 F Operating humidity 10 to 90 non condensing Altitude 60 m to 5000 m 196 85 ft to 16 404 2 ft Table 6 4 Specifications for NVR with 8 Hard Disks Item Description Dimensions W D H Height 2U 442 0 mm 421 mm 86 1 mm with front panel 17 4 16 57 3 39 Weight Without disk 5 5 kg 12 13 lb With disks 11 kg 24 25 lb Power 100V to 240V AC with power switch Maxim...

Page 34: ...26 Item Description Operating humidity 10 to 90 non condensing Altitude 60 m to 5000 m 196 85 ft to 16 404 2 ft ...

Page 35: ...BOM 3101C0C6 ...

Reviews: