background image

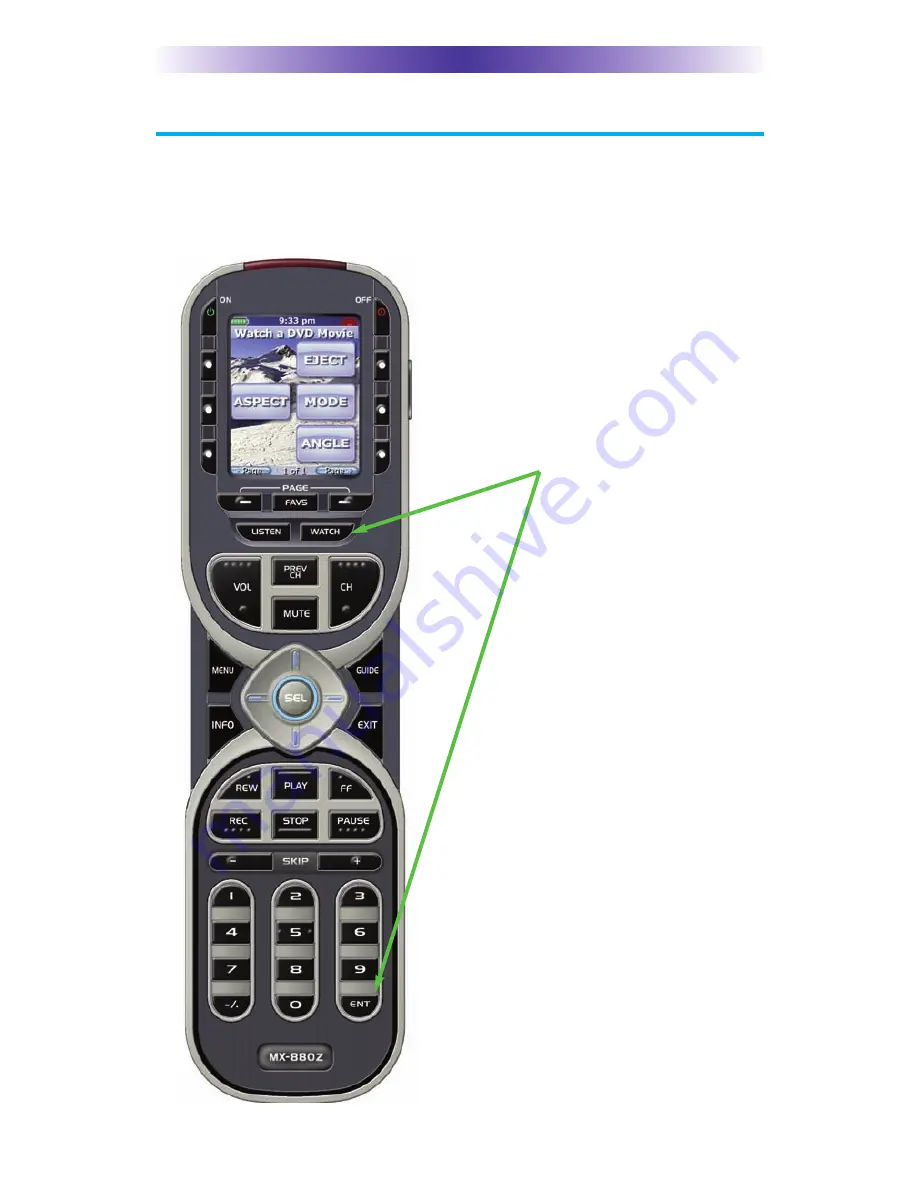
Accessing the MX-880Z’s Setup Menus

The MX-880Z has internal setup menus that enable you to change the set-
tings that control your color screen, the button lighting,  battery warnings
and the clock. To access these settings, you must press and hold two buttons
at the same time as shown here:

Simultaneously, press and
hold both the WATCH and
the ENTER buttons. When
the SETUP screen appears,
release the two buttons.

M

X

-880Z 

AND

M

RZ

-260 O

WNERS

M

ANUAL

Page 6

Summary of Contents for MRZ-260

Page 1: ...Operating Your System With the MX 880Z and the MRZ 260 co mpl et e Universal Remote Control co n t r o l co mpl et e ...

Page 2: ... Robert Ridenour of Connected Technologies www connected technologies com The information in this manual is copyright protected No part of this manual may be copied or reproduced in any form without prior written consent from Universal Remote Control Inc UNIVERSAL REMOTE CONTROL INC SHALL NOT BE LIABLE FOR OPERATIONAL TECHNICAL OR EDITORIAL ERRORS OMISSIONS MADE IN THIS MANUAL The information in t...

Page 3: ...Using the MX 880Z to Control an Activity 5 Accessing the MX 880Z s Setup Menus 6 Selecting from the Setup Menus 7 Setting the Color Screen 7 Setting the Button Lighting 8 System Menu 9 Setting the Button Beep Volume 10 Date and Time Menus 11 Erasing and Resetting 12 MRZ 260 Installation 13 Introduction to the MRZ 260 14 Features and Benefits 15 Installation and MAC Address Discovery 16 Testing 18 ...

Page 4: ...ront Blaster 20 Controlling Four Identical Components Zones 21 USA Limited Warranty Statement 24 Frequently Asked Questions 25 Specifications 25 Contact Us 25 Your Listen Devices 26 Your Watch Devices 27 Information to the User 28 TABLE OF CONTENTS ...

Page 5: ...off Integrated Sound Signaling The MX 880Z incorporates a small speaker for beeps Anytime you press a button the MX 880Z signals that it has understood your command with a beep sound Custom Labeled Buttons When you pick up the MX 880Z it automatically lights up the color LCD screen which labels the six buttons to either side of the screen These button labels change based on what you are watching o...

Page 6: ...the front panels of your compo nents The Flashers relay commands to com ponents out of sight of the MRZ 260 Front Blaster The flashers plug in to the MRZ 260 rear flasher line outputs via their 10 foot cables Uniquely the MRZ 260 can also con nect to components with rear panel IR Inputs via its adjustable IR Line Outputs 2 The MRZ 260 built in Front Blaster sends commands to com ponents in the sam...

Page 7: ...ng loaded contacts in the MX 880Z Angle the battery into the battery compartment contacts first then gently fit the rear of the battery into the compartment as well Replace the battery cover by insert ing the hinged end in first then snapping the cover back into place You can charge the Lithium Ion bat tery by simply plugging the includ ed charger into the base of the remote as shown here The MX 8...

Page 8: ...st simply press the WATCH button and select the new activity When you want to listen to the radio or to a CD touch the LISTEN button and select what you would like to listen to Your installer will have programmed the button you pressed to totally con figure your system to watch or listen to whatever you selected Now the screen will change and all of the LCD buttons will be reconfigured to give you...

Page 9: ...e choices The transport buttons Play Stop Skip Skip FF REW and Pause operate when the select ed activity requires them for example if you watch CABLETV with a TiVo type of DVR these buttons will control the built in DVR while if you are watching a DVD these buttons will control the DVD player The 4 way cursor buttons enable you to navigate on screen guides and menus with ease The Channel and Previ...

Page 10: ...ol your color screen the button lighting battery warnings and the clock To access these settings you must press and hold two buttons at the same time as shown here Simultaneously press and hold both the WATCH and the ENTER buttons When the SETUP screen appears release the two buttons MX 880Z AND MRZ 260 OWNERS MANUAL Page 6 ...

Page 11: ... MANUAL Select the setting you d like to adjust by pressing the button beside the screen Use the Page button to see other pages Exit the Setup Menus by pressing the WATCH or LIS TEN button or simply waiting the setup menus time out in 30 seconds Adjust the brightness of the screen to taste In most lighting conditions 50 gives good results The Pick Up sensor senses motion so it will keep the screen...

Page 12: ...ck Up Sensor OFF Setting the Button Lighting Note that button backlighting uses more battery charge than the screen So if you would like to extend the time between charges lower the usage of button lighting If you turn off Automatic On you will extend battery life the buttons will still light up when you press the light button The buttons will stay lit for so many seconds after you stop pressing b...

Page 13: ...r when you stop pressing buttons Pick Up Sensor OFF System Menu While you are using the MX 880Z you can get a more accurate reading of the exact power remaining by checking the System Menu Additionally the System Info page offers a look at how much memory you have used Select Power Remaining to check your power remaining or to set a new battery warning level To view the system info press here Use ...

Page 14: ...ached System Info See how much memory you ve used on this screen Setting the Button Beep Volume Use the buttons next to OFF and LOUDEST to adjust how loud the beeps are Use the OFF and LOUDEST buttons to set the Beep volume Press the SAVE button to save your setting Use the LESS and MORE buttons to set the battery warning Note the current remaining battery charge here Press the SAVE button to save...

Page 15: ...is correct press the SAVE button Setting Display for Time or Date The MX 880Z can display either the time or the date not both Select what you would like to be displayed and press SAVE Select either Time or Date display Press the SAVE button to save your setting Select the field you d like to change then use the Number buttons on the MX 880Z to enter the year the month and the day Press the SAVE b...

Page 16: ...asing and Resetting You can erase your MX 880Z all of your work all devices all activities will be lost and reset it to the factory default configuration Use the CANCEL button to exit without erasing Press the ERASE button to erase all your work ...

Page 17: ...uts via its adjustable IR Line Outputs 2 The MRZ 260 built in Front Blaster sends commands to com ponents in the same cabinet space or you can use flashers 1 The MX 880Z sends radio waves in every direction so you don t have to point the remote anymore Introduction to the MRZ 260 The MRZ 260 base station is an addressable base station MAC addressing gives you the ability to use an unlimited amount...

Page 18: ... control components in a particular room by installing an MRZ 260 base station at each location In operation it s simple when you select a device located in the Den the MX 880Z remote only sends commands to the Den When you select a device located in the Family Room the MX 880Z remote only sends commands to it A Single MRZ 260 Can Control an Array of Identical Components or Individual Zones of a M...

Page 19: ...tor to discover the MRZ 260 RF base station 5 Select Program then Configure Home 6 Add a MRZ 260 base station and the properties window opens 7 Plug the MX 880Z remote via USB to the PC 8 Click on the Discover button to automatically discover the MAC address of the MRZ 260 base or type in the 8 characters found on the MAC ID sticker located in the rear Note If you receive a Not Connected message s...

Page 20: ...ion is fixed connect each of the emitters to the appropriate IR output and run the cable to the appropriate compo nent Do not attach the emitters to the front panel yet Utilize the included preprinted labels to identify which emitter goes to which component If you d like to make your own the slots for the labels have been sized at 12mm to enable a Brother P Touch 12mm label to fit perfectly NOTE T...

Page 21: ...ition the flasher If you still have sluggish operation check that the remote control is set to a particular LINE OUT rather than ALL When IR commands are sent to all the flashers in a cabinet you can have difficulty adjusting the IR Output Reprogram the remote control to send IR commands only via a specific 1 4 Line Output then readjust the IR Line Output level 1 Connect an IR emitter to each IR o...

Page 22: ... Zigbee now you also have control of your URC Lighting What bet ter way to watch a movie and control your universe 1 Simply plug the included RFTX 1 10 pink connecting cable into the MRZ 260 pink fixed port 4 2 Set the URC Lighing Device in the CCP Editor to RF and set the IR out put to Port 4 3 Download to the MX 880Z remote and begin controlling your lights ...

Page 23: ...will limit the number of components your MRZ 260 can control to four If you have more than four components you can purchase an additional MRZ 260 Enabling Disabling the Front Blaster Step by Step via PC Open the PC software then plug the MX 880Z PC programmable remote control into the PC Open your saved configuration and follow these steps to turn off the front blaster 1 Open the RF Control Window...

Page 24: ...onent IR can still be utilized for other devices in your system 2 You must note the NUMBER of the Flasher Output you have utilized for EACH of the identical components Identical Components Zones Step by Step via PC 1 Create and Program a Device for Each Component Zone Try to name each device with a descriptive title At a minimum label them TV1 TV2 TV3 and so on 2 Open the RF Setup Window The RF Se...

Page 25: ...rsection of a row and a column and then selecting RF from the three options shown in the pull down list box Select RF from the three options shown for EACH of the identical TVs You may leave the other components of the system set to IR RF 4 Adjust the Flashers For Each of the Identical Devices The RF Setup window enables you to adjust which Flashers output by the remote control for each device ind...

Page 26: ...ss You program each of your remotes to talk to the equipment locations you want by assigning each of your devices to a receiver First you must add and name your receivers for the locations they are placed in 1 Open CCP Editor This editor will allow you to program multiple base stations 2 Click on Program and Configure Home 3 Add as many MRZ 260 base stations as needed Follow steps 4 11 on page 3 I...

Page 27: ...F switch on the RFTX 1 is set to the correct frequency for the URC Dimmer or Switch URC Lighting Models MRFA is 418MHz and MRFB is 433MHz Specifications Memory 32 Megabits of Flash Memory Total 28 Megabits for User Configuration Customization Capability Up to 48 devices and up to 8 pages each for a total of 384 pages Learning Capability Standard frequencies 15kHz to 460kHz Macro Capability Up to 2...

Page 28: ...RORS BUGS IN THE URC SOFTWARE URC warrants that at the time of purchase the URC equipment and the URC software complied with all applicable regulations and policies of the Federal Communications Commission FCC regarding electromagnetic interference caused by electronic computing devices and to the extent that the URC equipment and or the URC software fails to so comply URC shall at its own expense...

Page 29: ...software or other materials that may have been programmed into the unit It is likely that such data software or other materials will be lost during service and URC will not be responsible for any such damage or loss A dated purchase receipt bill of sale installation contract or other verifiable proof of purchase is required For the URC equipment support and other important information please visit...

Page 30: ...LL URC BE LIABLE FOR THE ACTS OR OMISSIONS OF END USER OR ANY THIRD PARTY THE LIMITATIONS OF LIABILITY MAY NOT APPLY TO END USER IN WHOLE OR IN PART WHERE SUCH ARE RESTRICTED LIMITED OR EXCLUDED BY APPLICABLE LAW AND SUCH SHALL APPLY TO THE MAXIMUM EXTENT PERMITTED BY APPLICABLE LAW URC SHALL NOT BE HELD RESPONSIBLE FOR THE STATEMENTS MADE BY OTHERS SOME STATES OR JURISDICTIONS DO NOT ALLOW THE EX...

Page 31: ...Page 27 MX 880Z SETUP NOTES Your Listen Devices List any component or device you d like to access via the Listen menu Type of Device TV DVD VCR etc Brand Model ...

Page 32: ...Page 28 MX 880Z SETUP NOTES Your Watch Devices List any component or device you d like to access via the Watch menu Type of Device TV DVD VCR etc Brand Model ...

Page 33: ...ion reception which can be determined by turning the equipment off and on the user is encouraged to try to correct the interference by one more of the following measures Reorient or relocate the receiving antenna Increase the separation between the equipment and receiv er Connect the equipment into an outlet on a circuit different from that to which the receiver is connected Consult the dealer or ...

Page 34: ...500 Mamaroneck Avenue Harrison NY 10528 Phone 914 835 4484 Fax 914 835 4532 www universalremote com co mpl et e Universal Remote Control co n t r o l co mpl et e ...

Reviews: