background image

IR OUT/RFTX-1

This 3 Conductor removable connector can be used for either an
RFTX-1 RF transmitter or for a URC IR emitter.

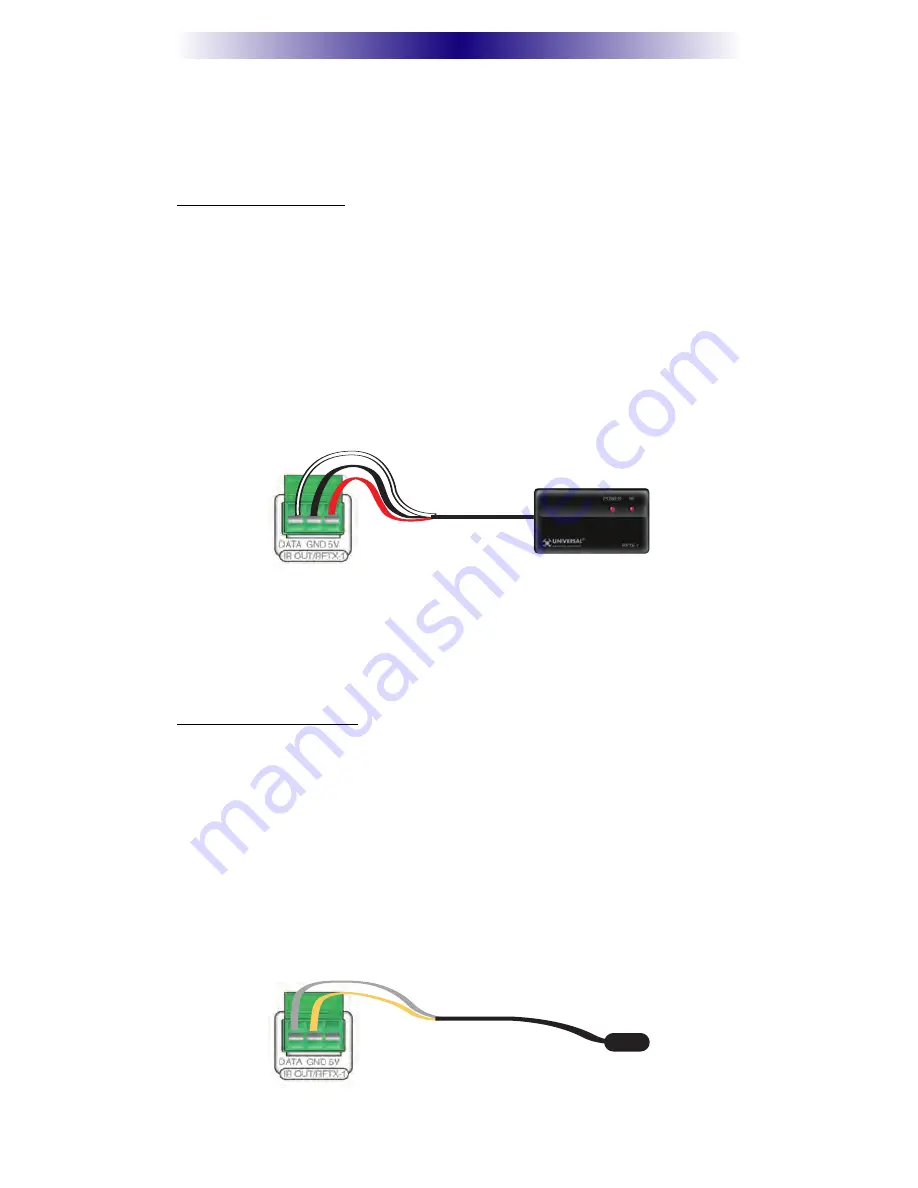
RFTX-1 Connections

In installations with URC RF lighting or a standard RF base station,
you will need to add an RFTX-1 RF Transmitter to the KP-4000.
Range can wildly vary, depending on the structure of the wall the
KP-4000 is installed in. You can make the RF range much more pre-
dictable by installing the RFTX-1 with the MRX-1 in most homes
and this is the recommended method! However in some installa-
tions, you may achieve satisfactory results from an RFTX-1 inside
the wall cavity. To connect use the following terminations to the KP-
4000:

Page 6

KP-4000 N

ETWORK

K

EYPAD

Data – Connect the white wire which is connected to the Tip of the 3.5mm plug

GND – Connect the black wire which is connected to the bottom sleeve(base) of the
3.5mm plug

5V – Connect the red wire which is connected to the ring of the 3.5mm plug

IR Emitter Connection

Should you need to drive an IR emitter directly from the KP-4000,
you connect the emitter to Data and GND. A URC emitter is wired
with a cable that has a silver and a copper conductor. If you have
another brand of emitter, reverse polarity if the first attempt doesn’t
work. URC emitters can be successfully powered over long cable
lengths if the wire gauge is at least 16 gauge. 

Data – Silver Conductor

GND – Copper Conductor

Summary of Contents for Complete Control KP-4000

Page 1: ...KP 4000 Installation Manual Network Keypad ...

Page 2: ...TE CONTROL INC SHALL NOT BE LIABLE FOR OPER ATIONAL TECHNICAL OR EDITORIAL ERRORS OMISSIONS MADE IN THIS MANUAL The information in this manual may be subject to change without prior notice Complete Control is a registered trademark of Universal Remote Control Inc All other brand or product names are trademarks or registered trademarks of their respective companies or organizations 500 Mamaroneck A...

Page 3: ...In Wall Installation 8 CCP MAC Address Discovery 9 Displaying the Settings Screen 10 Adjusting Sleep Settings 10 Button Light Settings 10 Setting Date and Time 10 Sound 11 Adjusting Brightness 11 System 11 Network 11 Factory Default 12 Exit 12 Frequently Asked Questions 13 Specifications 13 USA Limited Warranty Statement 14 Federal Communication Commission Interference Statement 15 Warning 15 FCC ...

Page 4: ...x to the Infrared sensors on the front panels of your client s compo nents The Flashers relay com mands to components The flash ers plug in to the MRX 1 rear flasher line outputs via their 10 foot cables The MRX 1can also connect to components with rear panel IR Inputs via its adjustable IR Line Outputs IR Controlled Device MRX 1 Network Base Station Router PoE Injector 1 The KP 4000 communicates ...

Page 5: ...t Scenes for URC Lighting via RFTX 1 Your client can fully control the lighting in their home without expensive black boxes and exotic wiring A lighting system can be as simple as a single URC RF lamp dimmer on a lamp that they d love to control without getting out of a chair The KP 4000 s optional RFTX 1 transmitter directly controls URC RF Dimmers and Switches Your client can brighten dim and re...

Page 6: ... advantage that a single CAT 5 cable to the KP 4000 supplies all connections needed However should you be installing a KP 4000 in a system where it is convenient to run an additional two conductor wire to the KP 4000 for power you may power a KP 4000 from any 12V wall adapter with a 1 amp rating 12v wall adapters may be separately ordered from URC Option 1 PoE Switch Page 3 KP 4000 NETWORK KEYPAD ...

Page 7: ...nections to IP devices MRX 1 and the internet connect a CAT 5 cable RJ 45 to the LAN connection on the rear of the KP 4000 and plug the other end into the Router Option 3 No PoE 12 Volt Power Supply 1 Connect the CAT 5 cable RJ45 to the LAN connection on the rear of the KP 4000 2 Plug the other end of the CAT 5 cable to the PoE Injector which will power the KP 4000 3 Connect the PoE injector not i...

Page 8: ... Labels Tear off the 2nd label and stick it to your Job Documentation indicating which room the KP 4000 is installed You ll need the MAC address when you program the KP 4000 Connections In most installations you will power the KP 4000 via a single CAT 5 cable connected to the network The KP 4000 is PoE so you can power it from either a PoE power injector or any PoE switch LAN PoE RJ 45 Plug an Eth...

Page 9: ...side the wall cavity To connect use the following terminations to the KP 4000 Page 6 KP 4000 NETWORK KEYPAD Data Connect the white wire which is connected to the Tip of the 3 5mm plug GND Connect the black wire which is connected to the bottom sleeve base of the 3 5mm plug 5V Connect the red wire which is connected to the ring of the 3 5mm plug IR Emitter Connection Should you need to drive an IR ...

Page 10: ... available You must run an additional two conductor cable to the KP 4000 to utilize this feature Connect a spliced power adapter 12Volt 1AMP with the polarity Positive Negative connected cor rectly 12V 1A Connect to the conductor of a 12V 1 Amp DC wall adapter GND Connect to the conductor of a 12V 1 Amp DC wall adapter KP 4000 NETWORK KEYPAD ...

Page 11: ...retro fit box not included into the wall 2 Make connections for IR Out RFTX 1 LAN or Power Supply For connections refer to page 5 3 Next secure KP 4000 onto p ring or retro fit box with the 4 included screws 4 Finally attach the magnetic cover plate to the four screws secured into the KP 4000 Two Gang Wall Box KP 4000 Magnetic cover plate In Wall Installation ...

Page 12: ...Network Keypad from the Remotes section and the properties window opens Note Adding a MRX 1 base station to communicate with a KP 4000 is recommended 5 Within the Network Information field press the Discover button to select the unique MAC address of your unit 6 The Discover window opens to reveal KP 4000 s connected to the network Highlight the MAC address which matches the KP 4000 s label Then p...

Page 13: ...ration Adjusting Sleep Settings Conserve energy by configuring the keypad to fall asleep after a specified amount of time Select a time from the drop down list Button Light Settings Conserve energy by opting to turn off the LED lighting behind the buttons Setting Date and Time Your KP 4000 may have been programmed to display the date or time on the touch screen If you need to you can adjust the ti...

Page 14: ...an adjust the volume to any level you like by touching and dragging the volume control here Adjusting Brightness Simply touch and drag the brightness slider to the desired level System The System Information screen displays data about your KP 4000 s operating system memory etc Network The Network screen displays network information about your KP 4000 and the network it is connect to ...

Page 15: ...ted to by Technical Support It resets the memory of the KP 4000 to the factory condition All your programming will be lost Exit When you have finished adjusting Settings simply tap the EXIT but ton to return to normal operation Page 12 KP 4000 NETWORK KEYPAD ...

Page 16: ...00 Use a pen or pointy device to depress the button and reset the unit How do I erase a KP 4000 Press and hold the Main Mute hard buttons for 3 seconds then press and hold the Factory Default button for 5 seconds Release the button a popup window appears asking Do you really want to erase the user s settings and reformat the storage disc Select Yes to reformat and No to return back to the KP 4000 ...

Page 17: ...ware or other materials that may have been programmed into your unit It is likely that such data software or other materials will be lost during service and Universal Remote Control will not be responsible for any such damage or loss A dated purchase receipt Bill of Sale Installation Contract or other verifiable Proof of Purchase is required For product support and other important information visi...

Page 18: ...ween the equipment and receiver uConnect the equipment into an outlet on a circuit different from that to which the receiver is connected uConsult the dealer or an experienced radio TV technician for help Warning Changes or modifications not expressly approved by the manufacturer could void the user s authority to operate the equipment Note The manufacturer is not responsible for any Radio orTV in...

Page 19: ...Page 16 MEMO ...

Page 20: ...500 Mamaroneck Avenue Harrison NY 10528 Phone 914 835 4484 Fax 914 835 4532 www universalremote com OCE 0080A Rev 01 ...

Reviews: