background image

-13-

TAMPER WARNING

This wood heater has a manufacturer-set minimum low burn rate that must not be altered. It is against federal 

regulations to alter this setting or otherwise operate this wood heater in a manner inconsistent with operating 

instructions in this manual.

EFFICIENCIES

Efficiencies can be based on either the lower heating value (LHV) or the higher heating value (HHV) of the fuel. 

The lower heating value is when water leaves the combustion process as a vapor, in the case of woodstoves the 

moisture in the wood being burned leaves the stove as a vapor. The higher heating value is when water leaves 

the combustion process completely condensed. In the case of woodstoves this would assume the exhaust gases 

are room temperature when leaving the system, and therefore calculations using this heating value consider 

the heat going up the chimney as lost energy. Therefore, efficiency calculated using the lower heating value of 

wood will be higher than efficiency calculated using the higher heating value. The best way to achieve optimum 

efficiencies is to learn the burn characteristic of you appliance and burn well-seasoned wood. Higher burn rates 

are not always the best heating burn rates; after a good fire is established a lower burn rate may be a better 

option for efficient heating. A lower burn rate slows the flow of usable heat out of the home through the chimney, 

and it also consumes less wood.

Notice: Use solid wood fuel only! Do not burn garbage , or flammable fluids. Do not use coal. This appliance is not 

designed to accommodate the air flow (draft) required to properly burn coal or coal products. Do not elevate 

the fire using grates or irons. Build the fire directly on the firebrick.

FUELING INSTRUCTIONS

This wood stove has been certified by the US EPA to meet strict 2020 guidelines. To ensure this unit produces 

the  optimal  minimum  emissions  it  is  critical  that  only  well-seasoned  cordwood  is  burned  (see  the  “Fuel 

Recommendations” section of this manual). Burning unseasoned wet wood only hurts your stoves efficiency and 

leads to accelerated creosote buildup in your chimney. Be considerate of the environment and only burn dry 

wood.

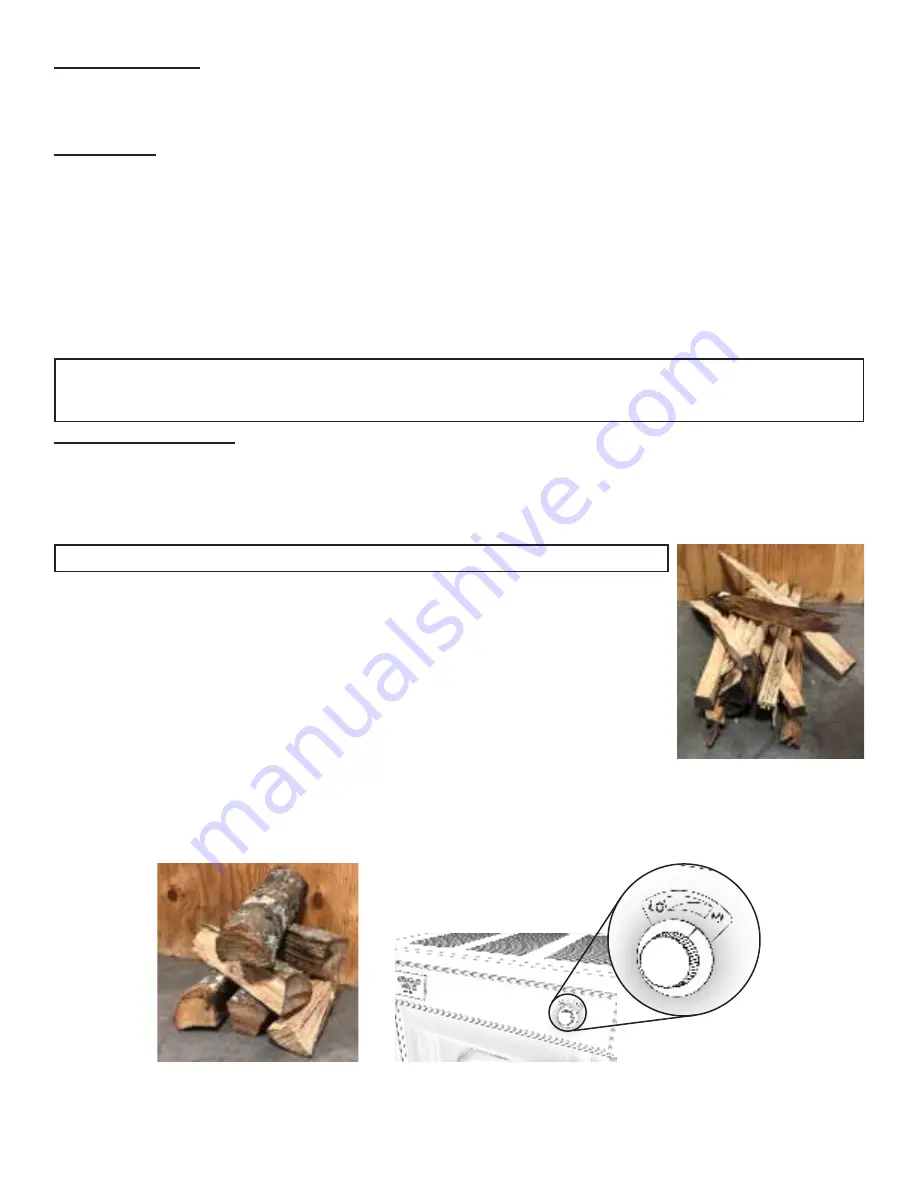
For a cold start-up, place 3 to 4 pieces of newspaper into the firebox. On top of the 

newspaper, lay 4 lbs of kindling in random placement to ensure airflow through the 

kindling. On top of the kindling, place approximately 6 lbs of small pieces of cordwood. 

NOTE: Use smaller pieces of wood during start-up and a high burn rate to increase the 

stove’s temperature.

CAUTION: DO NOT LEAVE APPLIANCE UNATTENDED WITH THE DOOR OPEN.

4 lb

Turn the air control knob to the high position. Light the newspaper, close the door, and allow the kindling to ignite. 

Once the kindling has burned down to a starter coal bed, load the unit with approximately 24 lbs of fuel for the 

first high burn load. Close the door immediately.

After the first high burn load and the stove is well warmed up, adjust the unit as needed for a medium or low burn 

setting.

For a medium burn, once the high burn fuel load is burned down to an established coal bed, load the unit with

27-28 lbs of cordwood and keep the door slightly open for 5 minutes. Leave the air control fully open (in the “HI” 

position) for 15 minutes. After 15 minutes turn the air control knob to the medium position. The blower can be 

turned on after 30 minutes. 

24 lbs

Summary of Contents for US2941EB

Page 1: ...n Agency Certified to comply with 2020 particulate emissions standards Tested to ALT 125 ASTM E2515 ASTM E3053 and CSA B415 1 10 Certified to UL 1482 11 R2015 and Certified to ULC S627 00 Room Heater...

Page 2: ...Depth 11 3 8 x 24 3 4 289 mm x 629 mm Volume Cubic Feet 2 32 ft Door Opening Width x Height 10 x 11 3 8 854 mm x 289 mm Note Register your product on line at www usstove com Save your receipt with you...

Page 3: ...ob assembly 1 Remove the machine screw and the door knob 2 Place the knob on the outside of the cabinet door re install the machine screw and tighten Be careful not to strip out the threads in the han...

Page 4: ...ire department Do not connect to any air distribution duct or system A source of fresh air into the room or space heated shall be provided when required POSITIONING THE STOVE It is very important to p...

Page 5: ...The clearance between the flue pipe and a wall are valid only for vertical walls and for vertical flue pipe The chimney connector must not pass through an attic or roof space closet or similar concea...

Page 6: ...ing installed in is of tight construction or has negative pressure problems an outside source of air is needed Below is a list of possible indicators that a source of outside combustion air may be req...

Page 7: ...hose clamp over the tail piece and tighten SECURING APPLIANCE TO THE FLOOR Use the designated holes to secure the unit to the floor as shown 2 Slide the tail portion of the weather hood through the h...

Page 8: ...ough appliance and chimney connector joints An uncontrollable burn or excessive temperature indicates excessive draft To Appliance CHIMNEY Take into account the chimney s location to ensure it is not...

Page 9: ...re as recommended by the manufacturer The chimney must be the required height above the roof or other obstructions for safety and proper draft operation MASONRY CHIMNEY Ensure that a masonry chimney m...

Page 10: ...chimney connector and a minimum 24 gage ventilated wall thimble which has two air channels of 1 25 4 mm each construct a wall pass through There shall be a minimum 6 152 4 mm separation area containi...

Page 11: ...ns Under extreme conditions it may rot instead of drying This point cannot be over stressed the vast majority of the problems related to the operation of a wood stove is caused by the fact that the wo...

Page 12: ...s 6 Materials containing asbestos 7 Construction or demolition debris 8 Railroad ties or pressure treated wood 9 Manure or animal remains 10 Salt water driftwood or other previously salt water saturat...

Page 13: ...uired to properly burn coal or coal products Do not elevate the fire using grates or irons Build the fire directly on the firebrick FUELING INSTRUCTIONS This wood stove has been certified by the US EP...

Page 14: ...it is recommend to operate it with a wood load approximately equivalent to the height of fire bricks It is important to note that wood combustion consumes ambient oxygen in the room In the case of ne...

Page 15: ...ited this creosote makes an extremely high temper fire The chimney connector and chimney should be inspected at least once every two months during the heating season to determine if a creosote build u...

Page 16: ...posure It is recommended that you use both smoke and CO monitors in areas having the potential to generate CO GASKET CARE This unit s door uses a 1 diameter rope gasket It is recommended that you chan...

Page 17: ...6 891492 Blower Assembly B36 1 7 25598 Blower Mounting Box 1 8 29329 Smoke Curtain 1 9 610508 Right Side Casing 1 10 67969 Cabinet Door Assy 1 11 67444 Ash Pan Weldment 1 12 67859 Base Weldment 1 13...

Page 18: ...2 5 ft 8 40764 Cast Door 1 3 5 8 1 2 7 6 4 2 1 3 5 4 6 7 8 9 10 11 14 13 15 16 18 17 12 Key Part Description Qty 1 88336 Insulation Blanket 1 2 88335 Baffle Board 2 3 29437 Tube Retainer 1 4 29438 Ba...

Page 19: ...07 Date _____________________ Engineer Name ________________________________ License No ____________________________________ Company _____________________________________ Telephone No _______________...

Page 20: ...ice fiable et efficace de votre appareil de chauffage et vous permettre de commander correctement les pi ces de rechange Conservez ce manuel dans un endroit s r pour r f rence future Lors de l criture...

Page 21: ...____________________________ Service de 07 Date _____________________ Nom de l ing nieur ____________________________ N de licence _________________________________ Compagnie _________________________...

Page 22: ...neau d flecteur 2 3 29437 Retenue de tube 1 4 29438 C t d flecteur 1 5 27291 Dessus de doublure avant 1 6 29408 Retenue droite 1 7 893285 Brique r fractaire 3 8 27484 Support briques sup rieur 2 9 890...

Page 23: ...Base 1 13 22110 Bouclier Thermique 1 14 25550 Amortisseur De Tirage H pin 1 15 27469 Bras Amortisseur 1 16 610987 Ensemble De Bo te De Distribution D air 1 17 89687 Bouton De Thermostat Noir 1 18 6109...

Page 24: ...17 Pi ces De Rechange 1 2 3 4 6 7 9 10 11 12 13 14 15 16 17 19 20 21 22 23 18 24 25 26 27 28 5 8...

Page 25: ...S NEPERMETTEZPASAUCORDOND ALIMENTATION DE TOUCHER LES SURFACES CHAUDES GARDER LE CORDON D ALIMENTATION AU MOINS 12 po 30 5CM DES SURFACES DU PO LE OU DU TUYAU DANGER RISQUE D LECTROCUTION D BRANCHER L...

Page 26: ...r par p riodiquement pour fonctionner correctement Il est contraire la r glementation f d rale de faire fonctionner ce po le bois d une mani re non conforme aux instructions d utilisation de ce manue...

Page 27: ...DUITS D AIR Les conduits d air assembl s dans cette unit sont con us pour offrir un m lange pr cis d air secondaire et assurer une plus grande efficacit Tout dommage ou d t rioration de ces conduits p...

Page 28: ...usqu un lit de charbon de d marrage chargez l unit avec environ 24 lb de carburant pour la premi re charge de combustion lev e Fermez la porte imm diatement Apr s la premi re charge de combustion lev...

Page 29: ...Ce chauffage au bois a un taux de combustion minimum r gl la fabrication et qui ne peut tre modifi La modification de ce r glage ou une utilisation autre de ce chauffage au bois qui ne respecterait pa...

Page 30: ...is utilis tait trop humide ou avait s ch dans de mauvaises conditions Ces probl mes peuvent tre probl mes d allumage accumulation de cr osote causant des incendies de chemin e rendement nerg tique bas...

Page 31: ...ible Commencez avec une partie de chemin e Solid Pak fabriqu e en usine agr e d au moins 12 po 304 mm de diam tre int rieur avec une isolation de 1 po 25 4 mm ou plus et un raccord de chemin e de 8 po...

Page 32: ...d gagement appropri avec la structure tel que recommand par le fabriquant La chemin e doit avoir la hauteur requise au dessus du toit ou d autres obstructions pour des raisons de s curit et un bon tir...

Page 33: ...ent elle doit tre de type HT 2100 F Il est extr mement important qu elle soit install e conform ment aux sp cifications du fabriquant Si vous utilisez une chemin een ma onnerie il est important qu ell...

Page 34: ...ntr e d air le plus pr s possible du po le 3 Glissez les deux colliers de serrage sur le tuyau flexible en aluminium Glissez ensuite le tuyau flexible jusqu au tube d entr e d air du po le Serrez le c...

Page 35: ...ans lequel cette unit est install e est de construction tanche ou a des probl mes de pression n gative une source d air ext rieure est n cessaire Vous trouverez ci dessous une liste d indicateurs poss...

Page 36: ...ustibles moins de 4 pi 1 2 m de l avant de l appareil Le jeu entre le conduit de fum e et un mur est valable uniquement pour les parois verticales et conduit de fum e vertical Le connecteur de chemin...

Page 37: ...ION CONSULTER VOTRE SERVICE MUNICIPAL IMMEUBLE OU D INCENDIE PROPOS DE PERMIS RESTRICTIONS ET INSTALLATIONS EXIGENCES DANS VOTRE R GION UTILISATION D TECTEUR DE FUM E DANS LA PI CE O EST INSTALL VOTRE...

Page 38: ...oign e de porte 2 Placez le bouton l ext rieur de la porte de l armoire r installez la vis m taux et serrez Veillez ne pas retirer les fils de la poign e FONCTIONNEMENT DE LA POIGN E ET DE LA PORTE D...

Page 39: ...onstruction de 2020 de la US Environmental Protection Agency pour les appareils de chauffage au bois vendus apr s le 15 mai 2020 Dans des conditions de test sp cifiques il a t d montr que cet appareil...

Page 40: ...ENT LES PI CES DE R PARATION GARDEZ DANS UN ENDROIT S R POUR R F RENCE FUTURE Test selon ALT 125 ASTM E2515 ASTM E3053 et CSA B415 1 10 Certifi UL 1482 11 R2015 et Certifi ULC S627 00 Chauffage de pi...

Reviews: