background image

2.7.2 Move items on the home screen

1. Click the item you want to move.
2. Drag the item to the desired position after being selected.

2.7.3 Remove items from the home screen

1. Click the item you want to remove.

The item is selected and a delete icon appears in the upper area of ​ ​ the screen.

2. Drag the item to the delete.

2.8 WLAN

Main menu→ Settings→ WLAN

·

WLAN:

Turn on or off WLAN.

·

Network notification:

Set the mobile phone to notify the user when an open network is available nearby.

·WLAN networks:

Find wireless networks around you:

1.

Select Settings→ WLAN

2.

Select WLAN and turn it on. The mobile phone will scan for available WLAN networks, and then list
the network names found in the WLAN network list.

3.

Click a network to connect.

4.

If it is a protected network, the system will prompt you to enter your password. For specific details,
please consult the service provider or administrator of the network.

2.8.1 Delete WLAN networks

You can make the mobile phone not save the memorized WLAN network details.

1. Turn on the WLAN.
2. Click and hold the connected network name on the WLAN Settings screen.
3. In the opened WLAN dialog, click cancel the save.

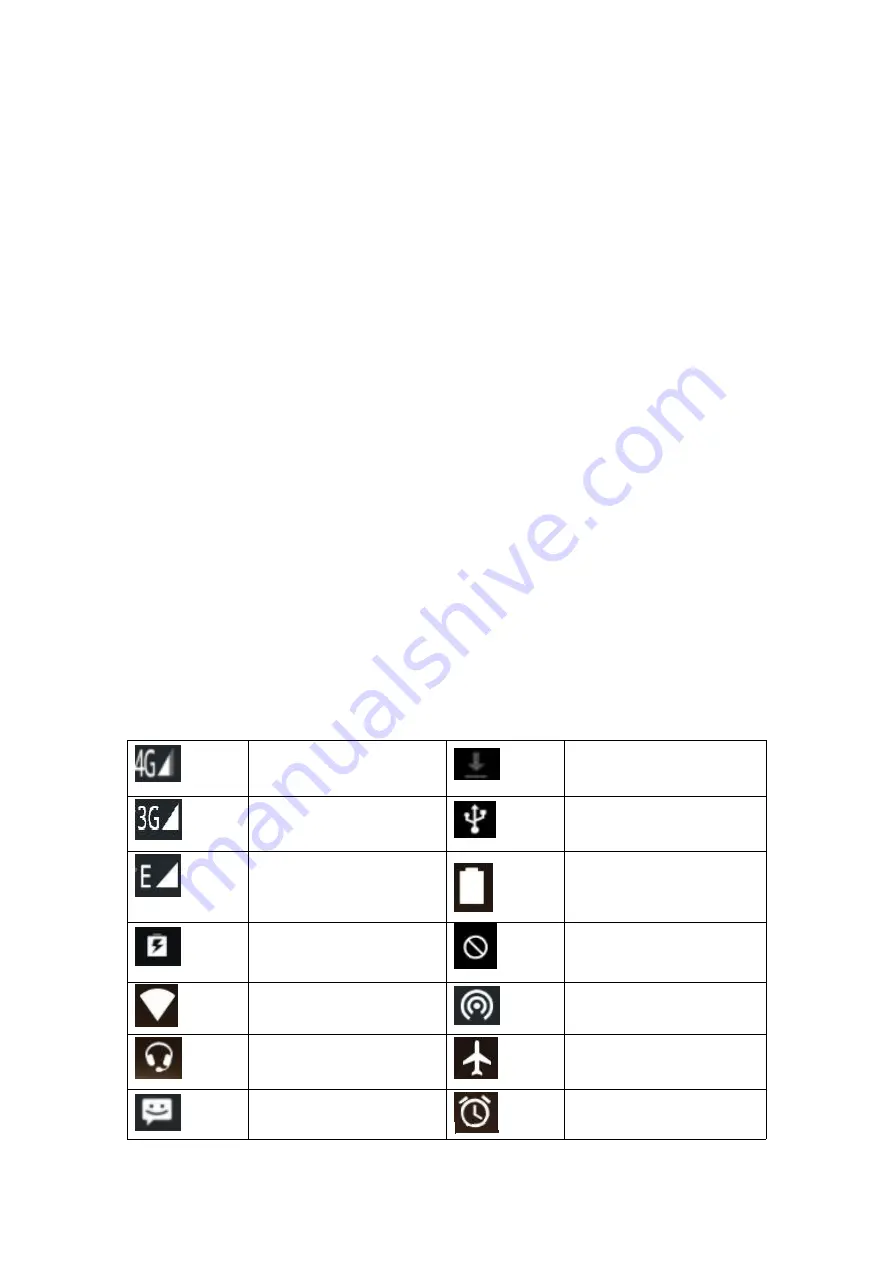
2.9 Operating status of mobile phone

The network signal strength is
4G.

Download

The network signal strength is
3G.

The USB is connected.

GSM network is in use.

The battery is full.

The battery is being charged.

Silent mode

The signal strength of WLAN

Turn on portable WLAN hotspots.

The headset is plugged in.

Airplane mode

New messages

Alarm is set.

Summary of Contents for EA520

Page 1: ...nect the positive and negative poles of the battery with metal and do not store or move the battery together with metal If the battery is short circuited a large current will flow through the battery...

Page 2: ...mmended charging method to charge the battery in recommended ambient conditions with a special charger Working temperature of the equipment 10 to 55 Use and maintenance of the mobile phone Please use...

Page 3: ...maged please send it to the designated service and maintenance center as soon as possible so that qualified technicians can repair them Do not disassemble the mobile phone by yourself otherwise it may...

Page 4: ...od 1 Insert the charger connector into the charger jack of the mobile phone 2 Connect the charger with the power supply and the battery symbol will display dynamically indicating that the battery is b...

Page 5: ...one Then you should enter the password as required If you want to set the mobile phone to make it on longer require an unlocking password please enter Settings Security to change the screen locking mo...

Page 6: ...to select contacts in the list you can quickly swipe the touch screen When quickly swiping a long list of contacts you can click screen to stop the swipe Friendly tips In order to avoid scratching the...

Page 7: ...screen to sleep to save battery prevent accidental operation of mobile phone and clean the screen by pressing the power button And then pressing it again to wake up the screen 2 If you need to adjust...

Page 8: ...list the network names found in the WLAN network list 3 Click a network to connect 4 If it is a protected network the system will prompt you to enter your password For specific details please consult...

Page 9: ...lick or click end call button 3 3 Answer the call and refuse the call When you have an incoming call the relevant information of the call will be displayed on the screen If you have missed calls you w...

Page 10: ...network service provider has set up one or more emergency numbers Different countries have different emergency call numbers so the emergency call number of your mobile phone will not be valid in all r...

Page 11: ...he contact group interface to view or manage your group 4 6 2 Create groups 1 Open the contacts group interface 2 Click the group icon in the upper right corner to create groups 3 Enter the name of gr...

Page 12: ...automatically converted into MMS after topics and attachments are added Similarly MMS will be automatically converted into SMS after subjects attachments and other contents are deleted 6 Press icon an...

Page 13: ...on and click next step 6 1 5 Create a name for your mail account and set the name to be displayed when you send out E mails and click next step 6 1 6 The system will synchronize with the mail server y...

Page 14: ...nformation on the Internet Notice 1 Use the browser to enable your mobile phone to access the web and web based applications If it necessary please consult your network service provider how to connect...

Page 15: ...ktop site settings help and feedback etc 8 Music Enjoy music stored in your mobile phone or SD card through the Music Player 8 1 Copy audio files to your mobile phone 1 Connect your mobile phone to yo...

Page 16: ...ect the music file to add to the playlist and press long until the shortcut Menu pops up 3 Click and add it to playlist 4 Click to create a new playlist 5 Enter the name of the new playlist 6 Click to...

Page 17: ...video library from the Main Menu Video displays the video from your SD card or mobile phone including video you shot with your camera and video you downloaded from the network or other settings 9 2 Pl...

Page 18: ...on object 4 Click to take pictures The thumbnail of the photo you just took is displayed in the lower left corner of the screen Click thumbnails to view photos Click Menu and then select Delete to del...

Page 19: ...are videos via messaging Bluetooth e mail and so on Click Menu select Delete to delete the video Click Menu select Cut to cut the video Click Menu select Silence the video will be saved to the camera...

Page 20: ...um are displayed as thumbnails 3 Click a thumbnail to browse a larger image 11 2 2 Delete picture Click the Menu Delete to delete the picture 11 2 3 Slide show 1 Open a Photo Album in which the pictur...

Page 21: ...meters and slide to the right to open 12 2 Calendar 1 Enter the calendar from Main Menu 2 Click the Date View drop down button in the upper left corner to view day view week view month view schedule a...

Page 22: ...shlight 12 8 Radio Enter the radio from the Main Menu headphones must be plugged in as an antenna to operate the radio 1 Click to turn off or turn on the radio 2 Click to turn on or off the speaker 3...

Page 23: ...ted B Preferred sim card You can set up a card for mobile data network call and short message respectively 4 Traffic usage A Check the use of mobile data network traffic by each application module in...

Page 24: ...atically locks Interactive Screen Saver Setting up Screen Saver Font size Set the font size When the device rotates Rotate the screen content direction keeping the current direction 2 Tones notificati...

Page 25: ...tallation of applications not provided by the electronic market G Credential Storage Storage type Default hardware support Trusted credentials Display Trusted CA Certificates Install from mobile phone...

Page 26: ...end the call automatically rotating screen saying password touching and holding delay color correction on and off and so on 4 Print Connect printer s 5 Developer Option Slide on and off this function...

Page 27: ...h you can select and install into your mobile phone as needed You can slide the screen to Category Hot Free New Hot Free Fastest Rise and other interfaces to find popular software Click a favorite sof...

Page 28: ...completion of download Click Menu on the home page of the Play Store and the following Menu will pop up Select My Applications to view your Installed Applications and All Applications and reset your a...

Page 29: ...tively when using mobile phones in poorly received areas such as near tall buildings or basements Try to avoid this problem Use the mobile phone during intensive call times such as commuting time and...

Page 30: ...s dirt on the metal surface of the SIM card Wipe the metal contact point of the SIM card with a clean cloth Unable to connect to the network Invalid SIM card Contact your network provider Beyond GSM o...

Page 31: ...functions network provider or you have not requested it...

Page 32: ...complies with part 15 of the FCC Rules Operation is subject to the following two conditions 1 This device may not cause harmful interference and 2 this device must accept any interference received in...

Reviews: