


16
ASSEMBLY PROCEDURE 3D MOTORIZED SYSTEM
(BEFORE NOVEMBER 2023)
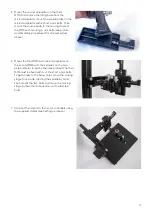
1 ⸀ Mount the 3D arm on the vertical post of the Laboratory Stand ⸀ To do
this, put the aluminium 昀椀nger bolts into the holes on the 3D arm and
mount the elongated nuts by one to two rounds ⸀ Slide the nuts into
the groove of the stand ⸀ Position the arm horizontally and tighten the
aluminium 昀椀nger bolts well with the provided tool.
2 ⸀
Mount the 昀椀rst Motor Stage (MMS) on the 3D arm using
4 of the long 4 mm bolts ⸀ Move the moving stage on the
MMS to one side by rotating the spindle by hand ⸀ This
will expose two of the 昀椀xing holes (see picture). Mount
the 2 bolts and move the moving stage to the other
side to expose the other two 昀椀xing holes and mount
the bolts ⸀
3 ⸀
Mount the 3D angle on the 昀椀rst MMS. This is 昀椀xed
using two 6 mm bolts as indicated in the picture ⸀
4 ⸀ Mount the second MMS on the 3D angle using
two long 4 mm bolts (see picture) ⸀ Make sure the
second stage is horizontal and tighten the bolts
well ⸀
3D Arm
Moving stage
Fixing holes
Spindle
Fixing holes
3D Angle
Fixing holes


