


•
Turn to 1 (0.1s)
: The time the ADF takes to lighten after welding becomes shorter. The shortest time
is about 0.1s depending on the welding point temperature and shade setting. This setting is ideal
for track welding or production welding with short welds.
•
Turn to 5 (0.9s)
: The time the ADF takes to lighten after welding becomes longer. The longest time
is about 0.9s depending on the welding point temperature and shade setting. This setting is ideal
for welding at high amperage where there is an afterglow from the weld.
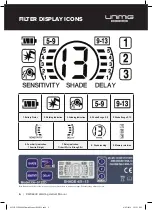
GRIND SELECTION
Press
WELD/GRIND
button (13) repeatedly until
Icon 3
appears on the screen and the red light on the
button flashes. Additionally,
Icon 8
will show shade 4.
Note: Do not weld in the Grind mode, the ADF will not darken.
MEMORY SETTING
The three most frequently used settings can be stored and reactivated easily by using the
3 MEMORY
buttons (12) on the right side of the screen.
Upon use of this helmet, the last ADF settings will be stored automatically (stored about 5 minutes
after). The next time when you start to weld, the last settings will be automatically re-activated.
• If you want to store a complete welding setting, press and hold one of the memory buttons and
release when the
Icon 9
stops flashing.
• To activate the stored memory, press the memory button.
Note:
Only in welding mode you can activate the memory. Change to welding mode if you are
currently using the grinding function.
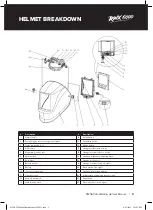
HEADGEAR ADJUSTMENTS
The harness can be adjusted for better comfort during operation. The
Headband Adjustment Button
(23)
adjusts the size of the headband. The
Segmental Positioning Plate (24)
adjusts the viewing
angle. The
Headband Tightness Knob (19)
adjusts the tightness of the headband.
BATTERY INDICATOR
Icon 1
indicates battery status. Replace the battery when it is low; otherwise, the ADF switching time
will become slower, and shade accuracy will be compromised.
POWER SUPPLY AND REPLACING THE BATTERY
The power of the auto-darkening helmet is provided by solar cells and a CR2450 lithium battery. To
change the battery, open the Battery holder (8) at the side of the ADF and replace the battery (9).
OPERATING INSTRUCTIONS
8
| RWX6000 Welding Helmet Manual
0356 RWX6000 Helmet Manual MAY19.indd 8
8/05/2019 3:53:53 PM


