Unify OpenScape WLAN Phone WL4 Installation Manual Download Page 4

Introduction

Safety

 Introduction

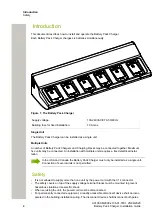
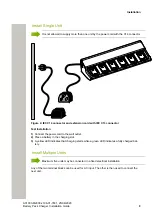
This document describes how to install and operate the Battery Pack Charger.
Each Battery Pack Charger charges six batteries simultaneously.

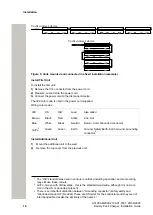
Figure 1: The Battery Pack Charger
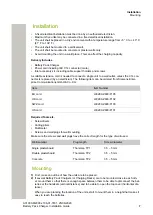
Supply voltage:

100-240VAC/0.7A 50/60 Hz

Building fuse for fixed installation:

10 A max.

Single Unit

The Battery Pack Charger can be installed as a single unit.

Multiple Units

A number of Battery Pack Chargers and Charging Racks may be connected together. Maximum

five units may be connected. An installation with multiple units requires a fixed electrical instal-

lation.

In the USA and Canada the Battery Pack Charger must only be installed as a single unit.

Connection of several units is not permitted.

 Safety

• It is not allowed to supply more than one unit by the power cord with the C14 connector.

• The safety covers on top of the supply voltage terminal blocks must be mounted to prevent

hazardous situations, like electric shock.

• When servicing the unit, the power cord must be disconnected.

• For permanently connected equipment, a readily accessible disconnect device shall be incor-

porated in the building installation wiring. The disconnect device shall disconnect both poles.

A31003-M2000-J106-01-7631, 25/06/2020

4

Battery Pack Charger, Installation Guide

Summary of Contents for OpenScape WLAN Phone WL4

Page 1: ...Battery Pack Charger OpenScape WLAN Phone WL4 WL4 Plus Installation Guide A31003 M2000 J106 01 7631...

Page 2: ...ify Software and Solutions GmbH Co KG 25 06 2020 All rights reserved Reference No A31003 M2000 J106 01 7631 The information provided in this document contains merely general descriptions or characteri...

Page 3: ...pliance Statements USA Canada only 5 2 Installation 7 2 1 Mounting 7 2 1 1 Remove the Top Cover 8 2 2 Electrical Installation 8 2 2 1 Install Single Unit 9 2 2 2 Install Multiple Units 9 2 3 Charging...

Page 4: ...ts requires a fixed electrical instal lation In the USA and Canada the Battery Pack Charger must only be installed as a single unit Connection of several units is not permitted Safety It is not allowe...

Page 5: ...stances or affect the declaration of substances used in products can be found in the Unify Expert WIKI at http wiki unify com under the section Declarations of Conformity Regulatory Compliance Stateme...

Page 6: ...or modifications to the equipment not expressly approved by the party responsible for compliance could void the user s authority to operate the equipment A31003 M2000 J106 01 7631 25 06 2020 6 Batter...

Page 7: ...ns GmbH Co KG Item Item Number EU cord L30280 Z600 F105 UK cord L30280 Z600 F102 SWZ cord L30280 Z600 F103 US cord L30280 Z600 F101 Required Tools etc Screwdrivers Cutting pliers Multimeter Screws and...

Page 8: ...wall with four screws 400 290 70 5 Figure 2 Mounting dimensions in mm Charging Rack seen from back Remove the Top Cover Remove the top cover by first pressing on the sides of the top cover then liftin...

Page 9: ...to the wall outlet 2 Place a battery in the charging slot 3 A yellow LED indicates that charging starts while a green LED indicates a fully charged bat tery Install Multiple Units Maximum five units m...

Page 10: ...Green Earth Ground Safety Earth Earth Ground Grounding conductor 3 Install Additional Unit 1 Mount the additional unit to the wall 2 Remove the top cover from the previous unit 1 The Old standard was...

Page 11: ...ver 4 Mount the cable support holder at the unused opening on the previous unit The cable sup port holder is provided in the parts bag Figure 7 Remove safety cover 5 Remove the C14 connector from the...

Page 12: ...markings L earth symbol and N Figure 8 Terminal block for power cord 9 Secure the power cord with two screws which are provided in the parts bag Figure 9 Securing the power cord 10 Mount the safety co...

Page 13: ...lly charged bat tery Operation When the charger is connected to external power supply normal operation is done as follows Charging 1 Connect the charger to the AC power supply 2 Place a battery in the...

Page 14: ...shooting Fault Solution Charging does not start Check that the battery is properly inserted in the charger Check the AC power supply connection A31003 M2000 J106 01 7631 25 06 2020 14 Battery Pack Cha...

Reviews: