


5
1
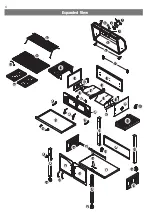
Chimney
2
Temperature Gauge
3
Brand Plate*
4
Lid Handle
5
Lid
6
Top Hinge (2)
7
Bottom Hinge (2)
8
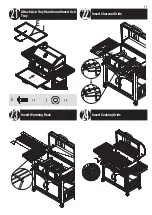
Warming Rack
9
Cooking Grid (3)
10
Charcoal Pan (2)
11
Side Shelf (2)
12
Left Body Panel
13
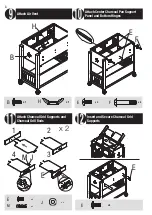
Charcoal Pan Support Panel (2)
14
Rear Body Panel
15
Charcoal Pan Support Handle Support (2)
16
Charcoal Pan Support Rod (4)
17
Center Charcoal Pan Support Panel
18
Charcoal Door Handle Support (2)
19
Right Body Panel
20
Front Body Panel
21
Charcoal Grid Handle (2)
22
Charcoal Door Handle (2)
23
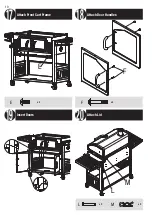
Ash Tray
24
Ash Tray Handle
25
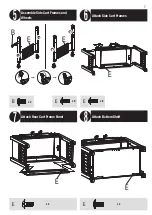
Cart Frame Panel (2)
26
Left Rear Leg
27
Front Cart Frame
28
Wheel (2)
29
Rear Cart Frame Panel
30
Right Rear Leg
31
Bottle Opener
32
Left Front Leg
33
Left Door
34
Right Door
35
Door Handle (2)
36
Right Front Leg
37
Locking Wheel (2)
38
Base
39
Magnet (4)*
40
Cooking Grid Handle
41
Air Vent
* Pre-assembled
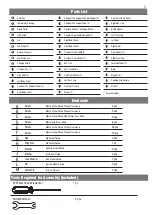
Parts List
Hardware
A
Screw
M4x10 Nickel Plated Phillips Truss Head
4 pcs
B
Screw
M5x10 Nickel Plated Phillips Truss Head
3 pcs
C
Screw
M5x15 Nickel Plated Step Phillips Truss Head
4 pcs
D
Screw
M6x15 Axial Truss Head
6 pcs
E
Screw
M6x15 Nickel Plated Phillips Truss Head
58 pcs
F
Screw
M6x35 Nickel Plated Phillips Truss Head
12 pcs
G
Nut
M8 Nickel Plated
2 pcs
H
Wing Nut
M5 Nickel Plated
1 pc
I
Washer
ø6.5x18 Nickel Plated
4 pcs
J
Washer
ø10 Nickel Plated
2 pcs
K
Lock Washer
ø8.5 Nickel Plated
2 pcs
L
Pin
ø6 x 45 Nickel Plated
2 pcs
M
Cotter Pin
ø1.4 x 30 Black
4 pcs
Tools Required for Assembly (Included)
#2 Phillips Head Screwdriver 1 pc
M10-M8 Wrench 2 pcs
Summary of Contents for Select CBC1684W-U
Page 12: ...12 D Attach Tool Holder Screws 25 D x 6...
Page 16: ...16...