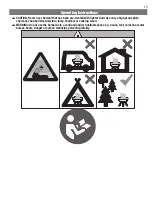
Uniflame Select CBC1684W-U Owner'S Manual Download Page 15

15 


W

CAUTION:  
1.  All cleaning and maintenance should be done when grill is cool and with the ashes properly disposed 

of.

2.  Do NOT clean any grill part in a self-cleaning oven. The extreme heat will damage the finish.

Notices

1.  This grill should be thoroughly cleaned and inspected on a regular basis. 
2.  Abrasive cleaners will damage this product. 
3.  Never use oven cleaner to clean any part of grill.

Before Each Use

1.  Keep the grill area free and clear from any combustible materials, gasoline, and other flammable vapors and liquids.
2.  See below for proper cleaning instructions.
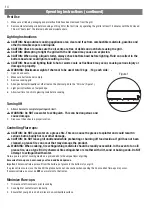
Cleaning Surfaces

1.  Wait for grill to fully cool.
2.  Wipe surfaces clean with a mild dishwashing detergent or baking soda mixed with water. 
3.  For stubborn stains, use a citrus-based degreaser and a nylon scrubbing brush.
4.  Rinse clean with water. 
5.  Allow to air dry.

Before Storing

1.  Wait for grill to fully cool.
2.  Clean all surfaces.
3.  If storing the grill indoors, cover the grill and store in a cool dry place.
4.  If storing the grill outdoors, cover the grill with a grill cover for protection from the weather.

Cleaning and Care

Refund information

28 day no quibble refund. If you’re not delighted by your product, simply bring it back within 28 days for a no quibble refund. Don’t forget to 
include all of the item’s original components and packaging along with your receipt or other proof of purchase.

Customer Services Information

If you require further information or advice regarding your product or experience any problems please contact customer services at the 
telephone number, e-mail or address below. When calling or writing please quote the product spec code or model number.
Spec Code: 505478106505.2019 / Model number: CBC1684W-U

Contact Us

Customer Services: 0800 9520101 / [email protected]

Visit our website: www.asda.com
Product for ASDA Stores Ltd, Southbank, Great Wilson Street, Leeds, LS11 5AD

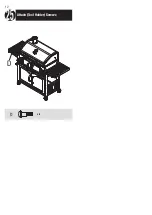
Summary of Contents for Select CBC1684W-U

Page 1: ...and instructions when using the appliance 7 Keep this manual for future reference FOR YOUR SAFETY Do not use spirit petrol or comparable fluids for lighting or re lighting WARNING FOR YOUR SAFETY For...

Page 2: ...in 7 62 m of this appliance W W Do NOT block holes in sides or back of grill W W Inspect grill before each use W W Do NOT alter grill in any manner Any alteration will void your warranty W W Do NOT bu...

Page 3: ...ance from all structures and combustible materials W W With a garden hose completely wet the surface beneath and around grill to extinguish any ashes coals or embers that may have fallen during the co...

Page 4: ...4 Expanded View 16 16 18 20 11 41 21 21 23 22 29 27 24 28 26 25 30 37 37 25 39 38 36 34 33 32 31 28 35 10 40 1 2 3 4 6 7 8 9 11 12 13 13 19 5 15 15 17 14...

Page 5: ...32 Left Front Leg 33 Left Door 34 Right Door 35 Door Handle 2 36 Right Front Leg 37 Locking Wheel 2 38 Base 39 Magnet 4 40 Cooking Grid Handle 41 Air Vent Pre assembled Parts List Hardware A Screw M4x...

Page 6: ...fore completing each step go back and fully tighten all hardware Be careful not to overtighten That could damage surfaces or strip threads 4 For best results complete each step in the order presented...

Page 7: ...7 Attach Side Cart Frames 6 Assemble Side Cart Frames and Wheels 5 B x 2 E x 8 E x 8 Attach Bottom Shelf 8 Attach Rear Cart Frame Panel 7 B E E E E E E x 4 E x 4 32 26 30 36...

Page 8: ...nter Charcoal Pan Support Panel and Bottom Hinges 10 Attach Charcoal Grid Supports and Charcoal Grill Rods 11 Insert and Secure Charcoal Grid Supports 12 H E F B 1 2 x 2 4 3 M J E E B x 1 H x 1 E x 3...

Page 9: ...9 Attach Magnets 16 Attach Charcoal Grid Supports and Charcoal Grid Support Handle 13 Attach Left Side Shelf 15 Attach Right Side Shelf 14 A x 4 c x 2 c x 2...

Page 10: ...10 Attach Door Handles 18 Insert Doors 19 Attach Lid 20 Attach Front Cart Frame 17 E F L M F x 4 E x 4 L x 2 M x 2...

Page 11: ...11 Attach Ash Tray Handle and Insert Ash Tray 21 Attach Ash Tray Handle and Insert Ash Tray 21 I I E E E x 2 I x 2 E x 2 I x 2 Insert Charcoal Grids 22 Insert Warming Rack 23 Insert Cooking Grids 24...

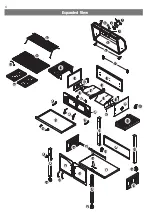
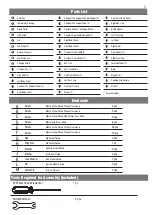
Page 12: ...12 D Attach Tool Holder Screws 25 D x 6...
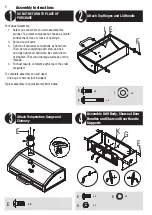
Page 13: ...uid Use only a high grade plain charcoal charcoal wood mixture lump charcoal or cooking wood W W WARNING Do not use the barbecue in a confined and or habitable space e g house tent caravans motor home...

Page 14: ...ng coals before cooking Turning Off 1 Allow charcoal to completely extinguish itself W W WARNING Do NOT use water to extinguish This can be dangerous and cause damage 2 Dispose of the ashes in a prope...

Page 15: ...fore Storing 1 Wait for grill to fully cool 2 Clean all surfaces 3 If storing the grill indoors cover the grill and store in a cool dry place 4 If storing the grill outdoors cover the grill with a gri...

Page 16: ...16...

Reviews: