background image

Assembly and Maintenance

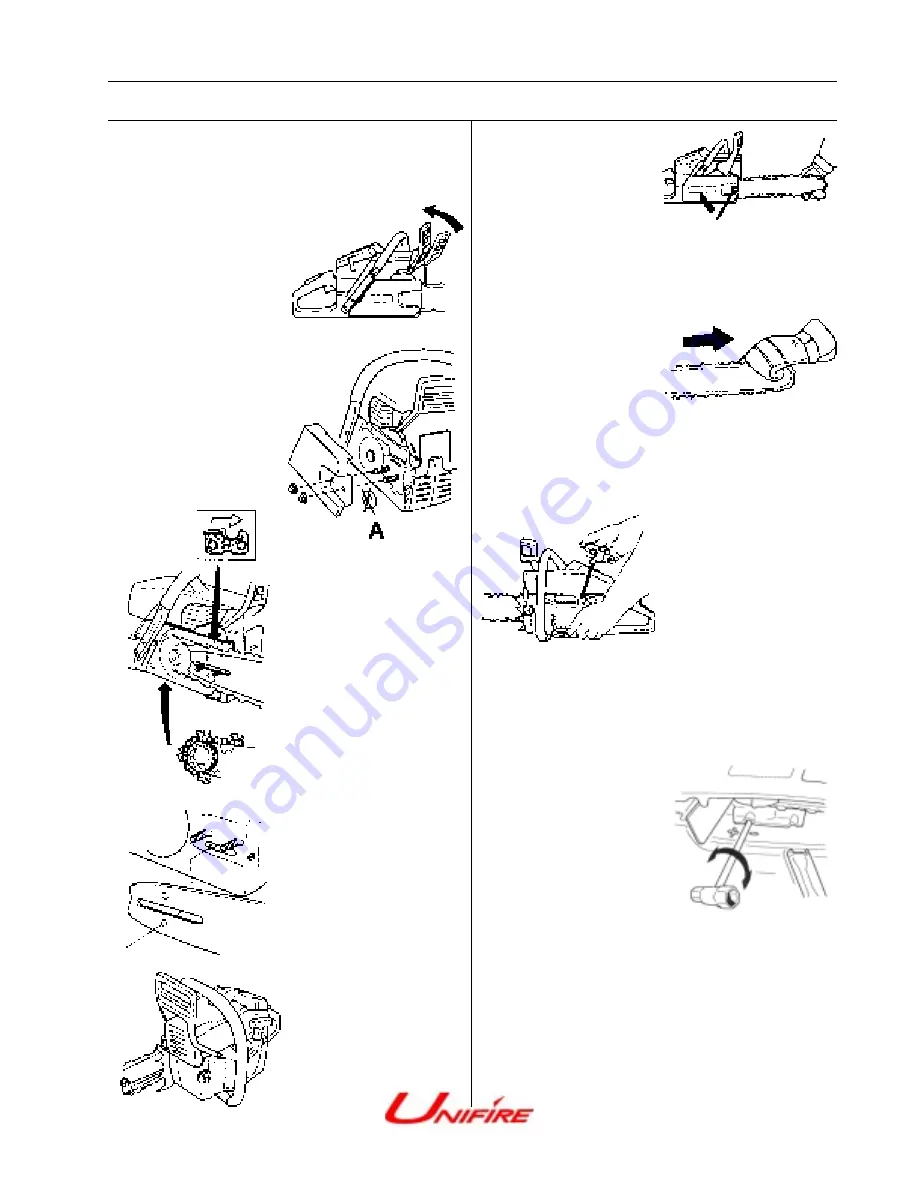
Check that the chain
brake is in disengaged
position by moving the
front hand guard towards
the front handle.

Take off the bar nuts and
remove the clutch cover.
Take off the transportation
ring (A).

Fit the bar over the bolts.
Place the bar in its
rearmost position. Place
the chain over the drive
sprocket and in the
groove on the bar. Begin
on the top side of the bar.
Make sure that the edges
on the cutting links are
facing forward on the top
side.

Fit the clutch cover and
locate the chain adjuster
pin in the hole on the bar.
Check that the drive links
of the chain fit correctly
on the drive sprocket and
that the chain is in the
groove on the bar. Tighten
the bar nuts finger tight.

Tension the chain by using
the combination wrench.
Turn clockwise. The chain
should be tensioned until
it fits snugly.

Hold up the tip of the bar
and tighten the chain. The
chain is correctly
tensioned when there is
no slack on the underside
of the bar, but it can still
be turned easily by hand.
Hold up the bar tip and
tighten the bar nuts with
the combination wrench.

When fitting a new chain
the chain tension has to
be checked frequently
until it is run-in. And then
check the tension on a
regular basis.

Starter Device Assembly

Assemble the starter
device, by pulling the
starter cord out first, then
place the starter against
the crankcase. Then
slowly release the starter
cord so that the pulley
engages with the pawls.

Assemble and tighten the
screws, which hold the
starter

Adjustment of oil pump

The oil pump is adjust-
able. Adjustments are
made by turning the
screwdriver or combina-
tion spanner.

Turning the screw clock-
wise will reduce the oil
flow and turning the screw
anti-clockwise will in-
crease the oil flow.

Recommended settings:

Bar

     -15”: 1 turn from the closed position

Bar

15”-18”: 2 turns from the closed position

Bar

18”-24”: 3 turns from the closed position

Bar

  24”-   : 4 turns from the closed position

Always wear gloves when working with the
chain, in order to protect your hands from injury!

Mounting Guide Bar and Chain

Page 4

Summary of Contents for Saw

Page 1: ...High Performance Ventilation Chain Saws 3924 E Trent Ave Spokane WA 99202 509 535 7746 509 535 9064 1 800 745 3282...

Page 2: ...performance ventilation saw This saw has been designed to meet the rugged require ments of the fire service To ensure maximuim performance and reliability this saw s carburator should be set for the...

Page 3: ...Pull the starter handle with your right hand and pull out the starter cord slowly until the starter pawls engage Then pull sharply Push the choke control immediately when the engine ignites and make...

Page 4: ...operate on unleaded gasoline Gasoline Two stroke Oil Lit 5 10 15 20 US GALLON 1 1 1 2 5 0 10 0 20 0 30 0 40 US fl oz 2 1 2 6 1 2 12 7 8 Mixing Always mix the gasoline and oil in a clean con tainer in...

Page 5: ...s no slack on the underside of the bar but it can still be turned easily by hand Hold up the bar tip and tighten the bar nuts with the combination wrench When fitting a new chain the chain tension has...

Page 6: ...ug first Changing a broken starter cord Loosen the screws that hold the device against the crank case and remove the starter device Pull out the cord approx 30 cm and lift it up into the notch in the...

Page 7: ...clockwise until the stop If the engine has bad acceleration or erratic idling turn the L needle counter clockwise until good idling and acceleration Final setting for the idling speed T The high spee...

Page 8: ...6 Sharpen the chain and check its tension and condition Check the drive sprocket for wear Replace if necessary 7 Check the starter and starter cord for wear or damage Clean the air intake slots on the...

Page 9: ...sitions using the template provided For precise drilling use a center punch 3 Replace the bar onto the powerhead and install chain Adjust chain to proper tension 4 Slide Depth Gauge over bar and chain...

Page 10: ...aded For a standard cut simply push saw bar and chain into cut area the guage will automatically slide back When the saw is pulled out of the cut then the depth guage automati cally springs forward to...

Page 11: ...ndle 9 Stop switch Ignition on off switch 10 Fuel tank 11 Muffler 12 Bar tip sprocket 13 Saw chain 15 Saw bar 16 Bumper 17 Chain catcher Catches chain if it jumps or breaks 18 Clutch cover 19 Right ha...

Reviews: