background image

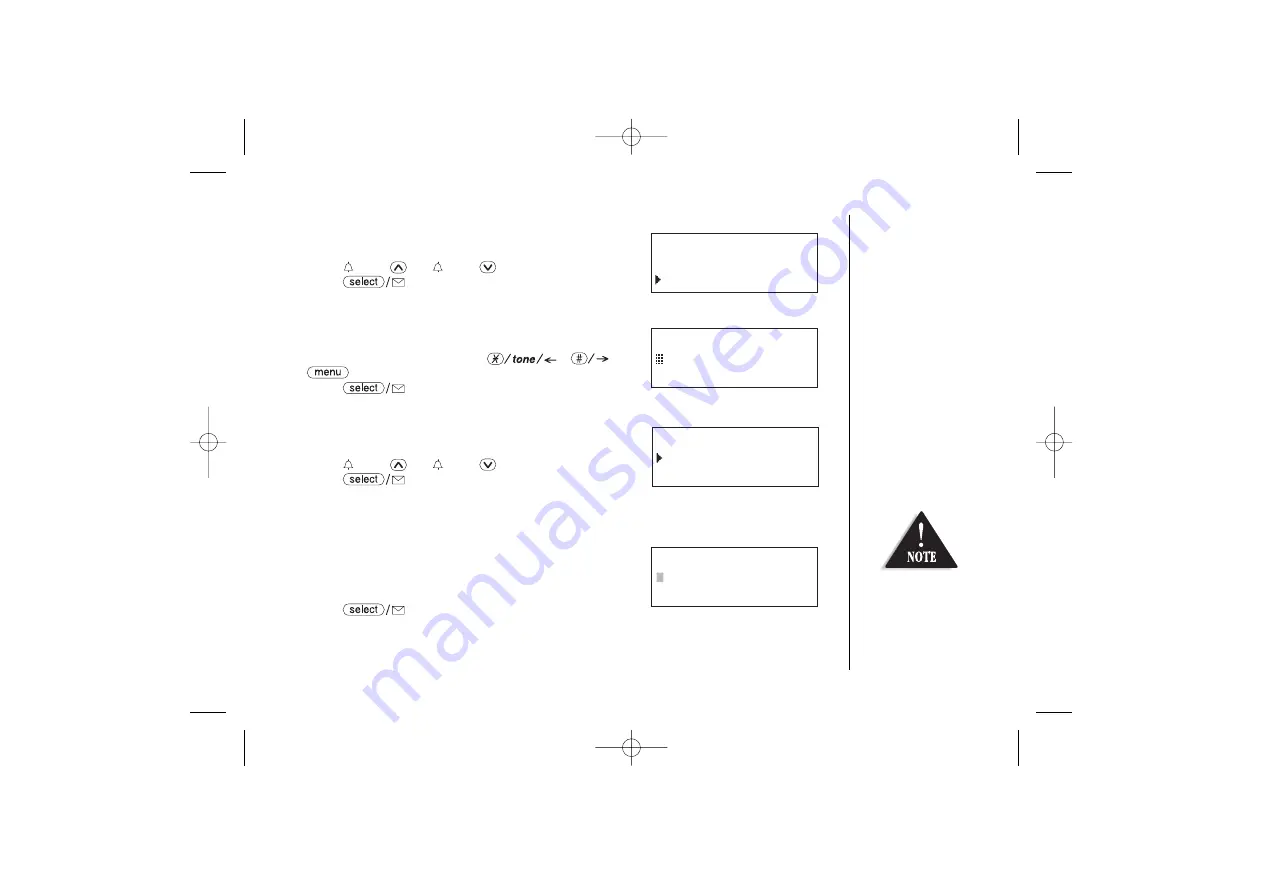
Setting the Anykey Answer

1) Enter the Handset Setup menu, and then the Anykey

Answer submenu (see “Entering the Menu” on page 14).

2) Press 

/vol/

or 

/vol/

to select 

On

or 

Off

.

3) Press 

. You will hear a confirmation tone.

Setting the True Banner

1) Enter the Handset Setup menu, and then the Banner

submenu (see “Entering the Menu” on page 14).

2) Use the number keypad (

0-9

), , 

or

/del

to enter or edit the name.

3) Press 

. You will hear a confirmation tone. 

Setting the Key Touch Tone

1) Enter the Handset Setup menu, and then the Key Touch

Tone submenu (see “Entering the Menu” on page 14).

2) Press 

/vol/

or 

/vol/

to select 

On

or 

Off

.

3) Press 

. You will hear a confirmation tone.

Answering System Setup

Setting a PIN Code

1) Enter the Answ. Setup menu, and then the Security Code

submenu (see “Entering the Menu” on page 14).

2) Enter a two-digit PIN code (00-99) using the number

keypad (

0-9

).

3) Press 

. You will hear a confirmation tone.

[ 17 ]

     Banner
 _________ #1

 Anykey Answer
 On
 Off

Key Touch Tone
On
Off

 Security Code
80         

__

For Answering Setup
menu, you can also
set them from the
base (see page 45).

UP336BH (WDECT2355) ENG OM  12/28/04  9:18 AM  Page 17

All manuals and user guides at all-guides.com

Summary of Contents for WDECT 2355

Page 1: ...e Quick Start WDECT 2355 2355 1 Wide Band Digital Technology provides the clearest sound and the best privacy UP336BH WDECT2355 ENG OM 12 28 04 9 17 AM Page a All manuals and user guides at all guides...

Page 2: ...d the power outlet AVOID moisture AVOID Television sets and other electronic appliances AVOID Microwave ovens AVOID Computers AVOID other cordless telephones CHOOSE a central location Note Ringing wil...

Page 3: ...the AC adapter to the DC IN 9V jack and to a standard AC wall outlet Make sure the AC Adapter s remains switched ON at all times Use only the Uniden AC Adapter s supplied with this unit Start Here In...

Page 4: ...y sliding it up until it snaps into place Red Wire Black Wire 3 Set the base on a desk or tabletop 4 Raise the antenna to a vertical position Connecting the charger WDECT2355 1 only 1 Connect the AC a...

Page 5: ...nd that the handset makes good contact with the base charging contacts After installing the batteries in the handset charge your handset at least 15 20 hours During a power cut or if the AC adapter is...

Page 6: ...0 Steps for Entering Names and Special Characters 32 Viewing the Phonebook 34 Making Calls Using the Phonebook 35 Speed Dialing 35 Editing or Erasing a Stored Name Phone Number Distinctive Ring and Sp...

Page 7: ...ent 6 New Message LED 7 Handset Earpiece 8 LCD Display 9 del Key 10 vol Key a ringer volume control b scroll keys for display screen 11 Key 12 redial pause Key 13 speaker Key 14 Key 15 Key 16 Key 17 K...

Page 8: ...s on off Key 35 Greeting Key 36 Mem Key 37 Redial p Key 38 Flash Key 39 Base Charging Contacts 40 Intercom Key 41 Mute find handset Key 42 Hold Key 43 volume Key 44 Key speaker LED 45 Base Antenna 46...

Page 9: ...outside line while two other handsets are making an intercom call You can now place a fully featured cordless handset anywhere in your home or office where AC power is available to connect the handset...

Page 10: ...Call Transfer Handset Conferencing 2 Handsets Outside Call Two Way Communication between Handsets Anywhere without the Base Dual Keypad at Base Integrated Answering Device DND Feature Do Not Disturb R...

Page 11: ...apter 1 Also included This Owner s Manual Other Printed Material Throughout this manual terms such as Standby and Talk Mode are used Below is the terminology explanation Standby Mode The handset is no...

Page 12: ...ews into the wall with their appropriate anchoring device 100mm apart Allow about 3mm between the wall and screwheads for mounting the phone 2 Plug the AC adapter into the DC IN 9V jack on the telepho...

Page 13: ...basis by returning the handset to the charger after each phone call Low battery alert When the batteries are very low and need to be charged the phone is programmed to eliminate functions in order to...

Page 14: ...about one year Please contact your place of purchase or the Uniden Parts Department for a replacement battery Caution Use only the specified Uniden battery pack BT 446 Do not remove the batteries from...

Page 15: ...Example of the standby mode display ICON STATUS DESCRIPTION Standby Talk Battery icons indicate the handset battery status This icon cycles depending on the battery status full medium low and empty St...

Page 16: ...th family members or friends You must set the two handsets to DirectLink Mode to utilize this feature Room Monitor This feature allows you to monitor sounds in another room see page 15 for setup One h...

Page 17: ...will activate all programmed distinctive ring memory locations AutoTalk Allows you to answer the phone without pressing or speaker Default is on When the AutoTalk is set to on simply remove the handse...

Page 18: ...nswering system picks up after six rings if you have new messages and after nine rings if there are none see page 18 Record Time Set the duration for recording the incoming messages You have three rec...

Page 19: ...s use tone Australia only dialing which send DTMF tone through phone line The default is tone dialing Default is tone Depends on your dialing system set the dial mode Copy Phonebook Allow you to trans...

Page 20: ...on between the Handsets Anywhere without the Base 1 Enter the DirectLink Mode menu see Entering the Menu on page 14 To enter DirectLink mode press SELECT appears 2 Press to enter the DirectLink mode Y...

Page 21: ...g vol or vol 3 Press RoomMonitor appears and you hear sounds in the room where the handset is installed 4 To finish the Room Monitor press or return the handset to the cradle This is an example if you...

Page 22: ...2 Press vol or vol to move the pointer You will hear the ringer or polyphonic tone as you scroll through the options 3 Press You will hear a confirmation tone Distinctive Ringer Setup 1 Enter the Han...

Page 23: ...andset Setup menu and then the Key Touch Tone submenu see Entering the Menu on page 14 2 Press vol or vol to select On or Off 3 Press You will hear a confirmation tone Answering System Setup Setting a...

Page 24: ...You will hear a confirmation tone Setting the Message Alert On or Off 1 Enter the Answ Setup menu and then the Message Alert submenu see Entering the Menu on page 14 2 Press vol or vol to select on or...

Page 25: ...tone Setting Day and Time 1 Enter the Global Setup menu and then the Day Time submenu see Entering the Menu on page 14 2 Press vol or vol to select the day of the week and then press 3 Press vol or v...

Page 26: ...transfer the phonebook locations and then press If you choose All Memory in the step 2 Are you sure appears Press vol or vol to select Yes and then press The phonebook locations will be transferred to...

Page 27: ...Base Setting below Replacing the Base Setting 1 Enter the System Reset menu and then the Replacing Base submenu see Entering the Menu on page 14 Replace base appears 2 Press vol or vol to select Yes 3...

Page 28: ...the number 3 Dial the number dial tone OR OR 3 Dial the number Dial the number and then Dial the number and then press press speaker To hang up Press or return the handset to the cradle AutoStandby P...

Page 29: ...CING A CALL ON HOLD KEYPAD LOCK 1 During a call press transfer int com or hold on the base The call will be put on hold After 10 seconds of pressing transfer int com or by pressing the key the handset...

Page 30: ...be deleted 3 Press del 3 Press vol or vol to choose Yes 4 Press The redialed number is deleted Storing a Redial Record 1 Press redial pause in standby mode 2 Press redial pause repeatedly to display...

Page 31: ...has ended Redialing from the Base 1 Press on the base 2 Press redial p on the base The last number dialed from the base is redialed Ringer Mute You can temporarily mute the incoming ring When the han...

Page 32: ...t disturb on the base You will hear a confirmation tone and the DND LED illuminates To cancel press do not disturb again You can also mute the ringer tone while the phone is ringing by pressing do not...

Page 33: ...he tone feature only applies when the dial mode is set to pulse This special number can be stored in a memory location This is referred to as Chain Dialing see page 37 TRAVELING OUT OF RANGE During a...

Page 34: ...on the base The handset will still be connected to the call 3 WAY CONFERENCING Talk Privacy Mode On Normally the talk time duration is 7 hours however when the Clarity Booster is On the talk time dura...

Page 35: ...el paging press any key on the handset or mute find handset on the base When speaking on the base 1 Press or speaker on the handset to initiate the 3 way conversation 2 To hang up return the handset t...

Page 36: ...ed go to step 4 No Name will be used as the name 4 Press to store the name Store Edit No appears 5 Press the number keypad to enter the phone number up to 20 digits press to store the number STORING P...

Page 37: ...Done appears in the display If you choose not to store a Distinctive Ring simply select the No Selectn option If you choose not to store the name number as a Speed Dial simply select the No Selectn op...

Page 38: ...acters With each press of a number key the displayed character appears in the following order upper case letters first lower case letters next and finally the number corresponding to the key Number of...

Page 39: ...acters press and hold del For example to enter Movies 1 When the phone is in standby mode press phonebook 2 Press Store Edit Name appears 3 Press 6 once and then press to move the cursor to the right...

Page 40: ...phabetical order from first to last when you press vol from last to first when you press vol You can also use letters on the number keys to select the first letter of the desired name Press a number k...

Page 41: ...Press The number in the displayed phonebook location is dialed 4 To hang up press SPEED DIALING If you store a phone number in a speed dial memory location 10 locations SPD1 SPD0 you can use the speed...

Page 42: ...n page 30 to complete the editing operation 3 Press You will hear a confirmation tone b Deleting the Stored Data 1 When the phonebook location to be deleted appears press del Delete Memory appears 2 P...

Page 43: ...hone numbers in the base and make calls with memory dialing from the base Storing Phone Numbers 1 Press mem in standby mode 2 Enter the number you wish to store The number cannot exceed 20 digits 3 Pr...

Page 44: ...l information is stored in the Caller ID record If the Caller ID service includes the caller s name the name will appear in the display up to 15 characters You may receive any one of the following mes...

Page 45: ...w the Caller ID messages with alphabetical search press the number key pad 2 9 and 0 with the letter associated with the first letter of the desired message 3 To finish the viewing operation press or...

Page 46: ...2 Press del Delete All appears 3 Press vol or vol to choose Yes 4 Press You will hear a confirmation tone DELETING A CALLER ID MESSAGE Once the Caller ID data has been deleted the information cannot b...

Page 47: ...The phone number and name of the party on the Caller ID list can be stored in memory 1 When the phone is in standby mode view the Caller ID message to be stored Then press Store Edit Name appears 2 T...

Page 48: ...me and Day Announcement Remote Message Retrieval Toll Saver Conversation Recording Voice Memo Message Alert Hands Free Speaker Phone at Base Digital Tapeless Recording allows you to quickly review sav...

Page 49: ...flashes then there are new messages waiting for you 2 To turn the answering system off press ans on off After the announcement Answering System is off the message counter display will no longer be il...

Page 50: ...is in standby mode press and hold greeting 2 Start your recording after the announcement Record greeting The message counter displays then begins to count down 3 When you have finished recording your...

Page 51: ...he volume levels 1 being the softest and 10 being the loudest Answering System Settings To set the following six functions you must enter the menu mode To scroll through the menu options repeatedly pr...

Page 52: ...you hear the correct AM or PM setting The message counter displays A or P 9 Press SET to select the AM PM setting A confirmation tone sounds and the day and time you set are announced for your review...

Page 53: ...LECT until the desired ring time appears 3 Press SET to select the new ring time A confirmation tone sounds system announces the new ring time Selecting the message record time You have three record t...

Page 54: ...e Alert on and when a new message is received the alert tone will sound every 15 seconds Set the Message Alert to on or off by using clock MENU 1 Press clock MENU five times The current setting on or...

Page 55: ...is answering 2 To answer the call press or pick up the handset from the base when AutoTalk is set to On If the handset is away from the base press speaker or any number key or when Any Key Answer is...

Page 56: ...e received Repeating a message 1 Press play stop to review your messages The number of stored messages is announced 2 To repeat the current message press repeat SELECT after a few seconds of beginning...

Page 57: ...intain maximum record time delete the old messages 1 Press play stop to review your messages 2 Press delete at anytime during the message to delete the message You hear a confirmation tone and the mes...

Page 58: ...rom the base 1 During a conversation using the base speaker phone press and hold memo record on the base until you hear a confirmation tone The unit begins recording and flashes on the display A confi...

Page 59: ...here after must be entered within 2 seconds You may select a command from the following chart REMOTE OPERATION Command Function Command Function then 1 Repeat a Message then 6 Answering System On then...

Page 60: ...in standby mode press on the handset Remote Answering Machine operation appears on the handset display The answering system announces the current time and the number of messages stored in the memory...

Page 61: ...hear intermittent beeps indicating that the system is waiting for a command You may enter another command at this time from the chart above 5 When you are finished hang up or press to exit the system...

Page 62: ...s EXPANDING YOUR PHONE IMPORTANT If you purchase a WDECT2305 extra handset please register the handset to the WDECT2355 series base before use The WDECT2305 will not operate until it is registered If...

Page 63: ...se unit to begin registration 3 While the handset is registering Handset Registering will appear in the LCD When Registration Complete is displayed the handset has been registered to the base If Regis...

Page 64: ...ou wish to DirectLink with by pressing the number keys 1 4 Your handset will then page the other handset 3 On the receiving handset press or if Any Key Answer is on press any number key or 4 When you...

Page 65: ...he receiving handset or the base to answer the call press or transfer int com or intercom or on the base Or press any number key or when Any Key Answer is on or pick up the handset from the cradle whe...

Page 66: ...elect the handset you want to talk with by pressing the number key 1 4 To page all the handsets press An intercom tone sounds To cancel the transfer press intercom or on the base 3 On the receiving ha...

Page 67: ...all the handsets you have see page 21 2 To register all the handsets do the following steps 1 Place a handset one at a time in the base 2 Registration starts automatically While registering Handset Re...

Page 68: ...ning To avoid the risk of personal injury or property damage from fire or electrical shock only use the Uniden battery model and Uniden adapter model specifically designated for this product Caution U...

Page 69: ...d wall outlet Disconnect the AC adapter for a few minutes then reconnect it Remove the base ID see Replacing the Base Setting on page 21 and register the handset see Register the Handset on page 57 Ma...

Page 70: ...Handset to the Base on page 57 The handset doesn t communicate Remove the base ID see Replacing the Base Setting on page 21 and with another handsets register the handset see Register the Handset to t...

Page 71: ...ou are using the correct PIN number features from another touch Make sure that the touch tone phone you re using can transmit the tone phone tone for at least two seconds If it cannot you may have to...

Page 72: ...nk 14 Distinctive ringer 16 E F G H Earpiece volume 25 Expanding your phone 56 Global setup 13 Handset setup 16 Hands free conversation 22 Headset installation 9 I J K L Insert Zero 19 Intercom 59 Key...

Page 73: ...nces the number of messages stored in memory and the help guidance 3 To quit hang up the phone Turn on the answering system remotely 1 Call your phone and let it ring 15 times until you hear a beep 2...

Page 74: ...essages Skipping a Message Deleting a Message Stop Operation Answering System On Memo Record Stop Greeting Message Record Stop Answer System Off Help Guidance UP336BH WDECT2355 ENG OM 12 28 04 9 22 AM...

Page 75: ...ar the Base unit and handset WDECT2355 or base charger and handsets 2 WDECT2355 1 All accessories AC Adapter etc are covered for 90 days only STATEMENT OF REMEDY In the event that the product does not...

Page 76: ...adding the WDECT2305 Handset and Charger The WDECT2305 gives you the mobility you need to stay connected with friends and family Place this handset and charger in any convenient location no need for...

Reviews: