background image

13

Operation

Priority Channel

To set the Priority channel. 

1.   Press 

[MENU/ENTER]

 two times. The current priority watch channel flashes.

2.   Press any channel key on the base or handset to change the Priority Watch channel. 

3.   Press and hold

 [MENU/ENTER] 

to store the setting and  exit from the menu mode.

If SCAN is deactivated while it is tuned to an active channel, the AM Marine Radio will 

stay on that active channel.

If none of the channels are active, the AM Marine Radio will reinstate the scan start

channel. 

If OS/GS Scanning is initiated when there are no channels programmed in

OS/GS memory, an error tone will be heard and scanning will not start (see

Add/Remove Channels from SCAN Memory - below).

Add/Remove Channels from SCAN Memory

Select which Scanning Mode you wish to use  

OS or GS.

Select the channel you want to store.

Press and hold

 [SCAN/MEM]

 to add channel 

in SCAN memory . 

M

 icon appears 

and a short tone beep is heard.

To remove the channel from SCAN memory, 

press and hold 

[SCAN/MEM]

.

The 

M


icon disappears. 

AM TRANSCEIVER

UM423 AM.indd   13

28/9/11   11:58:45 AM

Summary of Contents for UM423 AM

Page 1: ...UM423 AM AM Marine Radio ...

Page 2: ...Beep On Off 16 Selecting the Call tone 16 ANL Automatic Noise Limiter 17 NB Noise Blanker 17 Using the PA feature 18 Using the Siren feature 18 Installing the Hardware 19 Mounting the radio 19 Connecting the radio 21 Connecting accessories 23 Connecting to an External Speaker 24 Connecting to an external PA Speaker 25 Maintenance and Toubleshooting 26 Common questions 26 Engine Noise Suppression 2...

Page 3: ...tput Connect optional PA speaker for Public Address and Siren Function Siren Alert Function Alert nearby vessels with connection of an optional PA speaker ANL Automatic Noise Limiter Function Reduces unwanted signal noise for better clarity NB Noise Blanker Function Reduces unwanted power or ignition noise One Touch Channel 88 Recalling Instantly switch to the emergency Ch 88 with the touch of one...

Page 4: ...g Started 4 What s included AM TRANSCEIVER UM423 AM Radio DC Power Cable Accessory Cable Mounting Bracket and knobs Mounting Hardware Microphone Hanger and Mounting Hardware Spare Fuse 250V 3A Getting Started ...

Page 5: ...ctor External AM antenna with a male PL259 SO238 connector and 50 Ω impedance Minimum 1 2m 3dB rated antenna for sailboats 2 4m 6 dB rated for power boats Connecting the radio page 22 Power connector Nominal 13 8 VDC power supply with negative ground 10 8 VDC to 15 6 VDC Red wire black wire Connecting the radio page 21 Accessory connector External speaker external PA speaker Connecting accessories...

Page 6: ...ton SIREN button SQUELCH knob turn clockwise to decrease channel noise Button Press to Press and hold to MENU Select the option in MENU mode Store new setting and exit MENU mode CHANNEL UP Move up one channel at a time Move quickly up the channels CHANNEL DOWN Move down one channel at a time Move quickly down the channels 88 DUAL Go to Channel 88 Dual Watch mode see page 10 SIREN Initiate siren to...

Page 7: ...nel from memory 88 DUAL MIC MIC PTT PUSH TO TALK button 88 DUAL Dual Watch button up button move up a channel down button move down a channel Microphone button functions Button Press to Press and hold to Move up one channel at a time Move quickly up the channels Move down one channel at a time Move quickly down the channels 88 DUAL Go to Channel 88 Dual Watch mode see page 10 PTT PUSH TO TALK Temp...

Page 8: ...nnel Operation Think of the squelch control as a gate If you turn Squelch fully clockwise it raises the Squelch gate so high that no signals get through If you turn the Squelch fully counterclockwise it lowers the Squelch Gate to the extent that all signals get through weak medium and strong signals and noise To set the Squelch Gate to the desired level turn the squelch knob counterclockwise until...

Page 9: ...g a Channel Press or keys on the handset or base to select the desired channel For your reference a list of the available channels corresponding frequencies and guidelines for their use is printed on page 28 AM TRANSCEIVER ...

Page 10: ... Call Tone cannot transmit on Emergency CH88 and CH86 The Call Tone Function is restricted to one transmission per minute If a second transmission is attempted within one minute then an error tone will sound Channel 88 Instantly switch to emergency Channel 88 Press 88 DUAL on the handset or base DUAL Watch Dual watch will monitor the Priority Channel and the current channel for activity Dual watch...

Page 11: ...e the radio more effectively Press SCAN MEM and Scanning starts The SCAN icon appears and blinks The scan direction can be changed at any time by pressing a channel key After transmission in scan mode the unit will wait 20 seconds for the signal to return otherwise scanning resumes If SCAN is deactivated while on an active channel the AM Marine Radio will stay on that active channel If no channels...

Page 12: ...ity Channel while scanning see page 13 for setting Priority Channel To use GS Mode Scanning press MENU ENTER one time and then press any channel key to change the GS setting to on Then press and hold MENU ENTER to save the setting GS icon appears on the display GS Scanning checks the Priority Channel for activity regularly If the Priority Channel becomes active the radio will stay on that channel ...

Page 13: ... If none of the channels are active the AM Marine Radio will reinstate the scan start channel If OS GS Scanning is initiated when there are no channels programmed in OS GS memory an error tone will be heard and scanning will not start see Add Remove Channels from SCAN Memory below Add Remove Channels from SCAN Memory Select which Scanning Mode you wish to use OS or GS Select the channel you want t...

Page 14: ...or OFF 3 Press MENU ENTER to store the setting 4 Press and hold MENU ENTER to exit from the menu mode If a button is not pressed within 10 seconds the AM Marine Radio will automatically exit the Menu Mode Back Light 1 Press MENU ENTER four times The Backlight setting flashes 2 Press any channel key on the base or handset change the setting between OFF LO and HI 3 Press MENU ENTER to store the sett...

Page 15: ... flashes 2 Press any channel key on the base or handset to change the setting between ON or OFF 3 Press MENU ENTER to store the setting 4 Press and hold MENU ENTER to exit from the menu mode If a button is not pressed within 10 seconds the AM Marine Radio will automatically exit the Menu Mode ...

Page 16: ...g 4 Press and hold MENU ENTER to exit from the menu mode Selecting the Call tone 1 Press MENU ENTER seven times The call tone setting flashes 2 Press any channel key on the base or handset change the setting between C1 C2 C3 C4 and C5 3 Press MENU ENTER to store the setting 4 Press and hold MENU ENTER to exit from the menu mode If a button is not pressed within 10 seconds the AM Marine Radio will ...

Page 17: ...terference 1 Press ANL NB the ANL icon appears 2 Press ANL NB to turn ANL off the ANL icon disappears NB Noise Blanker NB will reduce noise caused by some ignition interference 1 Press and hold ANL NB the NB icon appears 2 Press and hold ANL NB to turn NB off the NB icon disappears AM TRANSCEIVER AM TRANSCEIVER ...

Page 18: ...press the red SIREN key The SIREN icon appears and the UM423 AM sounds the siren tone via the Front speaker Microphone speaker and optional PA speaker After one cycle output the SIREN icon disappears and the UM423 AM stays in the PA mode 2 Continuous Siren Lift the siren cover and press and hold the red SIREN key until the end of the 3 second display count down The SIREN icon flashes and the UM423...

Page 19: ...y need to use some type of anchor with the mounting screws to hold the radio depending on the surface Keep the battery leads as short as possible Keep the antenna lead in wire as short as possible Allow free air flow around the heat sink on the rear of the radio Avoid interference with the ship s compass Install the radio into the mounting bracket and connect the 1 power cable and accessory cable ...

Page 20: ...se the template to mark the drill holes on the mounting surface Drill the holes for the mounting bracket be sure to follow any special 4 requirements of the mounting surface Remove the bracket from the radio and use the mounting hardware to 5 secure the bracket to the mounting surface Hex bolt Washer Spring washer Hex nut Mounting bracket Mounting surface Install the radio back into the mounting b...

Page 21: ...Power leads should be kept as short as possible A direct connection to the power supply is ideal Minimum of 14 AWG copper wire for extensions up to 6m 12 AWG wire for extensions from 6m to 10m or 10 AWG wire for extensions from 10 to 18m Male PL 259 connector 50 Ω impedance Minimum 1 2m 3 dB rated antenna for sailboats or 2 4m 6dB rated antenna for powerboats Minimum RG 58 lead in wire for antenna...

Page 22: ...f the UM423 AM The power connector only fits one way NOTE To extend the life of the radio use waterproof tape to seal electrical connections Install your antenna according to the manufacturer s instructions 4 See Antenna Selection and Installation on page 29 for more details 5 Connect the PL 259 connector from the antenna lead in wire to the 6 SO238 connector labeled ANTENNA on the back of the UM4...

Page 23: ...ecting accessories 13 8V DC Accessory cable Accessory connector Green Not Used Orange Not Used Bare wire Ground Red External Speaker Brown PA Speaker Blue PA Speaker GND Black Ext Speaker GND Yellow Not Used Line up arrows to connect ...

Page 24: ...ssory cable from the accessory connection on the radio Connect the BLACK wire of the 2 accessory cable to the GROUND WIRE of your external speaker Connect the RED wire of the 3 accessory cable to the POSITIVE WIRE of your external speaker Be certain all wire connections are secure and that all open wires are 4 adequately covered If you are finished connecting all external accessories line up the 5...

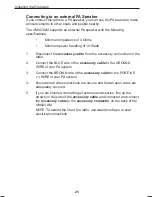
Page 25: ...nnection on the radio 2 Connect the BLUE wire of the accessory cable to the GROUND WIRE of your PA system 3 Connect the BROWN wire of the accessory cable to the POSITIVE WIRE of your PA system 4 Be certain all wire connections are secure and that all open wires are adequately covered 5 If you are finished connecting all external accessories line up the arrows on the side of the accessory cable and...

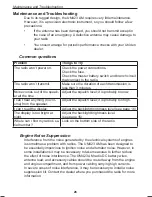
Page 26: ...ear anything no vol ume from the speaker Adjust the squelch level it is probably too high I can t read the display Adjust the backlight brightness level see page 16 The display is too bright at night Adjust the backlight brightness level see page 16 Where can I find my radio s se rial number Look on the bottom side of the radio Engine Noise Suppression Interference from the noise generated by the ...

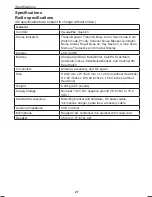
Page 27: ...ter Call PA Scan Mem Automatic noise Limiter Noise Blanker and Channel 88 Dual Watch Connectors Antenna accessory and DC power Size H 66 6 mm x W 162 6 mm x L 128 mm without Heat Sink H 2 62 inches x W 6 40 inches x L 5 04 inches without Heat Sink Weight 0 93kg 2 05 pounds Supply Voltage Nominal 13 8V DC negative ground 10 8 VDC to 15 6 VDC Standard Accessories Mounting bracket and hardware DC pow...

Page 28: ...720 Pro Fishing Calling ship ship shore shore 82 27 820 Pro Fishing Calling ship ship shore shore 86 1 27 860 Distress Safety Calling supp to 27 880 88 1 27 880 Distress Safety Calling 90 27 900 Non commercial Calling ship shore 91 27 910 Non commercial Calling ship shore 94 27 940 Non commercial Calling ship shore ship 96 27 960 Non commercial Calling ship ship 98 27 980 Rescue etc Calling ship s...

Page 29: ...antenna is the responsibility of the user or installer The antenna used with this radio should be installed using the following guidelines to ensure a safe distance between the antenna and persons close by Small whip antennas 3 dB or smaller should be installed with at least 1m away from any area where people are likely to be Larger antennas 6 dB or 9 dB should be installed with at least 2m away W...

Page 30: ...numbers addresses and images that may be stored on your Product Statement of Remedy If the Product is found not to conform to this warranty as stated above the Warrantor at its discretion will either repair the defect or replace the Product without any charge for parts or service This warranty does not include any reimbursement or payment of any consequential damages claimed to arise from a Produc...

Page 31: ... Bracket Template 22 mm 0 87 in 7 8 156 mm 6 14 in 6 5 32 5 5 mm 0 2 in 7 32 18 5 mm 0 73 in 3 4 22 mm 0 87 in 7 8 36 mm 1 42 in 1 7 16 40 mm 1 6 in 1 9 16 15 5 mm 0 61 in 5 8 53 mm 2 1 in 2 3 32 8 mm 0 31 in 5 16 ...

Page 32: ... 2011 Uniden Australia Pty Limited Printed in PRC UTZZ01378ZA 0 ...

Reviews: