background image

38

39


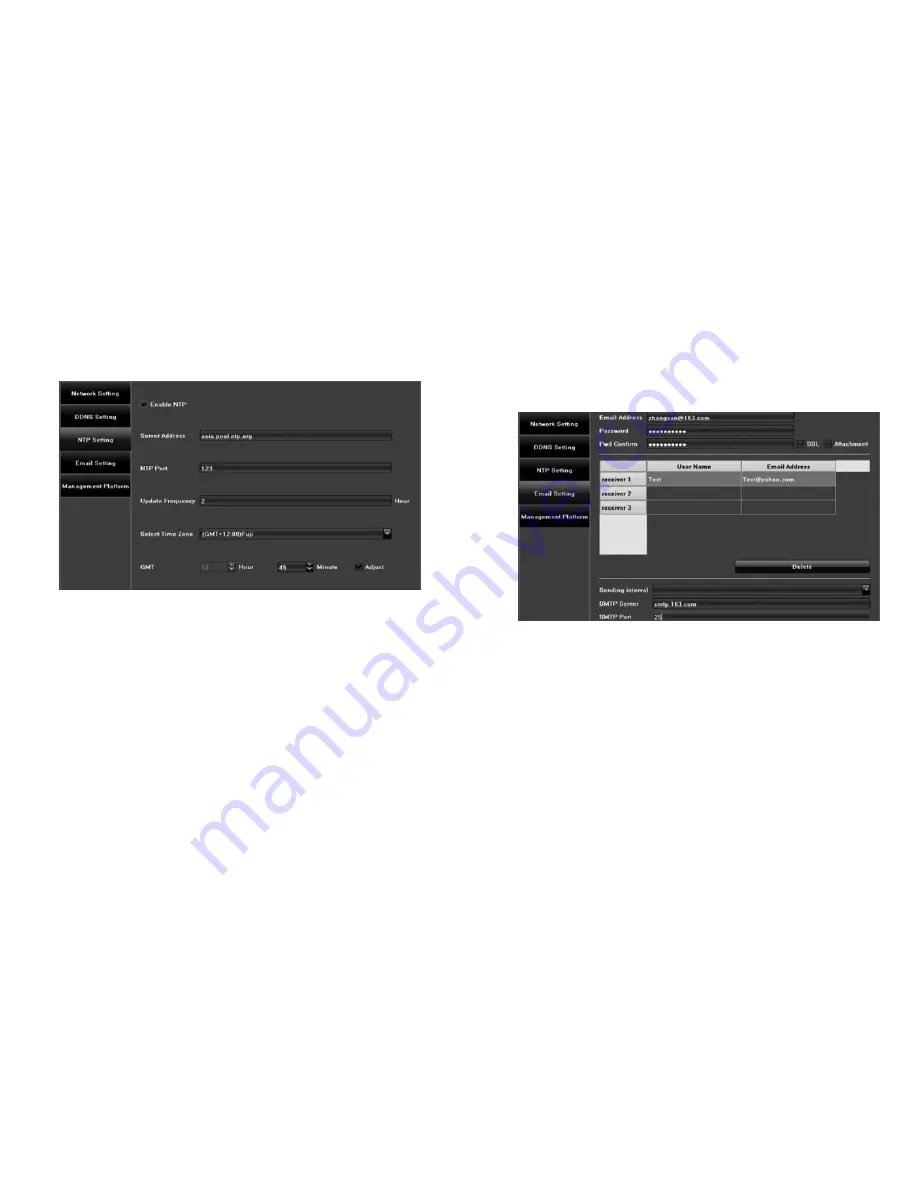
4.3.3 NTP Setting


• 

Server Address:

 Input the IP address of the NTP server. The 


  default is: asia.pool.ntp.org.

 • 

NTP Port: 

This NTP only supports TCP transmission, the 


  default is 123.

 • 

Update Frequency:

 Input the time interval in hours of how 


  often you would like to update, the default is 2 hours. 

 • 

Select Time Zone:

 Select from different time zone options. 

 • 

GMT:

 Make fine adjustments to the time settings.

NTP Settings Screen

Email Settings Screen


4.3.4 Email Settings  


Set up parameters so the DVR can send status messages about 


motion detection or other events through email notifications. 


Outbox address: 

 Password: 


Receiver address: 


SMTP server:


SMTP port:

 25 

Summary of Contents for Pro7400H1

Page 1: ...Pro7400H1 Hybrid DVR User Manual...

Page 2: ...7 Video Mask Setting 31 4 3 Network 33 4 3 1 Network Setting 34 4 3 1 1 Advanced Setting 36 4 3 2 DDNS Setting 37 4 3 3 NTP Setting 38 4 3 4 Email Setting 39 4 3 5 Management Platform 40 4 4 Alarm 41...

Page 3: ...own the System Hover over Start on the Main Menu with your cursor to view the Start Sub Menu and access the following options 2 1 Main Menu Start Sub Menu Items Main Menu Start Sub Menu DVR Login Scre...

Page 4: ...Logout Clicking Logout will kick off the current user and display the login screen for the next user to login Device Time Clicking on Device Time will open or close the DVR s time settings Volume Clic...

Page 5: ...logging in showing the current video feeds for each individual channel The example below contains 8 channels 4 System Configuration Settings The DVR s main configuration settings are located under Set...

Page 6: ...to the NVR will appear and you can modify the settings for each When you click the check box in front of any of the listed IP cameras the IP camera will be added to the channel window on the right Cl...

Page 7: ...l and check Enable to enable a channel Protocol Select a protocol type from Onvif Standard protocol I8 Private protocol I9 Private protocol and RTSP protocol Address Edit and modify the IP address man...

Page 8: ...rameters that needed to be removed and click the button Device Info Click Device Info on the Setting menu to input or modify the DVR s information Click Save to continue Device Info Check and modify t...

Page 9: ...he CD Channel Choose the channel you would like to modify Local Camera Name Enter the camera s name you would like displayed on the channel Time Format Choose from a 24 hour or 12 hour time display Da...

Page 10: ...Stream Type Choose to either stream the Audio and Video from the camera or just the Video Resolution Choose the resolution supported by the camera Bitrate Type Choose either CBR or VBR bitrate Bitrat...

Page 11: ...lect the area to define the preferred recording time Double click to set the start and end times 4 2 3 2 Set Scheduled Recording Time The system can be set to record based on a schedule or you can man...

Page 12: ...adjust for Pre Recording and Post Recording 4 2 4 Motion Detection Set the motion detection settings for each video channel and use Copy To to transfer the settings to other channels Note IP Cameras m...

Page 13: ...a Settings Set Linkage to define the Trigger Mode the system will use in response to a motion detection Upload to Center will upload alarm information to the platform and Trigger Recording will turn o...

Page 14: ...s video Use Copy To to transfer the settings to other channels Click the check box in front of Enable Video Lost to turn on the feature Set the Arm Schedule Select the Linkage to define the Trigger Mo...

Page 15: ...rm when a camera is tampered with Note IP Cameras must support tampering alarm Click the check box in front of Enable Video Tampering to activate this feature Define the tampering alarm areas under Ar...

Page 16: ...ule Select Linkage to define the Trigger Mode in the event of tampering Linkage Setting Screen Video Mask Screen 4 2 7 Video Mask Setting Use Video Mask to block off a portion of the camera s video th...

Page 17: ...he check box in front of Enable Video Mask to turn on this feature Define mask areas under Area Settings Area Settings Screen Network Screen 4 3 Network The Network screen gives you access to your net...

Page 18: ...address Default Route Select a NIC router from a list of options The default is NIC1 which can connect IP devices with different network segments Remote Port Input relevant remote port number The def...

Page 19: ...2 and Dnsdynamic Input the Server Name Sample member 3322 org Input the Port the default port is 80 Input the Username Input and confirm the Password Input the Domain Name Manage Host allows the DVR t...

Page 20: ...hours of how often you would like to update the default is 2 hours Select Time Zone Select from different time zone options GMT Make fine adjustments to the time settings NTP Settings Screen Email Se...

Page 21: ...r 4 4 Alarm The Alarm screen allows you to set up alarms for the DVR system The DVR will alert you by sounding an alarm sound and creating a pop up of the live video stream when triggered by events su...

Page 22: ...Alarm Input The Alarm Input enables alarm processing sets the alarm schedule and selects the trigger mode 4 4 2 Alarm Output Sets the alarm output delay and alarm schedule Alarm Input Screen Alarm Ou...

Page 23: ...alarm display settings for the monitor 4 5 Account View and modify details of the user accounts in your system 4 5 1 Account Information Setting Add modify or delete users and define each user s perm...

Page 24: ...46 47 User Privilege determines what each user is permitted to access User Privilege Screen User Online Screen 4 5 2 User Online Check to see the current status of each online user s connection...

Page 25: ...gs according to the video type and time System Screen Device Log Screen Main Type Sorts by All Types Alarm Exception and Operation Sub Type Separates line items into sub categories under their main ty...

Page 26: ...6 2 Stream Info View the band width of data streaming for each channel 4 6 3 HDD Setting Check the capacity and free space of the Hard Disk Drive HDD and format if needed Stream Info Screen HDD Settin...

Page 27: ...the PTZ vertical or horizontal rotation speed lens zoom aperture and focus speed for the camera Accessory equipment Control the camera s accessibility to connect to accessory equipment Preset Rotate...

Page 28: ...hen click Add to create a new cruise preset Click Delete to clear the preset Cruise Screen Record Screen 6 Record Record located on the Main Menu allows you to set the system to record based on a sche...

Page 29: ...current video playback Stop Click to stop the current video playback Slow Click to slow down the playback speed to 1 2 1 4 1 8 or 1 16 of the speed Fast Click to speed up the playback speed to 2 4 8 o...

Page 30: ...Choose a language Simplified Chinese English French etc Auto Logout Determine how many minutes the system must be idle before it will automatically logout TV Adjust Adjust the display of the analog ou...

Page 31: ...ick Stop at any time Click Unmount USB when you are finished to remove the device safely 11 Alarm Setting Alarm is located in the Main Menu and displays the alarm information from all features 12 File...

Page 32: ...ess contrast saturation and hue on the video image through Image Setting located on the Main Menu 14 Screen Aspect Ratio Segmentation Set the Screen Aspect Ratio on the Main Menu according to the DVR...

Page 33: ...Service Uniden provides Pro Series Customer Service offering quality support when you need it including Direct Pro Support Customer Support 24 7 Videos FAQs Specifications Feedback Portal Need help C...

Reviews: