background image

4) Plug the AC adapter into a

standard 120 V AC wall outlet.

5) Raise the antenna to a

vertical position.

WALL INSTALLATION

t

Setting the Handset Retainer for Wall Mounting

1) Remove the handset retainer on

the base by sliding it upward.

5

HINT

Before using your phone,
fully charge the Nickel-
Cadmium battery pack for
15-20 hours.

Use only the Uniden AC adapter supplied with this phone

and DO NOT use an outlet controlled by a wall switch.

Place the power cord so that
it does not create a trip
hazard or where it could
become chafed and create
an electrical hazard
or fire.

C:...EXI 6960H1-5 VA.vp

Thu Nov 18 10:10:54 1999

Color profile: Disabled

Composite  Default screen

Summary of Contents for EXI 6960

Page 1: ...E X I 6 9 6 0 900 MHz Cordless Phone with Caller ID MANUAL OWNER S ...

Page 2: ...g U S patents 4 511 761 4 523 058 4 595 795 4 797 916 5 381 460 5 426 690 5 434 905 5 491 745 5 533 010 5 574 727 5 650 790 5 660 269 5 661 780 5 663 981 5 671 248 5 717 312 5 754 407 5 768 345 5 787 356 5 838 721 1999 Uniden America Corporation All rights reserved Printed in China ...

Page 3: ...97 1023 PLEASE DO NOT RETURN THIS PRODUCT TO THE PLACE OF PURCHASE Our Uniden representatives will be happy to help you with any matters regarding the operation of this unit available accessories or any other related matters Hours M F 7 00 a m To 7 00 p m Central Standard Time Thank you for purchasing this Uniden product ...

Page 4: ...e Security 14 Using Your New Phone 15 Making and Receiving Calls 15 Flash and Call Waiting 15 Storing a Phone Number in Memory 16 Editing a Phone Number in Memory 17 Erasing a Number from Memory 18 Using Memory Dialing 19 Chain Dialing 19 Using Caller ID 20 Using Redial 25 Using the Tone Feature 25 Selecting a Different Channel 25 Traveling Out of Range 26 Troubleshooting 27 Quick Reference Chart ...

Page 5: ... allows you to hang up by simply returning the handset to the base The UltraClear Plus true compander circuitry virtually eliminates background noise This innovative technology together with 40 different channels provides you with the best possible reception during all your conversations To protect you against misbilled calls which might result from your phone being activated by other equipment th...

Page 6: ...g Telephone Cord NOTE If any of these items are missing or damaged contact the Uniden Parts Department at 800 554 3988 Hours are from 8 30 a m to 5 00 p m Central Time Monday through Friday We can also be reached on the web at www uniden com TIP To get the most from your phone please read this reference guide thoroughly Also be sure to complete and mail the product registration form ...

Page 7: ...ack on the base then place the telephone cord into the right molded channel cord holder 3 Plug the other end of the long telephone cord into the telephone wall jack Remember the phone must be fully charged before you can use it 4 AND ADJUSTING YOUR PHONE INSTALL ING TIP When choosing a location for your phone keep the base unit and the handset away from electrical noise caused by objects like moto...

Page 8: ...handset retainer on the base by sliding it upward 5 HINT Before using your phone fully charge the Nickel Cadmium battery pack for 15 20 hours Use only the Uniden AC adapter supplied with this phone and DO NOT use an outlet controlled by a wall switch Place the power cord so that it does not create a trip hazard or where it could become chafed and create an electrical hazard or fire ...

Page 9: ...jack on the back of the base then place the AC adapter cord inside the left molded channel cord holder 2 Plug a short telephone cord into the TEL LINE jack on the base then place the telephone cord inside the right molded channel cord holder 6 DO NOT use an outlet controlled by a wall switch Before you plug the other end of the telephone cord into the modular jack on the wall charge the battery re...

Page 10: ...phone must be fully charged before you can use it 4 Place the base on the two posts of the wall plate and slide it downward to secure 5 Plug the AC adapter into a standard 120 V AC wall outlet that is not controlled by a wall switch 6 Raise the antenna on the base 7 ...

Page 11: ...one to a wall plate with a built in phone jack If the selected mounting area has no wooden support beams directly behind it you will need the appropriate anchoring devices in order for the wall to properly support your phone 1 Insert two mounting screws into the wall with their appropriate anchoring device if necessary 3 15 16 inches apart Allow about 3 16 of an inch between the wall and screw hea...

Page 12: ...into the TEL LINE jack on the back of the base and place the telephone cord into the right molded channel cord holder 5 Place the base on the screws and push it downward to secure 6 Plug the other end of the telephone cord into the wall jack 9 ...

Page 13: ...7 Plug the AC adapter into a standard 120 V AC wall outlet that is not controlled by a wall switch 8 Raise the antenna on the base 10 ...

Page 14: ...the handset battery cover by pressing in on the cover release and sliding it downward 2 Plug the battery s cable into the handset 3 Slide the battery cover on until it snaps into place 11 Use only the Uniden battery BT 905 supplied with your phone ...

Page 15: ...andset makes good contact with the base charging contacts t Low battery indicator When the battery pack is very low and needs to be charged the phone is programmed to eliminate functions in order to save power The handset beeps Complete your conversation as quickly as possible and return the handset to the base for charging CLEANING THE BATTERY CONTACTS To maintain a good charge clean all charging...

Page 16: ...ge the settings the selection appears on the LCD t Handset Earpiece Volume The EXI 6960 comes with four volume settings for the handset earpiece normal medium high and loud During a call press vol s to increase the earpiece volume press vol t to decrease the earpiece volume As you increaseordecreasethevolume yourselection appearsontheLCD When you hang up the EXI 6960 keeps the last volume setting ...

Page 17: ... EXI 6960 Your phone s handset and base share this code which is randomly set each time you place the handset in the charging cradle To reestablish communication between the handset and the base in the event of a power failure 1 Restore power to the base 2 Place the handset in the base and press page find 3 Pick up the handset from the base 4 Return the handset to the base The status LED blinks to...

Page 18: ...or the dial tone 3 Dial the number OR Dial the number then press talk To hang up Press talk or return the handset to the base AutoStandby To redial 1 Pick up the handset 2 Press talk 3 Listen for the dial tone 4 Press redial 1 Press talk 2 Listen for the dial tone 3 Press redial FLASH AND CALL WAITING If you have call waiting service and a call waiting tone sounds while you are on a call press fla...

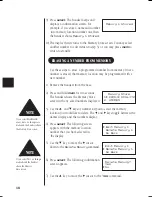
Page 19: ...e phone number with the handset keypad 9 Press select The handset beeps and displays a confirmation screen For example if you store a name and number into memory location number one the display shows Memory 1 Stored 10 Press mem or return the handset to the charging cradle to exit store mode Or wait 20 seconds for the phone to return to standby 16 HINT The character menu consists of letters symbol...

Page 20: ... is ready for the name to be edited 6 Use the and keys to scroll through the character menu Use the and keys to move the cursor to the desired location and enter the name 7 Press select The following screen appears and a cursor flashes indicating that the display is ready for the number to be edited 8 Enter the phone number with the number keypad 17 NOTE If you select Go Back at any time no change...

Page 21: ...y saved numbers displayed 3 Use the and keys or number keypad to select the memory location you would like to delete The and keys toggle between the names display and the numbers display 4 Press select The following screen appears with the memory location number that you have selected in the display 5 Use the key to move the cursor down to the Delete Memory command 6 Press select The following con...

Page 22: ...umber dials CHAIN DIALING On certain occasions after dialing a number you may be requested to enter an access code such as your account number You can enter this number into a memory location for later use by doing the following 1 Store the access code into one of the memory locations 0 9 See Storing A Phone Number in Memory page 16 2 Dial the party or service main number 19 HINT Use the and keys ...

Page 23: ... Waiting performs the same as regular Caller ID on a call waiting number You must subscribe to CIDCW from your phone company in order to use this feature If you enter your 3 digit area code number in the Area Code option your local area code does not appear in Caller ID messages When reviewing Caller ID messages you will see only the local seven digit number For calls received from outside your lo...

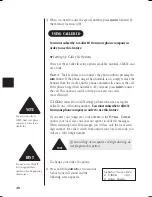
Page 24: ...s the display shows the date time call count name and phone number of the caller If your Caller ID service is number only then the name does not appear on the second line If a name or number is not available the display will show a message such as Incomplete Data Private Number Private Name etc t Using CIDCW Caller ID on Call Waiting 1 During a call when you hear the Call Waiting tone check the ha...

Page 25: ...alling a Caller ID Number 1 Press call id and the Caller ID summary screen appears The screen shows the number of new callers and the total number of callers stored in Caller ID memory 2 Select the number that you would like to dial Press to scan forward and to scan back through the list 3 Press talk and the number automatically dials 22 NOTE Your phone stores the most recent 30 numbers in Caller ...

Page 26: ... with the Caller ID number press select and the following screen appears 6 Use the key to move the cursor to Yes and press select A confirmation tone sounds and the number is programmed t Deleting a Caller ID Number To delete a single Caller ID message follow the steps below 1 Press call id and the Caller ID summary screen appears The screen shows the number of new callers and the total number of ...

Page 27: ...delete all of your Caller ID numbers follow the steps below 1 Press call id and the Caller ID summary screen appears The screen shows the number of new callers and the total number of callers stored in Caller ID memory 2 Press delete and the following screen appears 3 Use the key to move the cursor to Yes then press select or delete 4 A confirmation tone sounds and the following screen appears 5 P...

Page 28: ...e is canceled and pulse dialing resumes The tone feature applies only when the base unit is set to pulse SELECTING A DIFFERENT CHANNEL If you encounter interference while using your phone you can manually change the channel for clearer operation This function works only when the phone is in use The chan button on the handset allows you to choose between 40 channels During the course of a conversat...

Page 29: ...TRAVELING OUT OF RANGE During a call as you begin to move too far from your base unit noise increases If you pass the range limits of the base unit your call will terminate within 20 seconds 26 ...

Page 30: ...roperly seated in base Make sure the charging contacts on the handset and base are clean The audio sounds weak and or scratchy Make sure that the base antenna is in a vertical position Press chan to help eliminate background noise Move the handset and or base to a different location away from metal objects or appliances and try again Can t make or receive calls Check both ends of the base telephon...

Page 31: ...eive a page The Nickel Cadmium battery pack may be weak Charge the battery on the base unit for 15 20 hours The handset may be too far away from the base unit Place the base unit away from appliances or metal objects Reset security code see page 14 28 ...

Page 32: ...n W x 2 1 4 in D x 8 1 2 in H Weight Approx 11 1 oz HANDSET Frequency 902 052 to 904 002 MHz 40 channels Power requirements Rechargeable Nickel Cadmium battery pack Size without antenna 2 1 8 in W x 1 1 2 in D x 7 in H Weight Approx 8 6 oz including battery Battery BT 905 Capacity 600 mAH 3 6V Talk mode 7 hours Standby mode 14 days Specifications features and availability of optional accessories a...

Page 33: ...30 ...

Page 34: ...AND FUNCTIONS CONTROLS ...

Reviews: