Uniden DXAI 5188-2 Series Owner'S Manual Download Page 54

T H E   I N T E G R A T E D   A N S W E R I N G   D E V I C E

[ 54 ]

www.uniden.com

For your convenience
remote operation cards
are provided for you to
use while away from
home (located backward
of this manual).

You must enter a 
command within 15 
seconds of entering 
command waiting mode
or the answering system
automatically hangs up
and returns to standby.

Remote access

You can operate your answering system from a remote location using any touch-tone
telephone. Use this function to check for recorded messages, to play or delete
messages, even to record a new greeting message.

1) Call your telephone number.
2) During the greeting message, press 

0

and enter your PIN code. 

(See "Setting a Personal Security Code (PIN)," page 43).

3) The answering system announces the current time and the number of messages

stored in memory. Then you hear "To play incoming messages, press zero two. 
For help, press one zero."

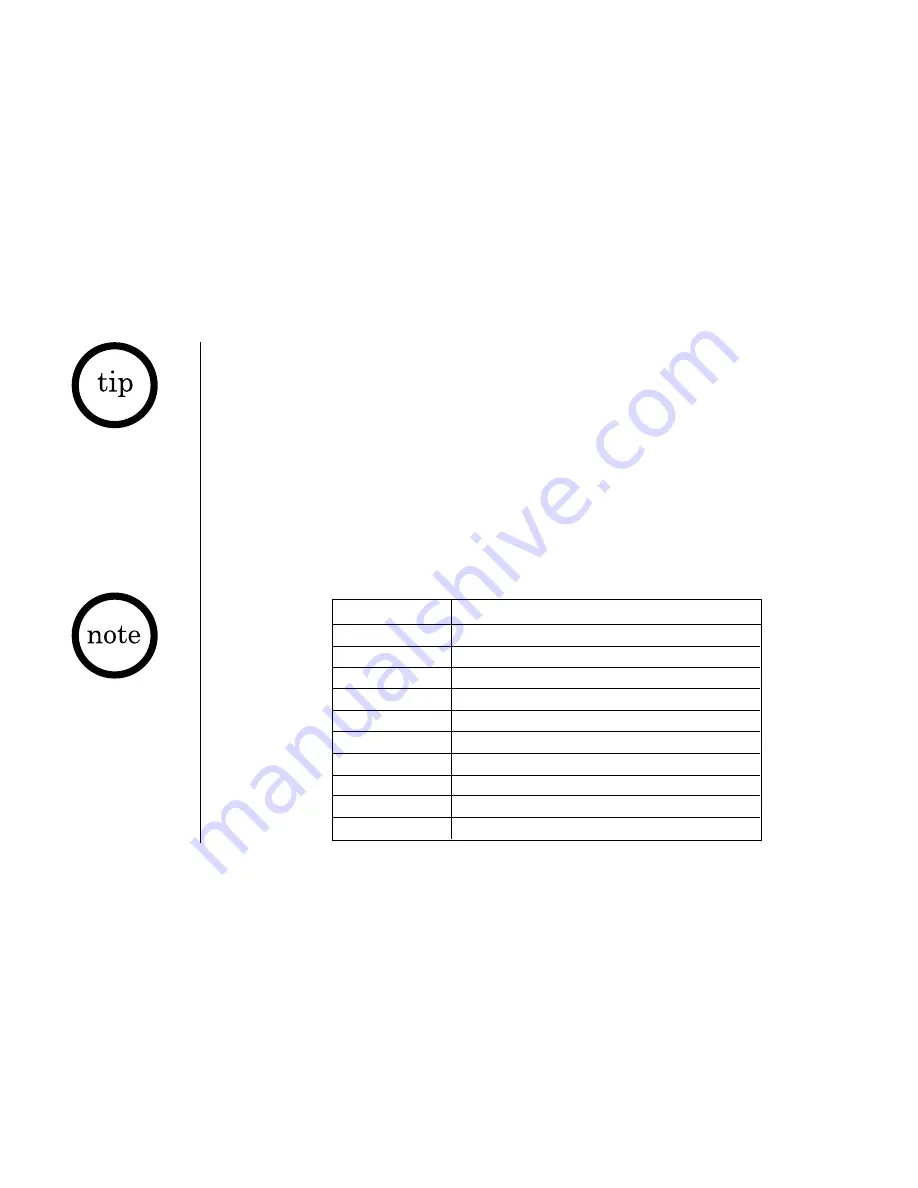
4) You may continue to listen to the voice prompts, or you may select a command

from the following chart:

Command

Function

0

then 

1

Repeat a Message

0

then 

2

Playing Incoming Messages

0

then 

3

Skipping a Message

0

then 

4

Deleting a Message

0

then 

5

Stop Operation

0

then 

6

Answering System On

0

then 

7

Memo Record/Stop*

0

then 

8

Greeting Message Record/Stop*

0

then 

9

Answer System Off

1

then 

0

Help

Summary of Contents for DXAI 5188-2 Series

Page 1: ......

Page 2: ......

Page 3: ...ored Name and or Phone Number 28 Erasing a Stored Name and Phone Number 30 RocketDial RocketDial 31 Storing and Editing the RocketDial 31 Making Calls with the RocketDial 31 Deleting the RocketDial 32 Caller ID Features Caller ID and CIDCW Caller ID on Call Waiting 33 When the Telephone Rings 33 Viewing the Caller ID Message List 34 Deleting Information from the Caller ID List 35 Making a Call fro...

Page 4: ...gistered trademarks of Uniden America Corporation AutoTalk AutoStandby UltraClear Plus Random Code and AutoSecure are trademarks of Uniden America Corporation Features 5 8 GHz Extended Range Technology Dual Handset System Extra Handset Charger Included Integrated Telephone Answering Device ITAD Trilingual Announcement Option Voice Prompted ITAD Setup Menu 3 Line Backlit Display Caller ID Caller ID...

Page 5: ...mpartment 5 Handset earpiece 6 LCD display 7 call id Caller ID menu key 8 vol volume scroll key 9 vol volume scroll key 10 tone left cursor key 11 redial pause key 12 select channel key 13 Handset microphone and ringer speaker 14 RocketDial key 15 end key 16 talk flash key 17 right cursor key 18 memory key 19 delete transfer key 20 Handset charging contacts Controls and Functions Handsets ...

Page 6: ... for Second Handset 40 42 41 21 repeat rewind key 22 volume SELECT up key 23 memo rec record key 24 volume SELECT down key 25 answer on off key 26 ringer key 27 Base charging contacts 28 Base antenna 29 charge in use LED 30 play stop key 31 skip fast forward key 32 delete key 33 MENU CLOCK key 34 greeting key 35 find hs key 36 SET key 37 mic microphone 38 DC IN 9V jack 39 Telephone line jack 40 Ch...

Page 7: ...ns and fluorescent lighting The base can be placed on a desk tabletop or mounted on a standard wall plate Avoid excessive moisture extremely low temperatures dust mechanical vibration or shock Avoid heat sources such as radiators air ducts and sunlight Avoid television sets and other electronic equipment Avoid noise sources such as a window by a street with heavy traffic Avoid microwave ovens Avoi...

Page 8: ...notches fit into the grooves of the jack only one way Match the wire colors to the polarity label in the battery compartment connect the battery and listen for a click to insure connection 3 Make sure you have a good connection by slightly pulling on the battery wires If the connection is secure the battery jack will remain in place For optimum performance use only the Uniden BT 800 rechargeable b...

Page 9: ...radually discharge over a long period of time For optimum performance be sure to return the handset to either cradle after a telephone call Cleaning the battery charging contacts To maintain a good charge it is important to clean the charging contacts on the handsets main base unit and charging cradle once a month Using water only dampen a cloth to clean the charging contacts Then make sure to go ...

Page 10: ...ging cradle 3 Make sure that the charge in use and charge LED illuminate If the LED does not illuminate check to see that the AC adapter is plugged in and that the handset makes good contact with the cradle s charging contacts 4 Place the handset in the main base unit and one handset in the charging cradle for 15 20 hours without interruption The main base or charging cradle unit s LED light label...

Page 11: ...phone outlet isn t modular contact your telephone company for assistance If the main base charge in use or charging cradle charge LED light does not illuminate Check to see if the AC adapter is plugged into both cradles and the electrical wall outlet properly Use only the supplied AC adapters Do not use any other AC adapters Check to see if both handsets are sitting correctly in each cradle and ma...

Page 12: ...C adapter into the DC IN 9V jack 3 Wrap the AC adapter cord inside the molded wiring channel as shown 4 Plug the AC adapter into a standard 120V AC wall outlet 5 Plug the telephone line cord into the TEL LINE jack Wrap the cord inside the molded wiring channel as shown 6 Plug the telephone line cord into the telephone outlet 7 Align the mounting slots on the base with the mounting posts on the wal...

Page 13: ...to mount your phone within 5 feet of a working phone jack to avoid excessive lengths Make sure the wall material is capable of supporting the weight of the base and handset Use 10 screws minimum length of 1 3 8 inches with anchoring devices suitable for the wall material where the main base unit will be placed 1 Insert two mounting screws into the wall with their appropriate anchoring device 3 15 ...

Page 14: ... The second handset charging in the extra charging cradle MUST also be registered to the main base before use Follow the steps below to register the second handset 1 Be sure both handsets are fully charged 2 Remove the handset from the charging cradle and place it in the main base The charge in use LED light on the main base will begin to flash indicating that the registration is taking place 3 Wa...

Page 15: ...k with an outside caller The second handset cannot go off hook to listen to conversations or make an outgoing call while the other handset is in use To transfer a call 1 During a call press delete transfer The call will automatically be placed on hold and the transfer tone sounds 2 When the other handset receives the call the transfer tone stops To cancel the transfer and return to the caller pres...

Page 16: ...election that you would like to change Press select channel to toggle between On and Off 3 Press end and return the handset to the main base unit to complete the setting The handset returns to standby mode AutoTalk allows you to answer the phone without pressing the talk flash key If the phone rings when AutoTalk is on simply remove the handset from either charging cradle and the phone automatical...

Page 17: ...nge a previously entered area code use the delete transfer to backspace 5 Press select channel A confirmation tone sounds and the displayed area code is entered 6 Press end to complete the setting The handset returns to standby mode Choosing the dialing mode Most phone systems use tone dialing However some phone systems such as those in rural areas still use pulse dialing Your Uniden phone support...

Page 18: ...ose from English French and Spanish 1 When the phone is in standby mode press and hold call id menu The following screen appears 2 Use vol to move the pointer to Language 3 Press select channel to select Eng Fr or Esp 4 Press end or return the handset to the main base unit or charging cradle to complete the setting The handset returns to standby mode If you are not sure of your dialing system set ...

Page 19: ...Press talk flash 3 Listen for the dial tone 4 Press redial pause OR 1 Remove the handset 2 Press redial pause then press talk flash Handset on Main Base or Charging Cradle Handset off Main Base or Charging Cradle Receiving a call Making a call Hanging up Redialing Press talk flash AutoTalk off or press talk flash tone or any number key AutoTalk on 1 Press talk flash 2 Listen for the dial tone 3 Di...

Page 20: ... standby mode to select one of five ringer tone volume combinations Earpiece volume To change the earpiece volume press vol or vol keys during a call This setting will remain in effect after the telephone call has ended Temporarily Mute Ringer If the handset is off the base simply press end to temporarily mute the incoming ring The ringer will sound with the next incoming call ...

Page 21: ...ption refills customer support menus etc If your phone is set to pulse dialing mode make your call normally Once your call connects press the tone Enter the desired number These digits will be sent as tone dialing Once the call ends the tone mode is canceled and pulse dialing mode resumes Traveling Out of Range During a call as you begin to move your handset too far from your main base unit noise ...

Page 22: ...elect channel Scanning appears on the display indicating the phone is changing to another channel For more information on interference refer to page 65 under Precautions The UltraClear PlusTM true compander circuitry virtually eliminates background noise This innovative technology together with 20 different channels provides you with the best possible reception during all your conversations If you...

Page 23: ...the list with vol and vol 3 Press memory or select channel 4 Press memory or select channel The Store Name screen appears and a cursor flashes indicating that the display is ready for the name to be entered If the selected speed dial number is already assigned the Edit screen appears You can select Edit to edit this entry select Delete to delete this entry or select Go Back to choose another speed...

Page 24: ...use to insert a two second delay between the numbers You can enter multiple pauses to increase the delay Each pause counts as a digit The display shows a P for every pause 8 Press memory or select channel You will hear a confirmation tone and the following screen appears Memory storage is complete After about 2 seconds the screen displays the list of the entries in Speed Dial Memory 9 Press end to...

Page 25: ...xt and finally the number corresponding to the key If you make a mistake while entering a name Use tone or to move the cursor to the incorrect character Press delete transfer to erase the wrong character then enter the correct character To delete all characters press and hold delete transfer For example to enter Movies 1 Press 6 then press to move the cursor to the right 2 Press 6 six times 3 Pres...

Page 26: ...ogrammed speed dial memory 2 Enter the number 0 9 or press vol or vol to select the speed dial number you would like to dial 3 Press talk flash Connecting changes to Talk and the volume setting appears on the display Then the displayed number is dialed Select Memory 01 Movies 02 JOHN DOE To cancel speed dialing press end The handset returns to standby mode ...

Page 27: ...andset are not limited to phone numbers You can also store a group of numbers up to 20 digits that you need to enter once your call connects This is referred to as Chain Dialing An example of this is a bank account number Once you have called your bank and are prompted to enter the account number press memory and select the location number where the special number has been stored Then press select...

Page 28: ... or vol to select Edit MemoryXX then press memory or select channel The following screen appears The cursor flashes indicating that the display is ready for the name to be edited When a name has not been stored the cursor appears at the beginning of the second line 5 Use the number keys tone or delete transfer to edit the name See page 25 To edit only the phone number skip this step 6 Press memory...

Page 29: ...r name or phone number a confirmation display shows up If it is correct press vol to select Yes and press select channel You hear a confirmation tone and the following screen appears The memory storage is complete For example if you edit a name and number into memory location number 01 the display shows Memory01 Stored After about 2 seconds the screen displays the list of the entries in Speed Dial...

Page 30: ... Press vol to move the pointer down to Delete MemoryXX 6 Press memory or select channel The Delete MemoryXX screen appears 7 Press vol to move the pointer to Yes 8 Press select channel or delete transfer You hear a confirmation tone and the MemoryXX Deleted screen appears 9 After about 2 seconds the display returns to the Select Memory screen You may delete the information in another memory locati...

Page 31: ...ubscribe to voice mail service you can store your access number in this location Storing and Editing the RocketDial 1 When the phone is in standby mode press and hold RocketDial The following display appears If the Edit screen appears there is a number already stored Press vol or vol to select Edit Number then press select channel 2 Store the number by following step 7 under Storing Phone Numbers ...

Page 32: ...s vol or vol to select Delete Number 3 Press select channel The following display appears 4 Press vol to move the pointer to Yes 5 Press select channel or delete transfer You hear a confirmation tone and the following display appears After about 2 seconds the handset returns to standby mode Edit Number Delete Number Go Back Delete Number Yes No Number Deleted ...

Page 33: ...er ID on Call Waiting you will hear a Call Waiting tone while you are on a call and the Caller ID data is displayed To accept the waiting call press talk flash Additionally you can dial a number stored in the Caller ID list or save data to your Memory dial list When the Telephone Rings When the Caller ID message is received the display shows the caller s phone number along with the date and time T...

Page 34: ...r ID appears next to the received time Once you view the new message the number will be cleared and disappear Viewing the Caller ID Message List The Caller ID list stores information for up to 30 messages Caller ID names numbers even unanswered calls 1 Press call id menu The summary screen appears The screen shows the number of new messages and total messages 2 Press vol to display the latest Call...

Page 35: ...the list is automatically deleted Caller ID data can also be deleted manually Deleting a Caller ID message 1 Press call id menu Display the message to be deleted from the Caller ID list by pressing vol or vol 2 Press delete transfer 3 Press vol or vol to select Yes or No 4 Press select channel or delete transfer When the pointer is at Yes You hear a confirmation tone and the Caller ID message is d...

Page 36: ...s or No 4 Press select channel or delete transfer When the pointer is at Yes You hear a confirmation tone and all stored Caller ID messages are deleted When the pointer is at No The display returns to the summary screen Caller ID Total 00 Caller ID New 01 Total 02 Delete All Yes No ...

Page 37: ...he phone number that you want to dial by pressing vol or vol 2 To add a 1 to the front of the displayed Caller ID number for a long distance call press 1 To delete a 1 from the front of the displayed caller ID number press 1 again 3 Press talk flash The displayed phone number dials automatically 5 17 12 30PM 03 Jane Smith 214 555 1234 Talk 2145551234 You can place a call from Talk Mode Press talk ...

Page 38: ... 2 Press memory 3 Enter a number 0 9 or press vol or vol to select the memory location to be stored 4 Press select channel You hear a confirmation tone and the number is stored in memory The display returns to the Caller ID list 5 17 12 30PM 03 Jane Smith 214 555 1234 Select Memory 01 02 JOHN DOE 5 17 12 30PM 03 Jane Smith 214 555 1234 Replace Memory Yes No If a number has already been stored in t...

Page 39: ...nstructions carefully Digital Tapeless Recording Up to 13 Minutes of Recording Time Call Screening Personal or Pre recorded Outgoing Message Voice Prompts English French or Spanish Time and Day Announcement Remote Message Retrieval Toll Saver Conversation Recording Voice Memo Selectable ringer options high low or off The Integrated Answering Device The cordless phone has a built in answering syste...

Page 40: ... a confirmation tone The message counter displays the number of messages stored in memory If the display flashes then there are new messages waiting for you 2 To turn the answering system off press answer on off again After the announcement Answering system is off the message counter display will no longer be illuminated To turn the answering system back on press answer on off volume SELECT SET ri...

Page 41: ...press MENU CLOCK in standby mode The system returns to standby after the last menu option You hear a confirmation tone to indicate standby mode If any of the following occurs during menu setup the system returns to standby Start over the procedure of the setting Press talk flash Press the key Receive a call If the system remains idle for about 5 seconds after the announcement the system returns to...

Page 42: ...y is announced The numbers through are displayed on the base 3 Press SET to select the day 4 Press volume SELECT or volume SELECT until you hear the correct hour setting The numbers through are displayed on the base as each hour is announced 5 Press SET to select the hour 6 Press volume SELECT or volume SELECT until you hear the correct minute setting The numbers through are displayed on the base ...

Page 43: ...es To set security code press menu again Setting a Personal Security Code PIN To play your messages from a remote location you need to enter a two digit Personal Identification Number PIN code To select a PIN perform the following steps 1 Press MENU CLOCK twice in standby mode The system announces Security code and the current PIN code is announced as it is displayed on the base Then the system an...

Page 44: ...e none This way if you make a long distance call to check your messages you can hang up after the second ring to avoid billing charges 1 Press MENU CLOCK three times in standby mode You hear Ring time and the current ring time 2 4 6 Toll saver and it is displayed on the base Then you hear the instructions for setting the ring time 2 Press volume SELECT or volume SELECT until the desired ring time ...

Page 45: ...o recording and it is displayed on the base Then you hear the instructions for setting the record time 2 Press volume SELECT or volume SELECT until the desired time appears 3 Press SET to select the new recording time You will hear a confirmation tone then the announcement Record time followed by the new recording time After a few seconds the system announces To set message alert press menu again ...

Page 46: ... select the new setting You hear a confirmation tone then the announcement Message alert followed by the current setting you have selected After a few seconds the system announces To set language press menu again When the first new message is received the alert tone will begin to sound Turning the Message Alert tone off by pressing any key 1 To quickly turn Message Alert tone off press any key on ...

Page 47: ...ns for setting the language The current setting or appears on the base 2 Press volume SELECT or volume SELECT to select the desired language 3 Press SET A confirmation tone is heard along with the setting in the language selected Setting Your Outgoing Message Greeting When you receive a call the answering system automatically plays either a preset message or your own greeting Preset message The fo...

Page 48: ...e other two are volume levels 1 Press ringer You hear the ringer at the current volume level High Low off if you set the base ringer volume to off Ringer off is announced and it is displayed on the base 2 Press ringer repeatedly until the desired ringer option appears 3 The system displays the new ringer volume To delete the personal Greeting press the key during the announcement and the system an...

Page 49: ... you can then play your old messages When the answering system is full is displayed on the base and the system announces No remaining time You should delete some messages so that the system can record new messages Refer to Deleting a Message on page 52 Temporarily Mute the Base Ringer Press the key to temporarily mute the incoming ring The ringer will sound with the next incoming call Adjusting th...

Page 50: ...ar a confirmation tone and an announcement End of messages The system returns to standby 2 After you have reviewed your new messages you can play your old messages by again pressing the key Once you have listened to a new message it becomes an old message The old messages will be played in the order in which they were received volume SELECT SET ringer find hs MENU CLOCK answer on off greeting mic ...

Page 51: ...rd one message If you have several messages press the key repeatedly to find the message you want to play 3 Press the key at any time to stop reviewing your messages and return to standby The message counter shows the number of messages stored in memory To quickly scroll forward through a message press and hold the key 3 Press the key at any time to stop reviewing messages and return to standby Th...

Page 52: ...s deleted You can also delete all the messages 1 Press the key in standby mode You will hear an announcement To delete all messages press delete again 2 Press the key again You will hear a confirmation tone and is displayed on the base All the messages are deleted volume SELECT SET ringer find hs MENU CLOCK answer on off greeting mic memo rec charge in use When you try to delete all messages witho...

Page 53: ... memo message and a tone flashes on the message counter 2 Start your recording 3 When you have finished press the key memo rec or SET to stop recording You hear a confirmation tone and the system returns to standby volume SELECT SET ringer find hs MENU CLOCK answer on off greeting mic memo rec charge in use Recording a conversation You can record up to 10 minutes of conversation while you are usin...

Page 54: ...ecord a new greeting message 1 Call your telephone number 2 During the greeting message press 0 and enter your PIN code See Setting a Personal Security Code PIN page 43 3 The answering system announces the current time and the number of messages stored in memory Then you hear To play incoming messages press zero two For help press one zero 4 You may continue to listen to the voice prompts or you m...

Page 55: ...chart 6 When you are finished hang up to exit the system The answering system automatically returns to standby Turn on the answering system remotely If you have forgotten to turn on your answering system you can turn it on remotely from any touch tone telephone 1 Call your telephone number 2 Wait ten rings until the system answers You hear a beep 3 Press 0 and then enter your PIN code The answerin...

Page 56: ...ect another cordless telephone is using the same security code you can change the code 1 Remove the handset from the main base unit or charging cradle Press and hold find hs on the main base 2 While holding find hs place the handset in the main base unit and leave the handset in the main base for more than 3 seconds 3 Remove the handset from the main base Then place the second handset in the main ...

Page 57: ...iden battery packs Do not remove the battery from the handset to charge it Never throw the battery into a fire disassemble it or heat it Do not remove or damage the battery casing Caution Do not use paint thinner benzene alcohol or other chemical products Doing so may discolor the surface of the telephone and damage the finish Maintenance To maintain a good charge it is important to clean the char...

Page 58: ...dsets are properly seated in each charging cradle Make sure the charging contacts on the handsets main base and charging cradle are clean Move the handset and or main base to a different location away from metal objects or appliances and try again Press select channel to help eliminate background noise Make sure that the handset is not too far from the main base Re register both handsets see page ...

Page 59: ... connection Make sure ringer volume isn t set to turned off Keep both handsets away from microwave ovens computers remote control toys wireless microphones alarm systems intercoms room monitors fluorescent lights electrical appliances other cordless telephones and other devices that use electricity Move to another location or turn off the source of interference The call was answered before the sec...

Page 60: ...ase for at least 5 seconds to re register to the main base Make sure the handset is not too far from the main base when trying to use Re register both handsets see page 14 Only one handset at a time can talk with an outside caller To allow the other handset to talk to the caller transfer the call Make sure the the AC adapter is plugged into the base and wall outlet Make sure the answering system i...

Page 61: ...call in features from another touch tone phone If you still have a problem Suggestion Record your personal outgoing message again The default message should remain Adjust the speaker volume on the base unit Make sure you re using the correct PIN code Make sure that the touch tone phone you re using can transmit the tone for at least two seconds If it cannot you may have to use another phone to acc...

Page 62: ...ery cover 5 Recharge the handset s battery pack for 20 hours before using again Base 1 Disconnect the AC adapter from the main base unit cutting off electrical power 2 Disconnect the telephone cord from the main base unit 3 Let dry for at least 3 days IMPORTANT You must unplug the telephone line while recharging the battery pack to avoid charge interruption CAUTION DO NOT use a microwave oven to s...

Page 63: ... battery is recharged please replace the battery With normal usage the battery should last about one year A replacement Uniden adapter and battery may be purchased at your local Uniden dealer or by contacting the Uniden Parts Department 800 554 3988 Hours are from 8 00 a m to 5 00 p m Central Time Monday through Friday We can also be reached on the web at www uniden com Specifications features and...

Page 64: ...ot overload wall outlets and extension cords as this can result in the risk of fire or electrical shock 10 Never push objects of any kind into this product through cabinet slots as they may touch dangerous voltage points or short out parts that could result in a risk of fire or electric shock Never spill liquid of any kind on the product 11 To reduce the risk of electric shock do not disassemble t...

Page 65: ...ment available now uses modular jacks Phone cords are fitted with a molded plastic connector which plugs into this type of jack If you do not have modular phone jacks contact your local telephone company for information about their installation Hardwired Jack Some equipment is wired directly to a phone jack and these types of installations require a modular jack converter This type of installation...

Page 66: ... equipment itself The REN assigned to each terminal equipment provides an indication of the maximum number of terminals allowed to be connected to a telephone interface The termination on an interface may consist of any combination of devices subject only to the requirement that the sum of the Ringer Equivalence Numbers of all the devices does not exceed five RADIO EQUIPMENT The term IC before the...

Page 67: ... Connection 10 D Dial mode 17 Digital security code 56 E F G Earpiece volume 20 General information 63 Find handset 22 H Headset installation 57 I J K L I C Notice 66 Installing the phone 7 Interference 65 Language 18 47 M N O Maintenance 57 Making a call 19 Menu mode 16 Message alert 46 Mounting on a wall 12 Outgoing message 47 P Q Personal security code PIN code 43 Precautions 64 R Receiving a c...

Page 68: ...Note ...

Page 69: ... enter your PIN code 3 Press 0 then 5 to stop the announcement 4 Press 0 then 6 to turn the answering system on REMOTE OPERATION CARD C U T Remote access away from home 1 Call your phone number from a touch tone phone 2 During the outgoing message press 0 and enter your PIN code The answering system announces the number of messages stored in memory and the help menu The phone stands by for you to ...

Page 70: ...ation 0 5 Answering System On 0 6 Memo Record Stop 0 7 Greeting Message Record Stop 0 8 Answer System Off 0 9 Help menu 1 0 Task Key Repeat a Message 0 1 Playing Incoming Messages 0 2 Skipping a Message 0 3 Deleting a Message 0 4 Stop Operation 0 5 Answering System On 0 6 Memo Record Stop 0 7 Greeting Message Record Stop 0 8 Answer System Off 0 9 Help menu 1 0 Task Key Repeat a Message 0 1 Playing...

Page 71: ...ETURN THIS PRODUCT TO THE PLACE OF PURCHASE Our Uniden representatives will be happy to help you with any matters regarding the operation of this unit available accessories or any other related matters Thank you for purchasing a Uniden product Hours M F 8 00 AM to 5 00 PM CST For information on the accessibility features of this product please call 1 800 874 9314 V TTY Accessibility ...

Page 72: ......

Reviews: