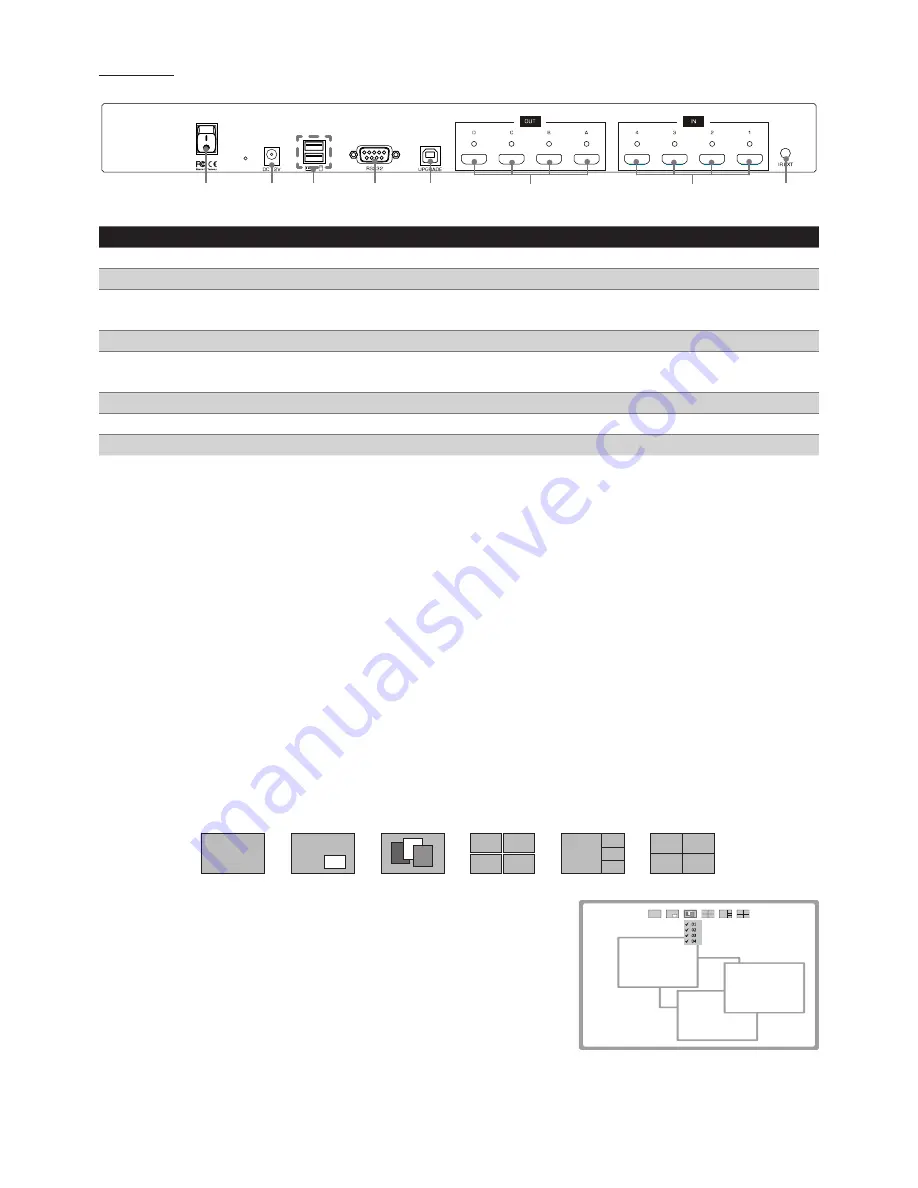
Uniclass RH144 User Manual Download Page 6

6

Rear panel

12            13       14           15          16                      17                                      18                    19

No. Item

Description

12

Power switch

Press to power on/off the unit.

13

Power jack

Connect to the power adapter (DC 12V).

14

USB Type A 

receptacles

Connect to USB keyboard and mouse.

15

RS-232 connector

Connect to a computer or RS-232 device.

16

USB Type B 

receptacles

Connect to a computer for updating firmware*.

17

HDMI OUT A~D

Connect to HDMI displays. 

18

HDMI IN 1~4

Connect to HDMI source devices.

19

IR EXT

Extend ability of remote control using 3.5mm jack extension cable.

* Firmware update

To update the firmware, please follow the steps below:

1. Press the power switch to turn off the power.

2. Press and hold the 

SET

 button, then turn the power switch to on. The 

SET

 button will be blinked 

rapidly. 

3. Plug the USB cable into the USB Type B receptacles. The procedure of updating will be started. 

4. Once the procedure of updating has been completed, a reminder message will be appeared on the 

screen and the blinking of 

SET

 button will be stopped.  

Please contact local dealer or distributor if you have trouble updating the firmware. 

2. Display mode menu

The display mode menu is a way of control using mouse. Please follow the steps below to select a 

desired mode, input and output. 

1. Simply click the mouse wheel anywhere on the screen to bring up the display mode menu.

Matrix               PIP            Windows     Video wall           PAP           Quadview 

2. Point the preferred mode to bring up the drop down menu. 

The selected mode will be highlighted by red color, and the 

corresponding options will be shown on the drop d0own menu. 

3. Left click to tick the desired option or left click again to cancel. In 

Windows mode, left click to turn on or off the windows.

4. 

To exit the display mode menu, press mouse wheel again. 

3

4

1

2

Example: Windows mode

Summary of Contents for RH144

Page 1: ...User s Manual RH144 4 x 4 MultiView HDMI Matrix Version 1 21...

Page 2: ...tion diagram 4 6 modes diagram 4 Operation 5 1 Parts and push buttons 5 2 Display mode menu 6 3 Keyboard hotkeys 7 4 IR remote control 8 5 RS232 Control 9 Mode descriptions 11 Settings 13 Title bar in...

Page 3: ...tive mode operation by front panel Push Buttons OSD or IR Remote Control Full HD Digital Video resolution can support up to 1920 x 1200 to give a combine total of 4K x 2K video resolution Support Lock...

Page 4: ...not included in the package it is for reference only Make sure all the devices and peripherals are connected appropriately before using this unit A B C D Video source 1 Video source 2 Video source 3 V...

Page 5: ...T Save the customized input and output up to 8 settings 1 Select a desired mode by pressing MATRIX PIP WINDOWS VIDEO WALL PAP QUADVIEW button 2 Set a preferred input source 1 4 and output display A D...

Page 6: ...Type B receptacles The procedure of updating will be started 4 Once the procedure of updating has been completed a reminder message will be appeared on the screen and the blinking of SET button will b...

Page 7: ...Quadview Matrix 1 4 A D Press to switch to Matrix mode The hotkey of Matrix mode is consisted with 2 keystrokes For example to monitor source 2 on display B you can press 2 and then press B PIP 1 4 A...

Page 8: ...A D on the unit will be flashed 4 Press a preferred button 1 4 and A D to save the setting to the memory of unit 3 Cursor buttons Press to move the cursor up down left and right on the menu 4 Select S...

Page 9: ...OK 4 Select Connect using to COM X X is the port which connected to RH144 5 Enter the following data to each option then press Apply OK Bits per second 115200 Date bits 8 Parity None Stop bits 1 Flow...

Page 10: ...dow unit pixel y y axis of window unit pixel vw n Switch to video wall n source 1 4 vwpip id n Set pip of video wall id display A D 0 restore to video wall n source 1 4 vwlayout n Set layout of video...

Page 11: ...still remain at same position which is normal Mode descriptions Matrix mode Viewing video sources up to 4 displays Press 1 4 to select the video source press A D to select the display To distinguish...

Page 12: ...source on multiple displays as one The images can be configured in 2x2 or 1x3 mode Press 1 4 to select the desired video source Viewing angle may not the same when placing the display in portrait and...

Page 13: ...screen The screen may be stretched Select Keep ratio to remain the original aspect ratios The black bars may appear on top bottom or left right sides of screen Channel name Change the name of video s...

Page 14: ...ow the input and output resolutions of RH144 if there is a problem of abnormal display or no video suggest using a more standard display mode from the list Input Resolution Refresh rates HZ 640x480 50...

Page 15: ...ated in a commercial environment This equipment generates uses and can radiate radio frequency energy and if not installed and used in accordance with this User Guide may cause harmful interference to...

Page 16: ......

Reviews: