Unichip Flux2 User Manual Download Page 4


<

>

>

>


a.


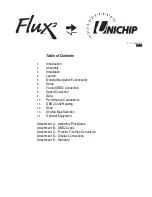
Accepting  the  second  caution  screen  by  pressing  the 

IIII     ACCEPT

ACCEPT

ACCEPT

ACCEPT

  >

  button  automatically  launches  a  vehicle 

communication procedure during which Flux2 determines the OBD2 protocol your vehicle uses so that it can communicate with 
your  factory  computer.      There  are  a  number  of  OBD2  protocols  and  Flux2  will  step  through  each  automatically  until  it 
establishes communication and this will occur each time you power up your Flux2 Display and no action is required by you.   


b.


Once communication with the factory computer is established, the Flux2 display will automatically change to a Link Success 

display which confirms the OBD2 protocol in use.   After 5 seconds the display will automatically advance to the Flux2 Main 
Menu Page.  You may also press the buttons on either side of the 

<

---

---

---

--- 


 CONTINUE 

CONTINUE 

CONTINUE 

CONTINUE ---

---

---

---

display to advance without any 

delay.   

Note:  To  speed  up  launch,  once  Flux2  has  established  communication  it  no  longer  searches  for  protocols  so  if  you 
switch the Flux2 to a different vehicle, you may have to “force” communication.   

When you connect to a new vehicle, Flux2 will run through a normal  

LINKING

LINKING

LINKING

LINKING 


 TO VEHICLE

TO VEHICLE

TO VEHICLE

TO VEHICLE

 display but may fail 

to  connect.    If  that  happens,  you  should  select  < 

SETUP

SETUP

SETUP

SETUP


and  either  select 

AUTO  DETECT

AUTO  DETECT

AUTO  DETECT

AUTO  DETECT

  or  manually  step 

through the protocols until communication is established.    
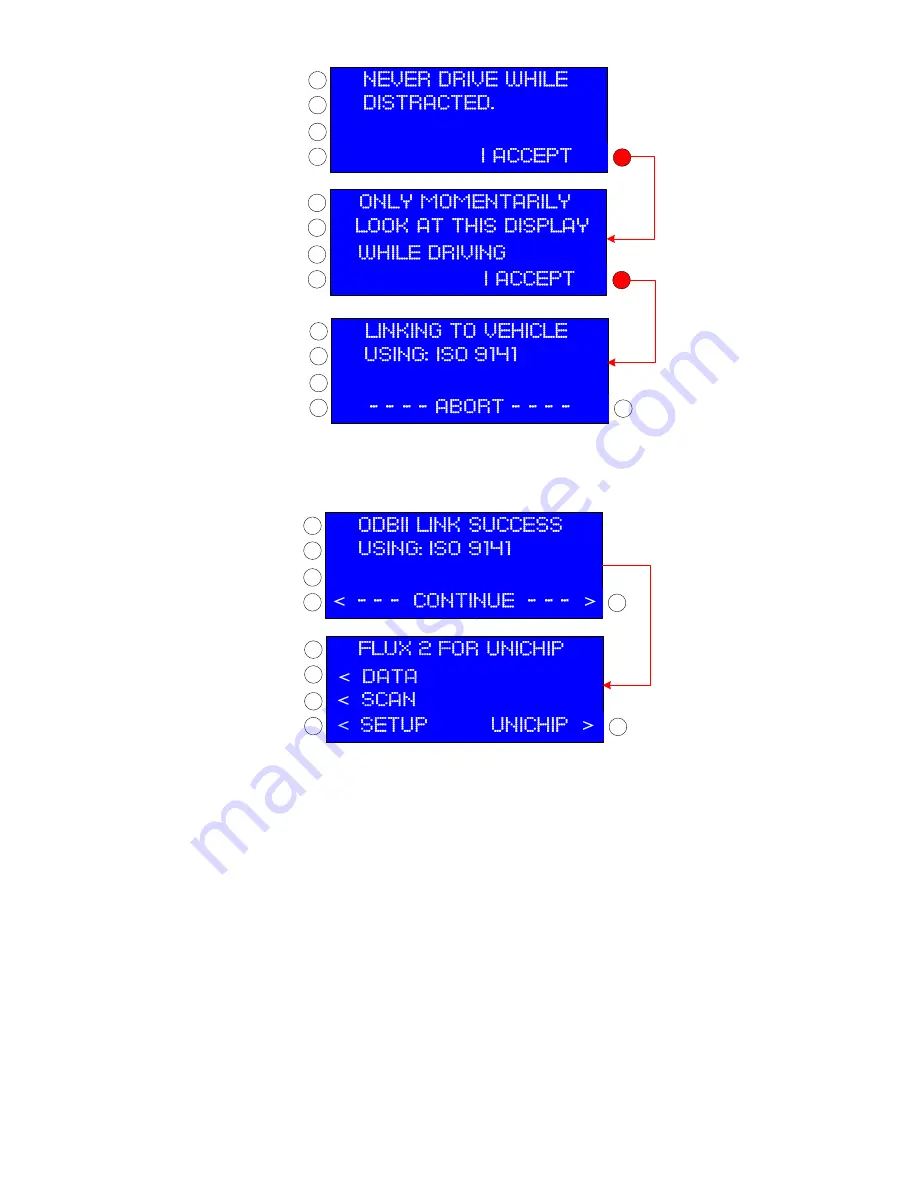
c.


The Flux2 Display Main Menu Page features navigation options to view live parametric data, to scan the factory computer 

for fault codes, to change screen settings, correct vehicle speed readings, and connect to the factory computer, and to change 
maps in the Unichip computer.  Each of these functions is described below. 

d.


When  you  turn  the  vehicle’s  ignition  key  off,  your  OEM  ECU  will  power  down  and  stop  communicating  with  the  Flux2.  

Although  the  time  for  Flux2  to  power  down  after  switching  the  key  off  varies  between  vehicle  types,  shortly  after  the 
communication stops, the Flux2 Display will transition to a 

NO LINK TO VEHICLE

NO LINK TO VEHICLE

NO LINK TO VEHICLE

NO LINK TO VEHICLE

 display. 

Summary of Contents for Flux2

Page 1: ...ality 6 Setup 7 Forced OBD2 Connection 8 Speed Correction 9 Data 10 Performance Calculations 11 OBD2 Code Reading 12 Scan 13 Unichip Map Selection 14 Optional Equipment Attachment A Assembly Procedure...

Page 2: ...hing requires the Unichip Connection Loom Manufactured by UNICHIP OF NORTH AMERICA www unichip us UNICHIP COMM BOOST EGT OBD Unichip Connection Loom OBD2 Connection Loom Existing PnP or Hardwire Unich...

Page 3: ...ough you won t damage the Flux2 Display some positions of those other devices will inhibit the Flux2 Display s map switching capability Warning Use care when routing the looms as poor routing may allo...

Page 4: ...r protocols so if you switch the Flux2 to a different vehicle you may have to force communication When you connect to a new vehicle Flux2 will run through a normal LINKING LINKING LINKING LINKING TO V...

Page 5: ...isplay settings change OBD2 communication settings and change the vehicle speed display a Unit Selection To change the display units to Metric press the METRIC METRIC METRIC METRIC button and to chang...

Page 6: ...NN CONN CONN button Without a connection there are no other navigation options e If you do not know the correct protocol for your vehicle press the SELECT SELECT SELECT SELECT button until the next pr...

Page 7: ...seconds on some applications e The supported information rotary is listed in this chart Note that those values that have associated English or Metric units are automatically changed by choosing the d...

Page 8: ...in which you will be able to accelerate to the required speed and slow back down with plenty of room left over Position the vehicle where you want to begin the acceleration and bring it to a complete...

Page 9: ...ID s will often but not always trigger a Check Engine Light You will see all Active PID codes when you scan the factory computer e All Active and Pending OBD2 codes displayed on your Flux2 with the Sc...

Page 10: ...y will change to NO CODES STORED NO CODES STORED NO CODES STORED NO CODES STORED g Component failures on some newer CAN OBD2 protocol vehicles produce codes that cannot be cleared with a scanning devi...

Page 11: ...rning and the Unichip Map will remain unchanged e Your new map selection is only selected when you leave the Map Selection screen by returning to the Flux2 Main Flux2 Main Flux2 Main Flux2 Main Menu M...

Page 12: ...flat washer onto the first screw and place it through one of the flange slots and turn it a few turns into the threads of the Flux2 Display 5 Place the washers in the same order on the remaining thre...

Page 13: ...text description for each of these codes by doing an internet search of the code DTC code structure DTC codes are formed by a single letter and four numbers each of which have specific meaning for exa...

Page 14: ...ng equation you can calculate the circumference of both and dividing the OEM number by the aftermarket number will produce the correction percentage The equation is Width x Aspect Ratio x 2 wheel diam...

Page 15: ...e the Flux2 Display firmware create map names for the display or to program the Unichip connect the appropriate cables into these ports These ports are not used during normal operation The connections...

Page 16: ...d for the original owner only for one year from the date of purchase regardless of the installation date UNA only warrants Unichip products sold by an authorized UNA reseller If a UNA product is found...

Reviews: