background image


OPERATING AND MAINTENANCE MANUAL ARES P / ARES ROLLER UP 


- 20 - 


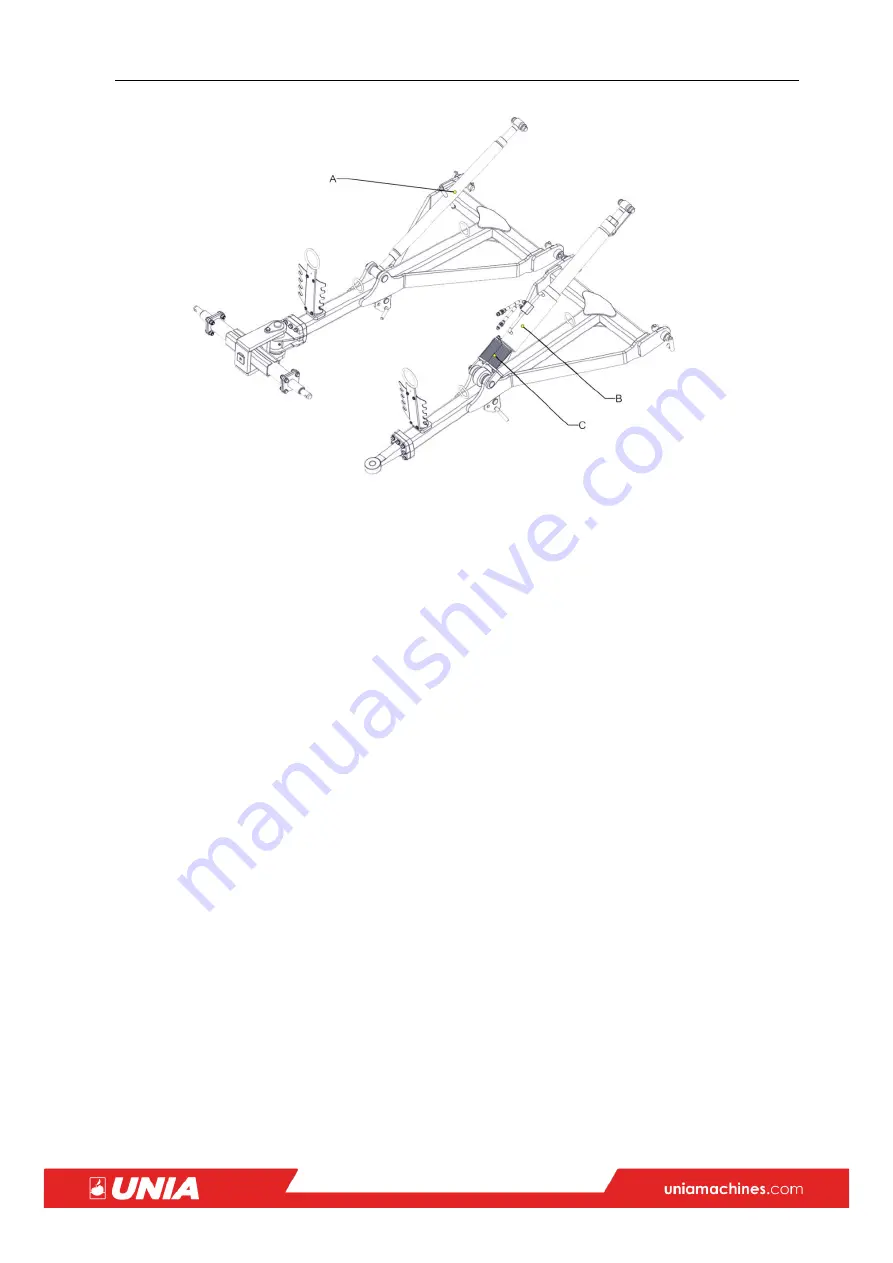
Once the machine working depth is set on the roller in the ARES P unit, adjust also the correct depth 
on the drawbar. Parallel position of the frame during work is the determinant.  


In order to adjust with the turnbuckle, rotate the turnbuckle 

[A]

 to the left or right, through 

which the machine front part is lifted up or lowered down 


Hydraulic adjustment consists of applying pressure from the tractor cab to the cylinder 

[B]


causing its extension. Then, put on the desired number of the stops 

[C]

 and reapply pressure 

to the cylinder 

[B]

. The cylinder comes back to the stops 

[C]

, through which, the machine is 

lifted up or lowered down.  


Fig.:10 

   Depth adjustment on the drawbar


Summary of Contents for ARES P

Page 1: ......

Page 2: ......

Page 3: ...tober 21 2008 Journal of Laws No 199 item 1228 and the EU Directive 2006 42 EC of May 17 2006 and the Ordinance of the Minister of Infrastructure of May 4 2009 Journal of Laws No 75 2009 item 639 and the following standards PN EN ISO 12100 2012 PN EN ISO 13857 2010 PN ISO 3600 1998 PN EN ISO 4413 2011 PN ISO 11684 1998 PN EN 349 A1 2010 PN EN ISO 11688 1 2010 PN EN 14017 A2 2009 PN EN ISO 4254 1 2...

Page 4: ......

Page 5: ...ata Type Production year Serial no This maintenance and operating manual is an integral part of the machine It is important that the manual is always in the possession of the machine user Access to the manual should be provided to machine operators and cooperating persons while operation regulation repairs and renovations Before starting the machine please read the operating manual and follow the ...

Page 6: ...ration of the Unit Tractor Machine 14 3 3 Connection and Disconnection 15 3 3 1 Mounted Machines 15 a Mounting 15 b Disconnecting 15 3 3 2 Semi Mounted Machines 16 a Mounting 16 b Disconnection 16 3 4 Transport on highways 17 3 4 1 Mounted Machines 17 3 4 2 Semi MountedMachines 18 4 Adjustment of the Cultivator 19 4 1 Working Depth Adjustment 19 4 2 CX B Heavy Duty Tine 21 4 3 Deflector 22 4 4 Adj...

Page 7: ...P ARES ROLLER UP 5 5 3 Hydraulic System 24 5 4 Lighting 25 5 5 Bolt screw and nut tightening torques Nm 25 5 6 Lubrication 26 5 7 Storage of the Cultivator 27 5 8 Disassembly and Disposal 27 5 9 Warranty Conditions and Warranty Services 28 ...

Page 8: ...wering on the hydraulic lift of the tractor setting the machine in the transport and working positions and on the headlands ensure that no bystanders and in particular children are present in the vicinity of the machine Perform these operations slowly without sudden jerks Never stay between the tractor and cultivator when the tractor s engine is running The machine may only be operated maintained ...

Page 9: ...rews and nuts on regular basis and tighten them if required Always use appropriate tools and wear safety gloves when changing tools The spare parts must be conforming to the revisions specified by the manufacturer This may only be provided by the genuine spare parts Use typical protection devices and pins for securing all bolts of the unit tractor machine Never use any temporary means of protectio...

Page 10: ...Maximum width of the machine which can be moved on highways is specified in the detailed regulations of the country of use They should be observed 1 5 Safety Symbol A Read through the Operating Manual thoroughly before operating the machine B Stop the tractor engine and take away the ignition key before any servicing and repair work C Keep safe distance off the machine D Never reach into the crush...

Page 11: ...YS ONLY AFTER HAVING OBTAINED AUTHORIZATION FROM THE COMPETENT HIGHWAYS ADMINISTRATION BODY WHERE THE JOURNEY BEGINS For the machines that exceed the allowable transport width 3 0m Safety signs and inscriptions should be protected against damage dirt and overpainting Replace any damaged or illegible signs and inscriptions with new ones that are available from the manufacturer or vendor of the mach...

Page 12: ...OPERATING AND MAINTENANCE MANUAL ARES P ARES ROLLER UP 10 1 6 Nameplate The unit data can be found on the nameplate Fig 1 Safety symbols ...

Page 13: ...able in the following widths 3 4 m ARES P can also be available in the following versions LONG in addition one row of CX tines with narrow coulters is located between the disc rows Spot adjustment of the working depth is possible The machine is available in the following widths 3 3 5 4 m DRIVE tyre roller acts as a chassis and tillage roller ARES ROLLER UP disc unit of a compact design It is avail...

Page 14: ...a system for lifting the tillage roller as required Width of the machine 3 m Fig 2 Construction Roller jib Rear row of discs Deflector RH Lighting Roller Chassis Frame Deflector LH Front row of discs Tutnbuckle Suspension axle Drawbar Roller UP system Deflector RH Frame Front row of discs Lifting rod Deflector LH Rear row of discs Tine beam Roller Lifting rod ...

Page 15: ...660 TWIXxø660 610 XLø560 XXLø660 TX ø660 TWIXxø660 610 7 Inter disc pitch cm 25 8 Working speed km h 8 15 10 Effective capacity ha h 2 8 4 5 2 8 5 3 3 2 6 0 2 8 4 5 3 2 6 0 2 8 4 5 11 Power demand KM 130 150 135 160 140 170 180 210 210 250 130 150 12 Dimensions L cm 645 705 308 W ARES P XL XXL 369 419 452 369 452 369 W ARES P TX TWIX 300 350 400 300 400 300 H 150 165 147 13 Working width W ROLLER ...

Page 16: ...achment system fits the tractor attachment system empty the hydraulic system and refill it with oil identical to oil contained in the tractor the machine will be connected to 3 2 Preparation of the Unit Tractor Machine pressure in the tractor wheels must be equal on the same axle in order to provide uniform working depth of the machine the tractor lower links c must be stiffened lock the oblong ho...

Page 17: ...onnect the tractor tow bars C and secure them in the frame plates D with bolts and cotter pins Connect the upper tractor connector A Select position of the upper bolt B in the carriage acc to the terrain During work of the cultivator the upper fixing point should be located higher than the point of fixing this connector to the tractor b Disconnecting Lower the machine on a plain and hard surface D...

Page 18: ...the tractor lower links lift arms B with the tractor tow hitch type E with bolts and cotter pins connect the machine hydraulic hoses to the tractor external hydraulic system and check the hoses for tightness Check lifting lowering and unfolding of the machine Remember to connect all hoses to all tractor 2 way hydraulic connectors in pairs lift and secure the support C b Disconnection lower and sec...

Page 19: ...of 180 on the hinge and secure it in the upper position with the bolt and the cotter pin Loosen the set screws and insert the deflector C accessory Pul out the securing bolt E and shift the stop D to the transport position i e vertical secure the mechanism with the bolt E again A unit consisting of a tractor and agricultural machine connected to it must meet the same requirements as the tractor al...

Page 20: ...otter pin and the bolt rotate the extension of 180 on the hinge and secure it in the upper position with the bolt and the cotter pin Clean the warning components lighting C of dirt accessory A unit consisting of a tractor and agricultural machine connected to it must meet the same requirements as the tractor alone Adjust the chains tensioning the side tow bars stabilizers of the tractor accordingl...

Page 21: ... machine rear roller is lifted up or lowered Perform hydraulic adjustment by pressurizing the cylinder B from the tractor cab which extends the cylinder Then put on the required number of stops C and pressurize the cylinder B again to slide it back to the stops C Through this you can raise or lower the rear roller of the machine Secure the cylinder B against dropping down with the lever D Fig 9 De...

Page 22: ...th the turnbuckle rotate the turnbuckle A to the left or right through which the machine front part is lifted up or lowered down Hydraulic adjustment consists of applying pressure from the tractor cab to the cylinder B causing its extension Then put on the desired number of the stops C and reapply pressure to the cylinder B The cylinder comes back to the stops C through which the machine is lifted...

Page 23: ...sc working depth You can adjust the tine working range in increments in 3 positions i e 13cm 16 5 cm and 20cm below the discs In order to reset the tine Remove the bolts B Shift the holder up or downwards aligning the relevant tine holes with the holes in the holder C Tighten the bolts B Pay special attention when changing the setting of the tine working depth due to the location of the mechanism ...

Page 24: ... USE ONLY GENUINE PROTECTION DEVICES Replace the working components once the unit operation effects deteriorate In order to replace the coulter remove the bolts X Y Z Use a drift to remove the screws from their slots if they cannot be removed after removing the nuts USE ONLY GENUINE SPARE PARTS 4 3 Deflector Ares can be provided with 2 types of the side deflector depending on the coulter used a Fi...

Page 25: ... par 3 4 Transport on Highways The extension design allow also changing the coulter working depth by its rotation Loosen the bolts A Rotate the beam with the coulter disc Lock it in the new position Tighten the bolts A 4 5 Adjustment of the Tines Ares Roller UP with the XL coulter disc is provided with a row of tines located between the second row of discs and the roller You can adjust them in the...

Page 26: ...e beginning any work at on it Disconnect it also from the tractor CAUTION THE HYDRAULIC SYSTEM IS PRESSURIZED CAUTION THE LIGHTING SYSTEM IS LIVE 5 2 Replacement of Working Parts Replace all working parts wearing parts in due time to protect the other more expensive assemblies against wear Contact the manufacturer s service department in order to replace any component of the hydraulic system and s...

Page 27: ... 2 4 5 5 2 M5 0 8 4 5 6 8 4 10 M6 1 8 11 15 17 M8 1 25 18 27 34 40 1 16 21 30 35 M10 1 5 35 46 65 76 1 25 31 41 57 67 1 27 36 50 59 M12 1 75 59 79 111 129 1 25 49 65 91 107 M14 2 92 124 174 203 1 5 76 104 143 167 M16 2 127 170 237 277 1 5 104 139 196 228 M18 2 194 258 363 422 1 5 135 180 254 296 M20 2 5 250 332 469 546 1 5 172 229 322 375 M22 2 5 307 415 584 682 1 5 212 282 397 463 M24 3 432 576 8...

Page 28: ...se for lubrication Clean lubrication points before pressing the grease Lubricate at the marked points If the machine worked less number of hectares please lubricate it before starting work and after its completion and at all lubrication points Fig 16 ARES P lubrication Fig 17 ARES ROLLER UP ...

Page 29: ...n applying grease with brush repair spot defects of the paintwork by repainting when the machine is to be stored outdoors in winter disassembly the hydraulic cylinder together with the hoses and keep them in a dry well ventilated and possibly darkened room 5 8 Disassembly and Disposal After its working life the cultivator is to be scrapped Disassembly should be performed by a specialized company I...

Page 30: ...warranty period only the genuine parts made by UNIA Grudziądz may be used Any modifications or repairs made by the user are not allowed in the warranty period This may lead to loss of warranty For more detailed information on how to file a complaint see the Warranty Card attached to each machine together with its Operating Manual The warranty services are performed by the supplier dealer entered t...

Page 31: ...OPERATING AND MAINTENANCE MANUAL ARES P ARES ROLLER UP 29 COMMENTS AND NOTE ...

Page 32: ...OPERATING AND MAINTENANCE MANUAL ARES P ARES ROLLER UP 30 COMMENTS AND NOTE ...

Page 33: ... the transport If so please specify what 3 When did you start work with the machine 4 How many ha have you worked with the machin 5 Tractor power HP 6 Which damages occurred 7 What is your general opinion about machine s work 8 What difficulties occur during the operation of the machine 9 Your comments regarding changes improvements of construction and machine operation 10 Your remarks concerning ...

Page 34: ...UNIA Sp z o o Szosa Toruńska 32 38 86 300 GRUDZIĄDZ tel 48 56 451 05 00 fax 48 56 451 05 01 Service tel 48 56 451 05 26 uniamachines com ...

Reviews: