background image


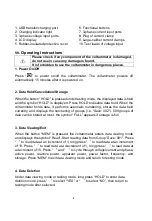
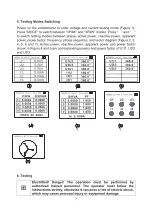
1. USB transfer/charging port 
2. Charging indicator light 
3. 3-phase voltage input ports 
4. LCD display 
5. Rubber-insulated protective cover 

6. Functional buttons 
7. 3-phase current input ports 
8. Plug of current clamp 
9. Large-caliber current clamps 
10. Test leads of voltage input 


VII.

 Operating Instructions 


Please check if any component of the voltammeter is damaged, 

do not use in case any damage is found. 

It is forbidden to use the voltammeter in dangerous places. 

1. Power On/Off 

Press  “

”  to power on/off the voltammeter. The voltammeter powers off 

automatically 15 minutes after it is powered on. 


2. Data Hold/Cancellation/Storage 

When the button “HOLD” is pressed under testing mode, the displayed data is held 
and the symbol “HOLD” is displayed. Press HOLD to disable data hold. When the 
voltammeter holds data, it performs automatic numbering, stores the data held 
currently, and displays the numbering of groups (i.e. “Save: 002”). 500 groups of 
data can be stored at most, the symbol “FULL” appears if storage is full. 


3. Data Viewing/Exit 

When the button “MEM” is pressed, the voltammeter enters data viewing mode 
and displays the symbol “Read”. Start reading data from Group “Save: 001”. Press 
“ ” to read data at an increment of 1, long press “ ” to read data at an increment 
of 10. Press “ ” to read data at a decrement of 1, long press “ ” to read data at 
a decrement of 10. Press “ ” and “ ” to cycle through voltage/current and phase, 
active  power, reactive power, apparent power, power factor, frequency, and 
storage. Press “MEM” to exit data viewing mode and return to testing mode. 


4. Data Deletion 

Under data viewing mode or testing mode, long press “HOLD” to enter data 
deletion mode, press “ ” to select “YES” or “ ” to select “NO”, then return to 
testing mode after selected. 


Summary of Contents for UT268B

Page 1: ...P N 110401111944X UT268B...

Page 2: ...erating Conditions 4 2 Rated Operating Conditions 4 3 General Specifications 4 4 Performance Specifications 6 VI External Structure 7 VII Operating Instructions 8 1 Power On Off 8 2 Data Hold Cancella...

Page 3: ...n is correct when performing phase test Remove the test lead from measured conductor before disconnecting the test lead with the voltammeter Do not make contact with the terminal by hand to avoid elec...

Page 4: ...in electric power petrochemical industry metallurgy railway industrial and mining enterprises scientific and research institute metrology service electric energy charging system relay protection syste...

Page 5: ...veform of measured signal Sinusoidal wave 0 05 5 Frequency of measured signal 45 65HZ 6 Current amplitude when measuring phase frequency phase sequence power and power factor 20mA 1000A 7 Voltage ampl...

Page 6: ...er 0 1W Reactive power 0 1VAR Apparent power 0 1VA Power factor 0 001 Current vector sum 1mA Phase sequence If the phase sequence of U1 U2 and U3 or I1 I2 and I3 is positive then the cursor flashes fr...

Page 7: ...0V 9 99V 0 01V 1 5 rdg 3dgt AC 10 0V 99 9V 0 1V 1 5 rdg 3dgt AC 100V 600V 1V 1 5 rdg 3dgt Current AC 0 0mA 9 9mA 0 1mA 1 5 rdg 3dgt AC 10 0mA 99 9mA 0 1mA 1 5 rdg 3dgt AC 100mA 999mA 1mA 1 5 rdg 3dgt...

Page 8: ...UT268B...

Page 9: ...sable data hold When the voltammeter holds data it performs automatic numbering stores the data held currently and displays the numbering of groups i e Save 002 500 groups of data can be stored at mos...

Page 10: ......

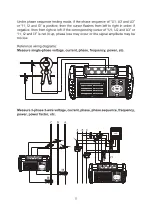
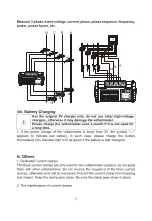
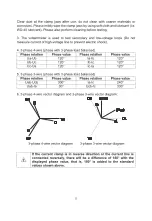
Page 11: ...sts Single phase testing Connect the measured voltage lines L and N with U1 YELLOW and COM BLACK terminals correspondingly then the current clamp I1 clamps the measured line L U2 GREEN COM BLACK and I...

Page 12: ......

Page 13: ......

Page 14: ......

Page 15: ...ely Charger USB cable 1 set User manual 1 pcs The content of this user manual cannot be used as a reason for using the product for special purposes The company is not responsible for other losses caus...

Reviews: