background image

3.  Restart your computer as suggested by the on-screen instructions.  Once your computer 

restarts, click the ‘X’ in the upper right corner of all open windows to close.  You are now 
finished installing the applications on the PowerLook 1000 CD. 

 
For users of APPLE Macintosh computers: 
 

1.  Install the scanner driver by inserting the scanner CD into the CD-ROM drive of your 

computer. 


2.  Double-click on the scanner CD installer icon.  Follow the on-screen instructions to install the 

drivers. 


3.  Restart your computer. 


Hardware Installation


Step 1. Unlocking the Carriage


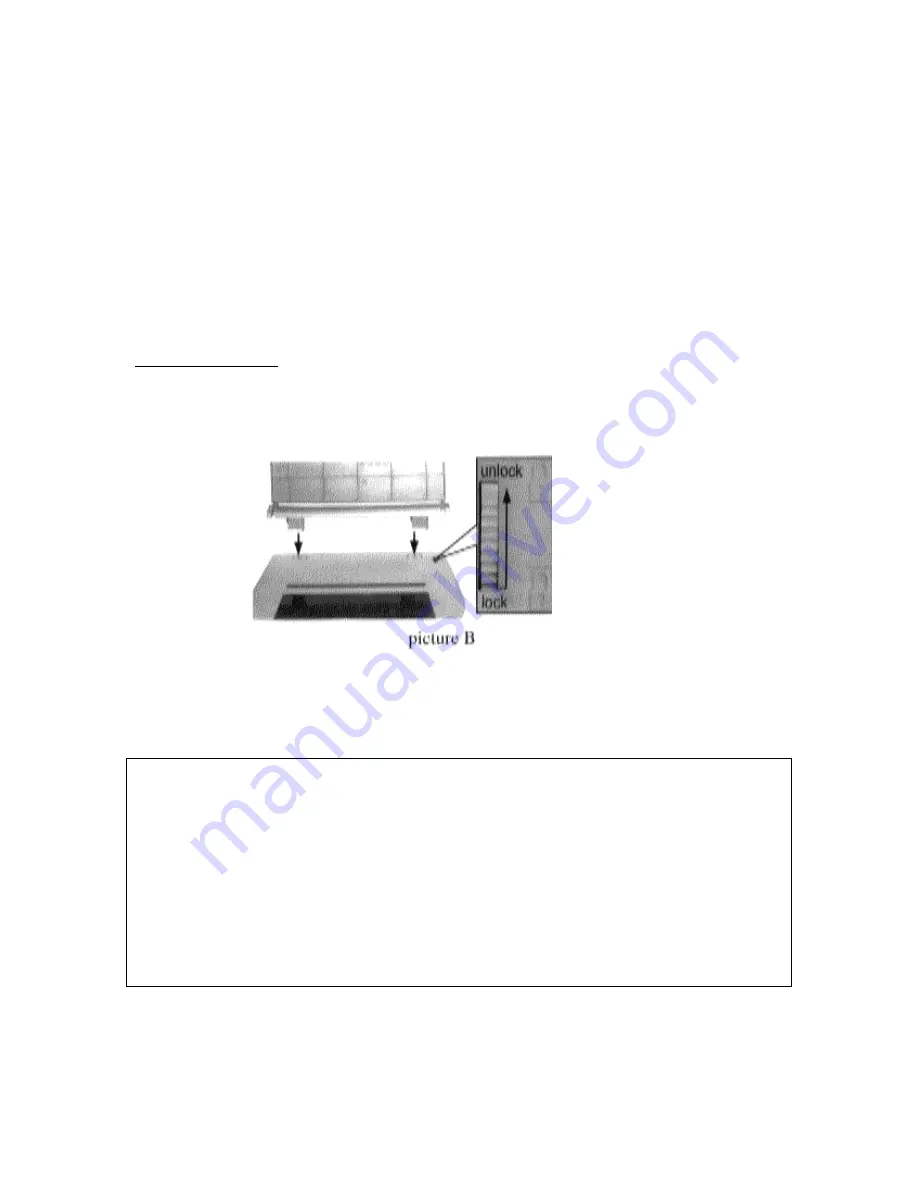
1.  Before operating the scanner, please unlock the restraint. 


2.  To better access the lock switch, remove the document cover by lifting it up from the scanner. 


3.  To unlock the restraint, move the carriage lock toward the unlocked position as shown above. 


Note: 
 
When transporting or shipping the scanner over a significant distance, be sure to relock the optical 
assembly to avoid damaging it.  Before re-locking the assembly, make sure the optical assembly of the 
scanner is in the “Home Position” by doing the following: 
 
1.  Turn the scanner off and then on again. 
 
2.  Wait for the ready indicator of the scanner’s to light up. 
 
3.  Turn off the power of the scanner again.  The optical assembly should be in the Home Position. 
 
4.  To lock the optical assembly, move the carriage lock until it points to the locked symbol. 


Summary of Contents for PowerLook 1000

Page 1: ...ead all of the instructions Follow all warnings and instructions marked on the product Do not use this product near water or in rainy moist environment Do not place the scanner on an uneven surface wh...

Page 2: ...ALLATION 5 COMPLETING YOUR FIRST SCAN 8 HOW TO SCAN IMAGES 8 A Using the bundled image editing application to scan the image 8 B Scanning images directly to a file by using MagicScan 9 HOW TO SCAN TEX...

Page 3: ...u must move the locking switch to the unlocked position 3 Power Indicator Illuminates to indicate that the scanner is powered on 4 Object Glass The glass surface on which the document or image should...

Page 4: ...here are tow kinds of interfaces on the back of your scanner They are IEEE 1394 for PC Firewire for Mac and USB interface Connect the scanner to the computer using only one of the two Software Install...

Page 5: ...e scanner please unlock the restraint 2 To better access the lock switch remove the document cover by lifting it up from the scanner 3 To unlock the restraint move the carriage lock toward the unlocke...

Page 6: ...computer 2 Plug the small end of the cable into the port marked USB located on the back panel of the scanner as shown in picture C Connecting the IEEE 1394 Cable If your PC is equipped with a IEEE 13...

Page 7: ...f the USB cable to the USB connector on the back of the scanner For APPLE Macintosh G3 G4 iMac DV or other FireWire equipped users Connecting the FireWire cable 1 2 Connect one end of the FireWire cab...

Page 8: ...e Quick Start Guide How to scan images Original Image Placement Raise the scanner s document cover 1 2 3 Place the document graphic text or photo face down on the scanner Use the triangular marks alon...

Page 9: ...hop Elements window to edit the scanned image For more details on using bundled image editing application Adobe PhotoShop Elements please refer to its help by clicking on the help command in the menu...

Page 10: ...e type of original Flatbed Transmissive Negative scan mode Color RGB Color CMYK Gray 256 intensity level No filter Sharpen Blur Resolution 300dpi 200dpi 100dpi 50dpi by clicking on the arrows on the r...

Page 11: ...surrounding the area to be scanned Step 3 Select the type of original Flatbed Transmissive Negative scan mode Color RGB Color CMYK Gray 256 intensity level No filter Sharpen Blur Resolution 300dpi 20...

Page 12: ...gn the document 3 Lower the document cover Using the bundled OCR Optical Character Recognition application to scan and recognize the text document 1 Select Start Programs Caere Applications OmniPage P...

Page 13: ...to save the file 6 Input a name for the processed file and choose the appropriate file type for your word processing program e g Microsoft Word For more details on using bundled OCR application OmniPa...

Page 14: ...ck the installation procedures to ensure that all instructions have been followed Which should you use USB or IEEE 1394 FireWire All newer computers have at least one USB port so the USB option will w...

Page 15: ...er s printed circuit board or the computer s interface card Therefore it is important to observe basic precautions whenever handling electronic components for your computer Although areas with high hu...

Page 16: ...hod Single pass with color CCD Warm Up Time 30 sec Sample Depth Color Mode 42 24 Bit Pixel Grayscale Mode 14 8 Bit Pixel Scanner Settings Scaling 1 to 200 in 1 Increments at 1200 dpi Resolution Highli...

Page 17: ...vironmental Ranges Operating Temperature 10 C 40 C Relative Humidity 25 85 Dimensions F B 542mm x 330mm x 105mm L x W x H Net Weight 4 5 Kg Systems Supported PC Win 98se 2000 ME XP Mac OS 9 0 9 04 9 1...

Page 18: ...is designed for a specific software package and a specific image input device Object Glass The tempered glass of the scanner where documents or objects to be scanned are placed Optical Assembly The c...

Reviews: