


5
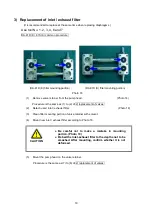
3-4 Verification Run in Installation
1) Detach rubber screen that attached to the inlet / exhaust pipe.
2)
Confirm that the pump switch is set to OFF (pushed to ○ side) and connect it to power source.
3) Turn the switch ON (push to |side) and confirm the unit is absorbing.
4)
After confirmation is finished, turn the power switch OFF (pushed to ○ side) and stop the pump
operation.
3-5 Piping
1) Connect piping tightly so that no leak is found.
2) Use the pipe larger than 8 mm internal diameter for inlet / exhaust port piping.
3) In case the back pressure is inevitable, make it less than 0.03MPa.
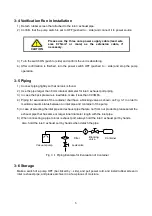
4) Piping for evacuation of the container shall have a blocking valve as shown on Fig. 3-1 in order to
maintain vacuum status between an inlet pipe and container of the pump.
5)
In case of selecting the inlet pipe and exhaust pipe that are not from our products, please select the
exhaust pipe that has same or larger inner diameter length with the inlet pipe.
6) When connecting a pipe to inlet / exhaust port, always hold the inlet / exhaust port by hands.
Also, hold the inlet / exhaust port by hands when detach the pipe.
Fig. 3 -1 Piping Example for Evacuation of Container
3-6 Storage
Make a switch of a pump OFF (be clicked by
○ side), and pull power cord, and install rubber screen in
inlet / exhaust pipe, and please archive it in a few places of moisture.
Vacuum pump
Filter
Leak valve
Blocking
valve
Container
Please use the three core power supply cable (lead wire
size 0.75mm
2
or more) as the extension cable, if
necessary.
CAUTION


