background image

1. Plug the unit into a suitable power source. Turn the main power switch on and it will illuminate if 
    power is present. The heat up time is approximately 8 minutes before haze can be produced. The 
    Green LED indicates “heating” when flashing and “ready” when the LED is “solid”. A three-flash pattern 
    and the fan turning on to full speed indicates an over temperature error.

2. The Haze Rate and Fan Control provides a limited range of control divided into to 8 steps plus OFF 
     for the assist fan and the haze rate. 
    The DMX address buttons are used to select the desired operation. Place the DMX address to 600 
    on the display. The display will stay illuminated indicating this mode is selected. Allow the machine to 
    heat fully by watching the green LED progress. The ‘tens’ button controls the haze rate. 0 is off, 1-8 
    runs from low to full (9 is the same level as 8). For minimum Flow Rate use DMX or Optional Hand 
    Remote Control. The ‘ones’ switch controls the assist fan in the same way, 1-8 is low to full. The Versa     
    Fan Power Port output will also be adjusted. The fan has a minimum setting and should always run when 
    the power is applied. The fan only runs faster when haze is requested.

3. 15 Minutes prior to shutting down your Radiance Hazer, adjust your output setting to “0” Doing this 
    will consume any haze fluid that is still in your distribution feed tubes and processing block. Failure 
    to do so will result in raw fluid being discharged from your output nozzle when you operate it next 
    start-up and will help reduce (not stop) the residue buildup.

Note:

 Stand Alone Operation overrides DMX and held held remote operation controls.

Radiance Setup

Operating Procedure

 After power up, the rear display will momentarily show the code revision levels in the machine and then 
display the DMX setting for several seconds. The display will blank after a short period of time. Touching an 
arrow key will relight the display. Further activation of the keys will alter the DMX setting.

Stand Alone Operation 

1. Insert a 2 or 4 Liter Jug of Ultratec Special Effects Luminous 7 Haze Fluid into the fluid jug holder.

2. Remove the cap and break the foil seal. Insert the fluid pickup tube into the jug and tighten the lid. 
    Ensure the fluid filter located at the end of the tube sits at the lowest end especially if the machine is 
    not mounted level.

3. An optional Versa Fan can be controlled at the same rate as the internal fan. Plug a matching 
    voltage VersaFan into the U-Ground (120 volt) or Neutrik Connector (220-240 volt). It will now vary 
    with the internal fan control.

Note:

 The Versa Fan speed control dial needs to be switched “ON” and set to maximum for proper    

          operation.

3

www.ultratecfx.com

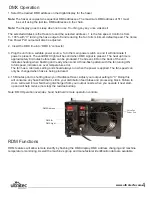
Hundreds Button

Tens Button

Ones Button

Heating Status
Green LED

Versa Fan 
Power Port

Summary of Contents for CLF2460

Page 1: ...Radiance Hazer v 102020 Operators Manual ...

Page 2: ...tions 2 Technical Drawings 2 Radiance Setup 3 Operating Procedure 3 Stand Alone Operation 3 DMX Operation 4 RDM Functions 4 Operation with Hand Remote 5 Maintenance Procedure 6 Troubleshooting 6 Recommended Fluid 6 Warranty 7 Contact Information 8 Table of Contents ...

Page 3: ...uses only Ultratec Special Effects Luminous 7 Haze Fluid which is a proven fluid that offers the best in low consumption with superior visual hang time It can accommodate both the 2L or 4L sizes of the Ultratec fluid containers 1 Ensure that any operation of the machine is supervised by suitably trained and authorized personnel 2 Do not modify the machine or use a machine which has been damaged in any...

Page 4: ...ater Base Haze Fluid Consumption settings from 27 380 cc hour Even lower output is achieved by using the Interval Timer Features 5 Pin USITT DMX 512 RDM Protocol Truss Mount Angle Floor Stand Power Cord 6 Detachable IEC Cord Heat up 8 Minutes Run Time Continuous Approvals 120V Full certification by T U V CE Certified 220 VAC CSA UL certified by QPS for 240 VAC Technical Drawings Technical Specificatio...

Page 5: ...will consume any haze fluid that is still in your distribution feed tubes and processing block Failure to do so will result in raw fluid being discharged from your output nozzle when you operate it next start up and will help reduce not stop the residue buildup Note Stand Alone Operation overrides DMX and held held remote operation controls Radiance Setup Operating Procedure After power up the rear ...

Page 6: ...LED on the back of the unit indicates heating when flashing and ready when solid A three flash pattern with the fan turning ON to full speed indicates an over temperature error The fan has a minimum setting and should always run when the power is applied The fan speed can only be changed when haze is being produced 4 15 Minutes prior to shutting down your Radiance Hazer adjust your output setting to...

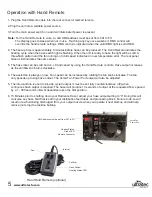
Page 7: ...utput increases as the variflow knob turns clockwise 6 The assist fan is always on low Fan speed can be increased by rotating the fan knob clockwise The fan only speeds up during haze output The Versa Fan Power Port output will also be adjusted 5 The interval knob is used to provide cycled output It must be set fully counterclockwise off when continuous haze output is required The hazer will produce...

Page 8: ...Contact Ultratec Special Effects for more help with this UNIT DOES NOT PRODUCE HAZE 1 Check that fluid pick up hose is sufficiently submerged into fluid in jug 2 Ensure fluid pickup line is fully primed with fluid 3 Ensure that green heater status LED is ON solid indicating that unit is fully heated 4 If using Standalone Mode ensure DMX address is set to 600 and that the 10 s column is set between 1 8 5 ...

Page 9: ...f the repair Ultratec Special Effects will return the unit via the most economical means available Should you require the item express returned the user dealer is responsible for indicating this request and for any difference in freight cost Warranty will be voided and customer will lose all rights guaranteed by the warranty if any of the following are observed occur If any non Ultratec Special Ef...

Page 10: ... Effects GmbH Dieselstrasse 30 40 60314 Frankfurt am Main Germany Direct 49 69 87 000 1850 Fax 49 69 87 000 1899 Canadian Shipping Address For All Canadian Repairs Ultratec Special Effects 1960 Blue Heron Drive London Ontario N6H 5L9 USA Shipping Address For All USA Repairs Ultratec Special Effects 640 Gadson Street Groveland Florida 34736 Contact Us www ultratecfx com 8 ...

Reviews: