background image


SYSTEM SETTINGS (LAYOUT)


Press the SETUP bu

tt

on to enter the SETUP menu. Scroll do

w

n and le

ft

 using the 

ARROW bu

tt

ons and the OK bu

tt

on to con

rm your selec

ti

ons. 


When you have 

nishe

d,

 repeatedly press the LEFT arro

w

 un

ti

l the cursor returns to 

the top MENU tab

,

 other

w

ise press SETUP again to exit.  


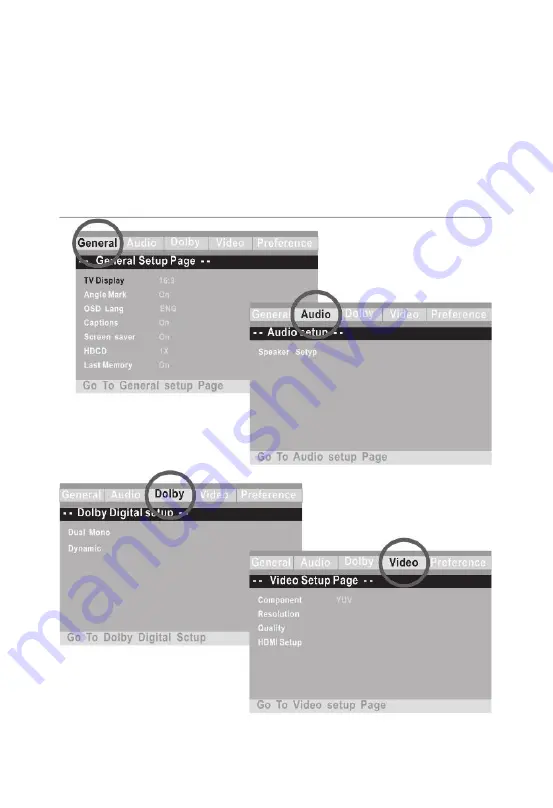
(Some of the menu screens have been displayed below for your reference.) 


Summary of Contents for UL-DVD600HD

Page 1: ...QUICK USER GUIDE UL DVD600HD ...

Page 2: ...THE FRONT PANEL THE REAR PANEL OPEN CLOSE PLAY PAUSE STOP ...

Page 3: ...r around screen ENTER Use to select on option or feature VOLUME Increase or decrease volume SLOW Reduce the speed of video playback PLAY PAUSE VIDEO Press to pause and again to play Select segment of video or music for reply STEP OSD View playback one frame at a time CLEAR Clear previously selected data and search information STOP Stop playback of files ZOOM N P Zoom IN OUT from an image FAST FORWA...

Page 4: ...ble into the HDMI OUTPUT on the player and into the HDMI input on the Home Theatre System 2 Plug the second HDMI cable into the HDMI OUTPUT on the Home Theatre System and into the HDMI input on the television OTHER CONNECTION EXAMPLES HDMI EASIEST COMPOSITE Red White Yellow RCA EASY COMPONENT EASY ...

Page 5: ...ffer HDMI ports solely for video switching If your receiver does not have audio input capability please read the following sections regarding other connection methods In order to play multi channel audio for all formats the receiver must support HDMI v1 1 or later A receiver that supports HDMI v1 3 with decoding capability for Dolby TrueHD and DTS HD Master Audio is preferred Please check the speci...

Page 6: ... and left using the ARROW buttons and the OK button to confirm your selections When you have finished repeatedly press the LEFT arrow until the cursor returns to the top MENU tab otherwise press SETUP again to exit Some of the menu screens have been displayed below for your reference ...

Page 7: ...P3 Image JPG Insert your disc or connect your USB thumb drive and press the USB button The following screen s will be displayed which will allow you to select a file for playback or for viewing then press the confirm button to begin MP3 PLAYBACK SCREEN IMAGE PLAYBACK SCREEN VIDEO PLAYBACK SCREEN ...

Page 8: ...dio track is supported by this player Disc playback is jerky Check the condition of the disc If surface is damaged or scratched repair or replace if necessary Video file playback is jerky and stops Check the file is compatible with player Check resolution of file High Definition files may cause intermittent playback issues Reduce resolution and bit rate of file to improve playback Abnormal Player operat...

Page 9: ...ower Consumption Video OutputVp p v Level Definition TV line AudioOutput Vrms S N Ratio db Audio Dynamic Range DVD Audio CD Audio AC Input v Frequency Hz 1 0 0 2 75Ω 450 1 8 0 2 10KΩ 80dB 80dB Fs 48KHz PCM 4Hz 22KHz Fs 496KHz PCM 4Hz 22KHz Fs 44 1KHz PCM 4Hz 22KHz 110 240V 50Hz 60Hz 6W Level Surface 225X190X45MM 700G Video AVI Xvid VOB Audio Mp3 Image JPG 10 40 ...

Reviews: