background image

Installing the Extrusion Upgrade kit

A C A D E M Y

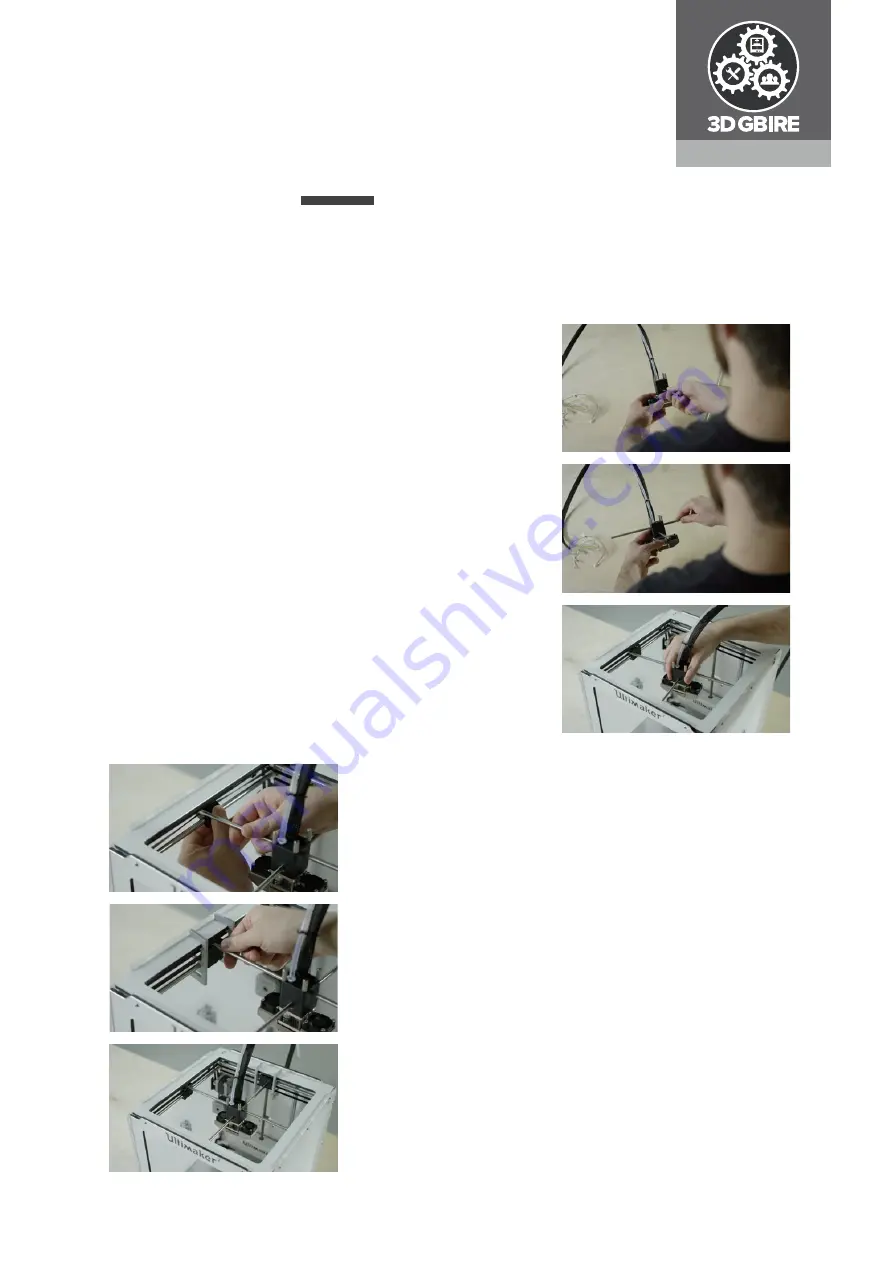
Installing the new print head

•  Guide the two new print head axles through the new  


print head. The long axle is the X-axle and the short  


axle is the Y-axle.

•  Place the print head in its original position and ensure  


that each axle is between the belts. The X-axle runs  


from left to right and the Y-axle runs from front to  

 back.
•  Align the axles to each sliding block.
•  Place the print head axis (dis)assemble tools on either  


side of the sliding blocks.

•  Click the X-axle in the left sliding block and push down  


until it snaps into place. Support the sliding block as  


much as possible when you snap the axle into place.

•  Repeat the steps for the other side of the X-axle and  


the front and back of the Y-axle.

Note:

 Ensure that the axles are put in centrally 

with equal space on each side and that there is 

at least 1 mm distance between the axle and 

the frame. Double-check that the left side of the 

X-axle is activating the Y limit switch.

Note:

 Ensure that all sliding blocks are upright.

Summary of Contents for EXTRUSION UPGRADE

Page 1: ...ead shafts X and Y 5 Hex wrench 2 mm 6 Pre assembled feeder 7 Calibration card 8 Build plate clamps 9 Geared feeder mounting plate 10 M3 ring 2x 11 M3 x 10 mm screw 6x 12 stickers 13 Print head alignm...

Page 2: ...otor from E1 on the main board There s a ferrite core around the motor cables Open it so you can remove the feeder motor wire completely It s possible that your Ultimaker is older and doesn t have the...

Page 3: ...d it to attach it A C A D E M Y Remove the four screws M3 x 25 mm from the feeder While removing the screws hold the feeder motor at the inside of the machine to prevent the motor from falling down Ke...

Page 4: ...mp between the spring and the build plate Place the build plate screw with the washer around it against the bottom of the build plate and hold it there Insert the screw from the top and use the hex wr...

Page 5: ...up the print head shaft until it comes out of the sliding block at this side Do the same on the right side Repeat the steps 2 and 3 on the front and back using the print head axis dis assemble tools...

Page 6: ...Place the print head axis dis assemble tools on either side of the sliding blocks Click the X axle in the left sliding block and push down until it snaps into place Support the sliding block as much a...

Page 7: ...wden tube to the feeder Place the clamp clip around the tube coupling collet to secure the bowden tube Place the Ultimaker on its right side Feed the braided sleeve through the hole at the back and th...

Page 8: ...tor to E1 Guide the motor wires of the Y motor and feeder motor through the ferrite core and close the ferrite core Connect the wires of the heater cartridge to the green terminal HEATER 1 Press at th...

Page 9: ...between the main board and frame Push towards the back panel before completely tightening the screws Place the electronics cover back and secure it with the two screws M3 x 12 mm and locknuts you set...

Page 10: ...ect the power supply and turn on the Ultimaker Start Cura and select the Ultimaker 2 or Ultimaker 2 Extended in the Machine menu depending on which Ultimaker you have Go to Machine Install default fir...

Page 11: ...s visible and click the print head shaft in the align tools Push the left pulley towards the frame and tighten the grub screw with the hex wrench Remove the print head align tools from the shaft Move...

Page 12: ...Attach the new smaller spool holder to the back of your Ultimaker and place the stickers their place Stick the biggest sticker behind the name of your Ultimaker on the front panel and the smallest on...

Reviews: