

Instructions for use and verification manual
Dear users, Welcome to the use of this smart lock. Please check the product list carefully and read the
operating instructions before you install and use this product. Please request professional personnel to
install the door lock and operate it according to the installation standards provided by our company. Do
not disassemble and assemble the door lock without permission. Please protect the relevant sealing
signs to avoid unnecessary trouble during the warranty period.
Instructions for use
1. In the initial state, the lock can be opened by fingerprint and 6- to 12-digit password. Please
complete the registration as soon as possible after the smart lock passes the debugging.
2. A total of 199 fingerprints: 10 admin fingerprints (No.101-110) and 130 user fingerprints
(No.111-240).
30 temporary fingerprints (No.241-270) and 29 coercive fingerprints (271-299).
3. A total of 99 passwords: the number of valid password digits is 6-12, 1 administrator passwords
(No.001), 79 user passwords (No.002-080) ,10 temporary passwords (No.081-090) and
9 coercive
passwords (No.091-099).
4. A total of 99 cards: 10 management cards (No. 301-310) and 70 user cards (No. 311-380).
10
temporary cards (No.381-390) and 9 coercive cards (No.391-399).
5. A total of 4 unlocking methods: fingerprint unlocking, password unlocking, mechanical key
unlocking, card unlocking \ network unlocking (optional).
6. A total of two power supply modes: the main power supply mode: powered by 4 No.5 batteries (the
normal service life is 1 year); Standby power supply mode (enabled when battery is dead) by
external USB power supply
7. Safety button: this button can prevent the cat's eye from opening when it is opened, and the door
cannot be unlocked by pressing on the internal handle; When the safety button if turned off, the cat's
eye opening prevention function fails, but the door can be opened normally by pressing on the
internal handle.
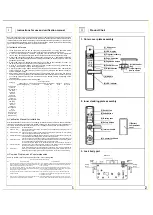
8. Unlocking authority is shown in the following table:
Category
Unlocking authority
Common Mode
(password/fingerprint)
Fingpassword
unlock mode
Fingfingerprint
unlock mode
Feedback
mode
Normally
open mode
Administrator
password
User password
Temporary
password
Coercive
password
Administrator
fingerprint
User fingerprint
Temporary
fingerprint
Coercive
fingerprint
Management
card
User card
Temporary card
Coercive card
Mechanical key
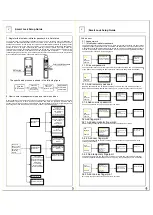
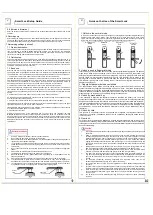
Verification Manual for Installation
After the installation of the whole lock, the following verification must be carried out, and all verification
items must be ensured to be normal, any problems arising from any of which requires reinstallation. If
necessary, contact the local customer service or our company's service hotline in a timely manner.
No. Verification Items
Verification Method
1
Power-on test
After four batteries are installed, the system can be awakened by sliding the cover or
touching touch screen
2
Internal handle test It can be locked by lifting the inner handle and unlocked by pressing the inner handle,
with flexible plate movement and smooth return.
3
External handle test It can be locked by lifting the external handle, and cannot be unlocked by pressing the
internal handle with a flexible plate movement and smooth return.
4
Safety button test
It cannot be locked or unlocked by popping up the internal handle of the safety button; At
this time, it can be locked by lifting the external handle backwards, and the safety button
can be pressed back manually after locking (it must be ensured)
5
Counter-lock test
Turn the counter-lock button to the horizontal state and voice broadcast "the door is
locked" and can control the safety piece to pop out. The display on the vertical state will
show "door unlocked" and can control the safety piece to retract.
6
Unlock test
In the locked state, enter a valid password or fingerprint, and it can be unlocked by
pressing on the external handle during the period when the green indicator light is on .
When the green indicator light is off, the external handle cannot be used for unlocking
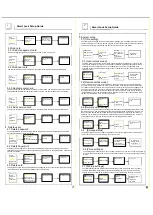
Common Problems and Countermeasures
Common problems and countermeasures are shown in the following table
Common Problems and Countermeasures
No.
Problem description
Countermeasures
1
After the fingerprint or password is verified, the door cannot be
open by pressing on the handle. The external handle must be
lifted first and then pressed down to open the door
For poor installation, please carefully read the installation procedures
in the installation instructions and re-install it to ensure that the lock
center is consistent
2
Every time the system wakes up, the system prompts that the
door has been unlocked and only the administrator fingerprint or
password can be used for unlocking
As a result of the reverse installation of the counter-lock knob, the
inner cover plate is re-installed. When the safety piece is not popped
out, the counter-lock button is installed vertically
3
The external handle function is normal and the internal handle
function is invalid
If the square bar is too long or too short, cut the square bar again
according to the door thickness. The length of the square bar is the
door thickness plus 1.5cm
4
When the door is normally open, the external handle can be
pressed down to open the door without verification
If the rotation direction of the front handle is not correct, remove the
front cover plate, rotate the black handle 180 degrees and reinstall it
I
II
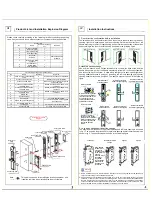
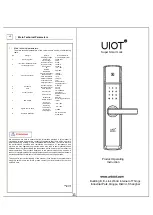
Product Chart
1. Outer cover plate assembly
2. Inner cladding plate assembly
[1]
Set button
[2]
LED display
[3]
Fingerprint library
[4]
Page-up button
[5]Page-down button
[6]Confirm button
[7]
Return button
[8]
Handle
[9]
LED indicator
[11]Mechanical
key
[12]Emergency
power source
[2]Voice button
[3]
Battery case
[4]
Safety button
[5]
Internal handle
[6]
Counter-lock knob
[7]Battery
compartment
cover
3. Lock body part
Safety
lever
Safety
lever
Safety
piece
Main bolt
Oblique
bolt
[1]
Slide cover