background image

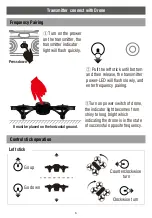
Press down

① 

Turn on the prower

on the transmitter, the 
transmitter indicator 
light will flash quickly.

② 

Pull the left stick until bottom 

and then release, the transmitter 
power-LED will flash slowly, and 
enter frequency pairing.

Turn on power switch of drone, 

the indicator light becomes from 
shiny to long bright which 
indicating the drone is in the state 
of successful opposite frequency.

It must be placed on the horizontal ground.

Left stick

Go up

Go down

Control stick operation

Clockwise turn

Counterclockwise 

turn

Transmitter  connect with Drone

Frequency Pairing

6

Summary of Contents for U61

Page 1: ...USER MANUAL U61 This product is suitable for users over 14 years old Stay away from the rotating propeller Read the important statement and safety guidelines carefully Suitable for indoor flight ...

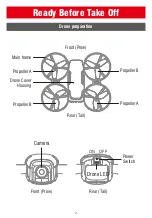
Page 2: ...ON OFF Ready Before Take Off Drone preparation Power Switch Drone LED Camera Main frame Propeller A Propeller A Propeller B Propeller B Front Prow Front Prow Rear Tail Rear Tail Drone Cover Housing 2 ...

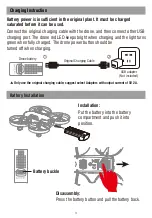
Page 3: ...en charging and the light turns green when fully charged The drone power button should be turned off when charging Original Charging Cable Drone battery Only use the original charging cable suggest select Adapters with output current of 5V 2A USB adapter Not included Battery buckle Press the battery button and pull the battery back Battery Installation Disassembly Put the battery into the battery ...

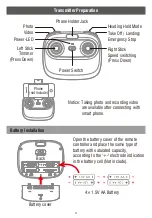
Page 4: ...ess Down Trimmer Press Down Phone not include Notice Taking photo and recording video are available after connecting with smart phone 4 1 5V AA Battery Battery cover Back Open the battery cover of the remote controller and place the same type of battery with saturated capacity according to the electrode indication in the battery cell Not include Battery installation 4 ...

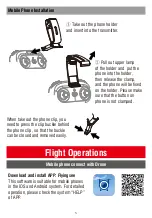
Page 5: ... of the holder and put the phone into the holder then release the clamp and the phone will be fixed on the holder Please make sure that the button on phone is not clamped Flight Operations Mobile phone connect with Drone Download and install APP Flyingsee This software is suitable for mobile phones in the IOS and Android system For detailed operation please check the system HELP of APP Mobile Phon...

Page 6: ... flash slowly and enter frequency pairing Turn on power switch of drone the indicator light becomes from shiny to long bright which indicating the drone is in the state of successful opposite frequency It must be placed on the horizontal ground Left stick Go up Go down Control stick operation Clockwise turn Counterclockwise turn Transmitter connect with Drone Frequency Pairing 6 ...

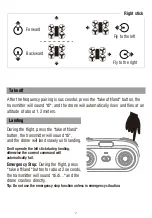
Page 7: ...eters Tip Do not use the emergency stop function unless in emergency situation Landing During the flight press the take off land button the transmitter will sound di and the drone will land slowly until landing Emergency Stop During the flight press take off land button for about 2 seconds the transmitter will sound di di and the drone crashes directly Don t operate the left stick during landing o...

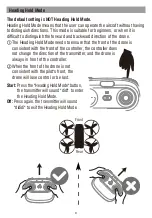
Page 8: ...e needs to ensure that the front of the drone is consistent with the front of the controller the controller does not change the direction of the transmitter and the drone is always in front of the controller When the front of the drone is not consistent with the pilot s front the drone will lose control or be lost Start Press the Heading Hold Mode button the transmitter will sound didi to enter th...

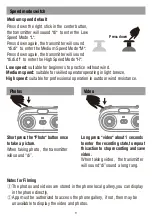
Page 9: ...ode M Press down again the transmitter will sound di di di to enter the High Speed Mode H Press down Short press the Photo button once to take a picture When taking photo the transmitter will sound di Photos Long press video about 1 seconds toenter the recording state to repeat thisaction to stop recording and save video When taking video the transmitter will sound di sound a long rang Video Notes...

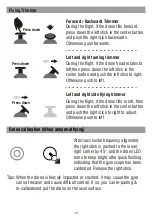
Page 10: ...ead rotates to left then press down the left stick in the center button and push the left stick to right Otherwise push to left Tips When the drone is fiercely impacted or crashed it may cause the gyro can not recover and cause difficult control if so you can re pairing re calibrateand put the drone on the level surface After successful frequency alignment the right stick is pushed to the lower ri...

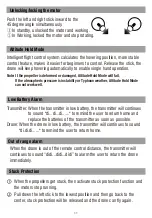
Page 11: ...ion Altitude Hold Mode Low Battery Alarm When the propellers get stuck then activate stuck protection function and the motors stop running Pull down the left stick to the lowest position and then go back to the center stuck protection will be released and the drone can fly again Stuck Protection Out of range alarm Transmitter When the transmitter in low battery the transmitter will continues to so...

Page 12: ...ion Parts Replacement Propeller Replacement Please make sure the propeller are installed correctly otherwise the drone cannot fly Attention Switching sequence At first turn on the power of the transmitter then turn on the power of the drone After the end turn off the power of the drone first and then turn off the power of the transmitter Improper operation caused the crash It is necessary to check...

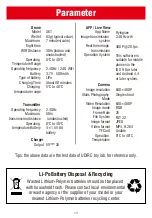
Page 13: ... 30m indoor and unobstructed 0 C to 40 C 2 4GHz 2 4G WiFi 3 7V 500mAh LiPo About 80 minutes 5 C to 40 C Transmitter Operating frequency Maximum transmission distance Operating temperature Battery 2 4GHz 50m unobstructed 0 C to 40 C 4 1 5V AA battery Charger Output 5V 2A APP Live View App Name Image transmission system Real time image transmission Operation System Flyingsee 2 4GHz wifi 480 P 20 fps ...

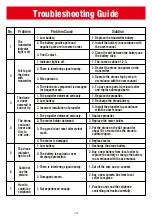
Page 14: ...rt the the drone to calibrate again 4 The motor is damaged 4 Replace motor Problem Problem Cause Solution No The transmitter indicator light is off 1 1 Low battery 1 Replace the transmitter battery 2 The battery positive pole and negative pole are in reverse order 2 Install the battery in accordance with the user manual 3 Poor Contact 3 Clean the dirt between the battery and the battery slice Fail...

Page 15: ...rantee that interference will not occur in a particular installation If this equipment does cause harmful interference to radio or television reception which can be determined by turning the equipment off and on the user is encouraged to try to correct the interference by one or more of the following measures Reorient or relocate the receiving a ntenna Increase the separation between the equipment...

Page 16: ... Changes or modifications to this equipment may cause harmful interference unless the modifications are expressly approved in the instruction manual Modifications not authorized by the manufacturer may void user s authority to operate this device Important Notice Our company s products are improving all the time design and specifications are subject to change without notice All the information in ...

Reviews: