background image

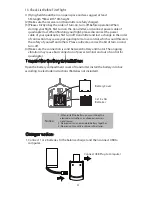
3. When moving throttle stick to left or right, 
    then the quadcopter is turning to left or 
    right at the same time.

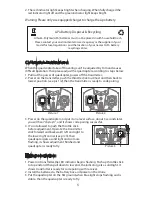
4. When moving forward and backward/ 
    left and right flying stick to front or back, 
    then the drone is flying forward or backward 
    at the same time.

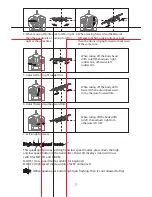
5. Adjust left and right rudder trim

When taking off, the body head 

drifts to left,then adjusts right 

rudder trim, otherwise left 

rudder trim.

6. Adjust forward and backward trim

When taking off, the body drifts 

forward, then adjusts backward 

trim, otherwise forward trim.

7. Left & right trimmer

When taking off,the body drifts 

to left, then adjusts right trim, 

otherwise left trim.

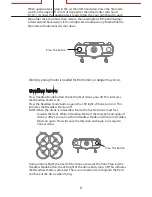
High/low speed mode

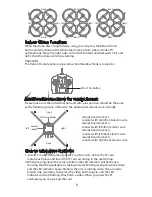
This quadcopter comes with high and low speed modes, press down the high 

and low speed button in the transmitter, then LCD display screen will show 

switch for MODE1 and MODE2.
MODE 1 (Low speed mode, suitable for beginner)

MODE 2 (High speed mode, suitable for RC enthusiast )

(When quadcopter bottom light gets flashing, then it's not allowed to flip)

Flip:

7

Summary of Contents for Upgrade U818A HD

Page 1: ...Warning 4GB memory card Headless Mode Return home function Scan to watch our videos on youtube Customer Service Email usa holystone com United States ca holystone com Canada Phone 1 626 465 7134 PST 4 30 pm 2 00 am Scan to visit our stores ...

Page 2: ...Blade Black Blade Power light Throttle Direction Control Stick Power On Off Direct Trimmer Photo Camera Forward backward left right control stick Forward Backward Trimmer left Right Trimmer Return Home High Low Speed Mode LCD Screen Four Direction Rolling Mode On Off Headless Mode 2 ...

Page 3: ...us of RC quadcopter is uncertain so it may cause potential danger When choosing a flying site stay clear of buildings trees and power lines AVOID flying in or near crowded areas Meanwhile avoid flying in rain storms thunder and lightning to protect machinery and parts out of damage 2 Keep away from humid environments Inside of quadcopter is made up of precise electronic components it must be kept ...

Page 4: ...quadcopter last When finishing your flight please disconnect the power cable of your quadcopter first turn off transmitter and last a change in the order of connection may cause your quadcopter to lose control which would threaten the safety of yourself and others Please cultivate a correct habit of turn on and turn off 4 Make sure the connection is solid between battery and motor The ongoing vibr...

Page 5: ...k to utmost and then back to lowest position see pic 1 2 then the transmitter is ready to code pairing 3 Power on the quadcopter and put it on a level surface about 3 seconds later you will hear di do di and it shows code pairing successful 4 It s not allowed to push the throttle stick before adjustment Operate the transmitter stick forward and backward left and right to the lower right corner see...

Page 6: ... on the quadcopter check the rotating of blades Left Front and Right Back rear blades rotating Clockwise Right Front and Left Back rotating Counterclockwise 3 When flying if the quadcopter tilts to one side then you can adjust balance by relative trim key 4 When the quadcopter battery is low then the transmitter will sound DI DO DI to warn When you receive the warning then you need to remote back ...

Page 7: ... Adjust forward and backward trim When taking off the body drifts forward then adjusts backward trim otherwise forward trim 7 Left right trimmer When taking off the body drifts to left then adjusts right trim otherwise left trim High low speed mode This quadcopter comes with high and low speed modes press down the high and low speed button in the transmitter then LCD display screen will show switc...

Page 8: ...light of drone goes off This indicates that Headless Mode is on Press the Headless Mode button again the LED light of drone turns on This indicates that Headless Mode is off NOTE When the drone is in Headless Mode the head of drone must face towards the front While in Headless Mode if the direction and angle of drone is offset you can exit from Headless Mode and then turn Headless Mode on again Th...

Page 9: ...socket 1 connect with right front electric wire receipt board socket 2 connect with left front electric wire receipt board socket 3 connect with left back electric wire receipt board socket 4 connect with right back electric wire left back right front LED lamp holder camera socket How to take video photo 1 Install TF card to the camera press TF card to insert notice the TF card metal touch place a...

Page 10: ...20P 30fps Camera resolution 1280 720 Spare Parts Below are spare parts for your selection for more convenience we listed each spare part you would buy through local distributors U818A HD 01 U818A HD 02 U818A HD 03 U818A HD 04 U818A HD 05 U818A HD 06 U818A HD 07 U818A HD 08 U818A HD 09 U818A HD 10 U818A HD 11 U818A HD 12 U818A HD 13 U818A HD 15 U818A HD 14 U818A HD 16 U818A HD 17 Standard Motor Red...

Reviews: