background image


⑯ 

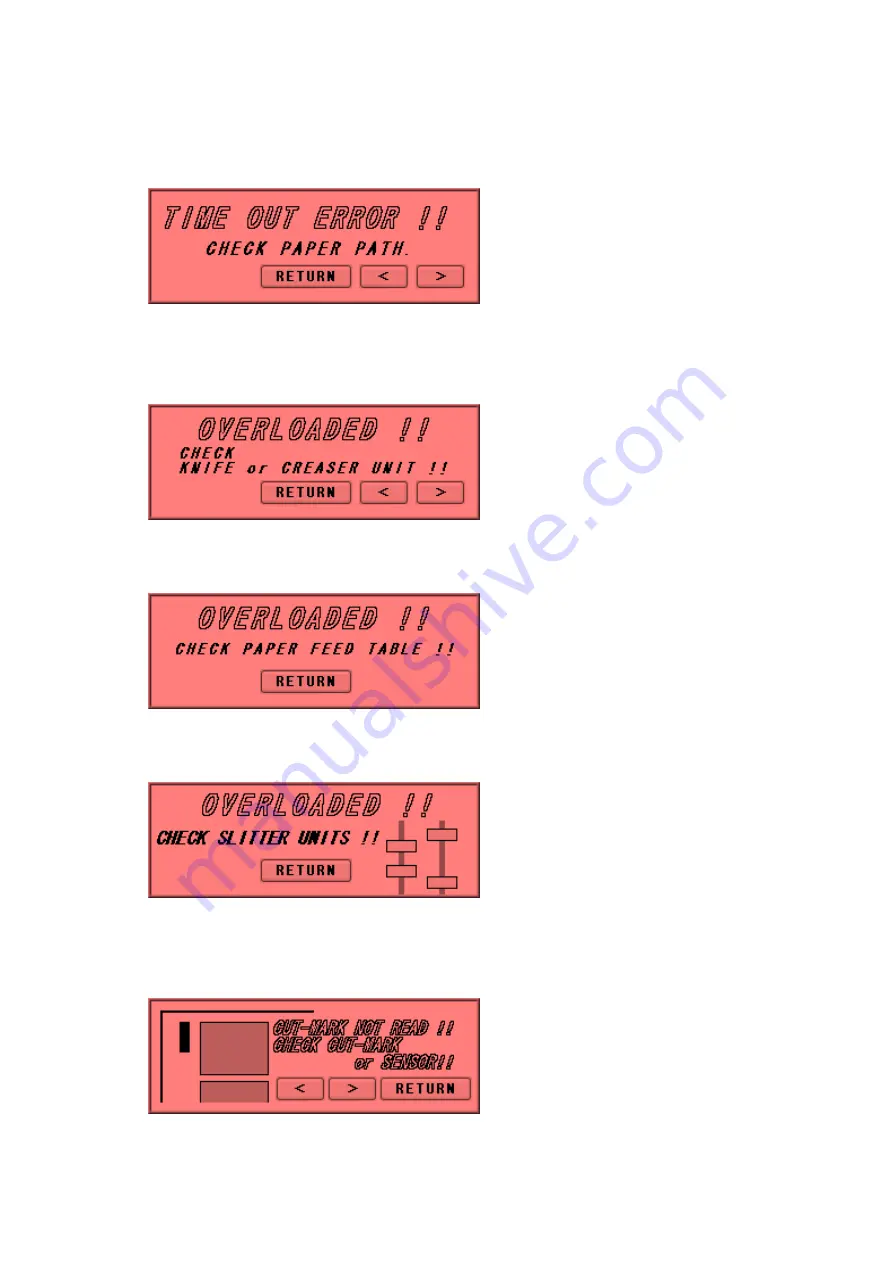
Timeout error 2 

Paper did not pass through within a set time period. Remove the paper remaining inside 

the machine.


⑰ 

Overload error 1 

Cutting or creasing did not complete within a set time period. Remove the paper 

remaining inside the machine.


⑱ 

Overload error 2 

An overloading error occurred at the feed table. Check the feed table. 


⑲ 

Overload error 3 

An overloading error occurred at the slitter. Check the blinking slitter. 


⑳ 

Cut mark detection error 

Cut mark was unable to be detected. Check the cut mark. Eject the paper inside the 

machine.


32

Summary of Contents for AeroCut

Page 1: ...OPERATION MANUAL UCHIDA YOKO CO LTD TOKYO JAPAN Jul 14 2011 USA ...

Page 2: ...nd signs stand for possible dangers Danger This symbol stands for immediate danger threatening the life and health of persons Disregarding these instructions may cause severe damage to health and even serious injuries Caution This symbol stands for an endangering situation that may occur Disregarding these instructions may lead to slight injuries or damage to property Note This symbol stands for n...

Page 3: ...anger 1 Don t open the cover of the equipment There is a danger of receiving an injury or electric shock 2 Turn off the power supply beforehand when attaching or detaching the perforating blade There is a danger of receiving an injury 3 Don t touch any rotating part There is a danger of receiving an injury 2 ...

Page 4: ...n injury 8 Turn off the power supply beforehand when removing paper scraps There is a danger of receiving an injury 9 Avoid the combined use of the creaser and the perforator as it may cause a paper jam or a mechanical failure 10 For the perforator papers of weight 65 lbs Cover stock 176 g or less is to be used Using heavier paper may cause a paper jam or mechanical failure 11 Do not exceed the MA...

Page 5: ...used properly Keep the manual at an appointed place with care so that it may be accessible whenever necessary The specifications of this product are subject to change for improvement Therefore don t mistake the Operation Manual of one product of the same model for that of another because descriptions in the Operation Manual of products of the same model may differ ...

Page 6: ...3 Operational method 18 1 Basic operation 18 2 Slitter initial location movement 18 3 Format selection 19 4 Free entry 21 5 User program retrieval 21 6 User program registration 22 7 Setting of slitter and feed table 23 8 Operation number cancellation 23 9 Manual operation 24 10 Speed change 25 11 Cut mark on off selection 26 12 Automatic operation 26 4 Instructions for use 27 1 If the machine sto...

Page 7: ...se 1 Description and quantities of accessories Electric power cord 1pc Hexagonal wrench 0 08 X 1pc Tweezers 1pc Waste ejector 1pc Instruction manual 1pc Waste box 1pc Paper guide Large 1pc Paper guide Small 5pc 6 ...

Page 8: ...terior features 1 Name of parts 4 5 6 7 8 10 9 1 3 2 1 Stacker 6 Slitter 2 Touch Panel 7 Feed Table 3 Crease Depth Adjustment Dial 8 Slant Adjustment Dial 4 Waste Box 9 Perforator 5 Safety Cover 10 Caster 7 ...

Page 9: ... the inlet are located inside the machine below the feed table 2 1 3 1 Power switch When it is set at I the power is turned on When it is set at O the power is turned off 2 Inlet Plug in the electric power cord here 3 Electric Power Cord Plug this to the inlet 8 ...

Page 10: ...ll a machine please install to a place with no dust and the place which is not influenced with a liquid It becomes the cause of failure if the installation method is mistaken 2 Setting of feed table Insert the feed table to the paper feeder and set the feed table s slotted holes onto the protruding bolts on the machine Install the 2 screws as shown below Feed table Protrusions M6x10 Screws 9 ...

Page 11: ... to remove accessories Remove the chute screws Lift the chute and take out the waste box The accessory case is inside the waste box Waste box Chute Screws 10 Caution Power it off Otherwise Injury could occur ...

Page 12: ...e electric power cord plugged in Is the waste box set 2 Setting of stacker Open the stacker and set the stays in the indentation of the back of the stacker at an appropriate angle to allow smooth paper ejection Adjust the large paper guide according to the paper size Caution Power it off Otherwise Injury could occur Paper Guide Large Stacker Stay Indentation 11 ...

Page 13: ...e Caution Power it off Otherwise 12 Injury could occur 4 How to attach the business card stacker Hang the business card stacker on Paper ejection port of Stacker panel Find the V notch to see where to put the business card stacker Stacker panel Paper ejection port V notch ...

Page 14: ...feed table Fix the paper with the small paper guides Make sure that the paper stack does not exceed the MAX label MAX Label Paper Guide Small Caution 13 Ensure that the paper stack does not exceed the MAX label as it may cause a mechanical failure Separate the sheets of paper well as it may cause a paper jam ...

Page 15: ... drawing below to adjust the crease depth The depth will become the most shallow by choosing Level 1 and the deepest by choosing Level 5 When selecting Levels 4 and 5 be careful of the paper thickness Placing the crease too deep may cause a paper jam or a mechanical failure when the paper is thick Dial Caution 14 Avoid the combined use of the creaser and the perforator as it may cause a paper jam ...

Page 16: ...r may cause a paper jam or a mechanical failure Perforator Gear cover Caution Be sure to install Gear cover or Perforator unit For safety reason machine doesn t work with cover open or if these parts are not in place Caution Power it off Otherwise 15 Injury could occur The maximum paper weight for use is 65 lbs Cover stock 176 g for the perforator Using a heavier paper may cause a paper jam or a m...

Page 17: ...ower blade and fix it Adjust the rest of the aid rollers according to the paper size so that the paper feeding will go smoothly Lower Blade Scale Upper Aid Rollers Upper Blade Lower Aid Rollers Hexagonal Wrench Lower Aid Rollers Upper Blade Caution 16 Avoid the combined use of the creaser and the perforator as it may cause a paper jam or a mechanical failure Avoid contacting the cutting edge of th...

Page 18: ...u adjust the depth of Perforation Loosen both lock levers move adjustment levers Up Shallow Down Deep Lock position by tightening lock lever Deep lock lever shallow height adjustment lever Caution 17 Avoid contacting the cutting edge of the perforating blade Otherwise injury could occur ...

Page 19: ...t when using the creaser Perforator adjustment when using the perforator Paper setting Sample cutting Input value correction and size correction Start of operation 2 Slitter initial location movement When initially turning the power on and after adjusting the head location Turn the power on Press INITIAL POSITION from the operation screen The slitter will move to the initial position The INITIAL P...

Page 20: ... Screen Return to Operation Screen Paper Selection Screen Select the cutting pattern Move to Cutting Pattern Confirmation Screen Confirm cutting pattern and move to Operation Screen Return to Paper Selection Screen Cutting pattern switching Cutting Pattern Selection Screen 19 ...

Page 21: ...ces in the feeding direction Number of pieces in the depth direction B F N A C G O P H I J K L Crease Pos Input Screen M D Confirm input value and return Cancel input value and return Please use as a calculator The maximum paper weight for the perforator is 65 lbs Cover stock 176 g It is not to be used in combination with the creaser Creasing can be performed up to four times per piece It is not t...

Page 22: ...een Line is the number of crease you make on a sheet It turns automatically into CREASE ON when you input the measure of any crease pos Return to Operation Screen User Program Selection Screen Move to the previous 10 program Move to the next 10 program Return to Cutting Pattern Correction Screen Confirm the details of the program for retrieval 21 Enter the number to jump to it Move to the previous...

Page 23: ...eturn to User Program Selection Screen Overwrite confirmation Enter the number to jump to it Delete confirmation Double Click to make a copy of input name Move to the previous program Enter the name for registration Change to number entry Finalize the registration name Press here to select the following symbols which will be displayed one by one Cancel the entry and return Uppercase lowercase swit...

Page 24: ...perating position The display will change from SET to START upon completion Operation Screen 8 Operation number cancellation The total number of processed sheets are counted Press CLR and hold to clear the number You can change the Total number Total number of operated sheets Operation Screen You can make a little adjustment on Total number 23 ...

Page 25: ...turn to Operation Screen Move to Adjust Screen 4 4 If the cut measurement does not match the input value The creaser will operate once The guillotine will operate once The feeder will rotate in reverse The feeder will rotate Manual Operation Screen Feeder speed Fast Slow switching 24 ...

Page 26: ...ly to occur PAPER FEED WORK TIME Skew feed 0 5s 5 0s less likely to occur Skew Feed more likely to occur BLOW OFF SHORT BLOW LONG BLOW Double feed more likely to occur Double feed less likely to occur AIR BLOW Skew feed less likely to occur Skew feed more likely to occur As a recommended default setting PAPER FEED WORK TIME should be 3 0 seconds and AIR BLOW should be LONG BLOW Return to Operation...

Page 27: ...e retrieved is displayed Operation Screen Enter the number of sheets for operation Batch Counter Enter 0 for continuous operations Press START to start an automatic operation The display will change to RUNNING Press STOP and the machine will make an EMERGENCY stop even if the operation is underway Press END if you wish to stop the machine when the current sheet is completed The END sign will blink...

Page 28: ...ration as continuing to operate it may cause a mechanical failure Press MANUAL from the Operation Screen and then press or from the screen or press or from the error screens as shown above to move the feeder for paper ejection Caution Avoid contacting any rotating object Otherwise injury could occur Don t bring a hand face hair sleeves of clothes and the like close to the rotating parts of the mac...

Page 29: ... and take them away Stacker panel Thumb screws If the paper scrap remains under cutter cover If Paper scrap remains under the Cutter cover of the machine turn off the machine and take off thumb screw to remove the anti static brush setting plate After removing plate there will be a space Push the paper scrap down with Waste ejector which comes with machine Waste ejector Anti static Brush Setting P...

Page 30: ...Cutting measurement error Correct the cutting measurement to fit in the value range below The maximum value is subject to change depending on the entered paper size Cut piece number error Correct the number of cut pieces to be in the value range below The maximum number of pieces is subject to change depending on the operation Bottom margin error Correct the bottom margin to fit in the value range...

Page 31: ...rgin to fit in the value specified below Perforation location error Correct the paper size to fit in the value range below Crease front margin error Correct the crease front margin to exceed the value specified below Crease back margin error Correct the crease back margin to exceed the value specified below 30 ...

Page 32: ...that the leading margin becomes larger than the cut mark margin Cover open error Safety cover or Stacker panel might be open Gear cover or Perforator might not be attached correctly Make sure to close the Safety cover and Stacker Panel is closed and Gear cover or Perforator is mounted correctly Paper jam error Paper remains inside the machine Remove the paper Timeout error 1 Paper was not fed with...

Page 33: ...ete within a set time period Remove the paper remaining inside the machine Overload error 2 An overloading error occurred at the feed table Check the feed table Overload error 3 An overloading error occurred at the slitter Check the blinking slitter Cut mark detection error Cut mark was unable to be detected Check the cut mark Eject the paper inside the machine 32 ...

Page 34: ...vary Check the paper Slitter units positioning error Slitter position is out of valid range Check paper size and input data Serial communication error Communication with the touch panel is not possible Turn off the power and turn it on again after 5 seconds or longer 33 ...

Page 35: ... can input 0 400 at the most Use H and I for magnificent adjustment If the printed image is bigger or smaller than the one you designate you can adjust cutting length to fit the printed measurement with this magnificent adjustment When the input value is 4 000 and the actual cut measurement is 4 080 input 0 980 4 000 4 080 input 1 010 4 000 3 960 when the actual cut measurement is 3 960 When this ...

Page 36: ...fset Coat UVcoat Glossy Laminate Paper feeding method Air Suction Input tray capacity MAX2 35 Speed MAX 10 sheets per minute in case of one cut from A4 to A5 Machine dimensions 34 5 W 28 1 D 40 8 H Occupancy area 67 7 W 28 1 D 59 1 H Net weight 397lbs 180Kg Power supply Single phase 100 240VAC 50 60Hz 2 0A 0 8A Power consumption 200W Use temperature 23 to 104 F 5 to 40 C Preservation temperature 1...

Page 37: ... Paper size Finish size 36 Limitations Cut mark size and position Crease limitations Max four times ...

Page 38: ...6 Equipment Electric circuit and parts 37 ...

Page 39: ...38 38 ...

Page 40: ...39 39 ...

Page 41: ...7 Ordering consumables etc When ordering consumables or parts be sure to specify the machine model 40 ...

Page 42: ...ke contact with the distributor or our salesman or customer service section to ask for a new operation manual after making sure of its contents Keep this Operation Manual at an appointed place with care so that it may be available whenever required UCHIDA YOKO CO LTD ...

Reviews: