background image

AeroCut XPro OPERATION MANUAL 

46 


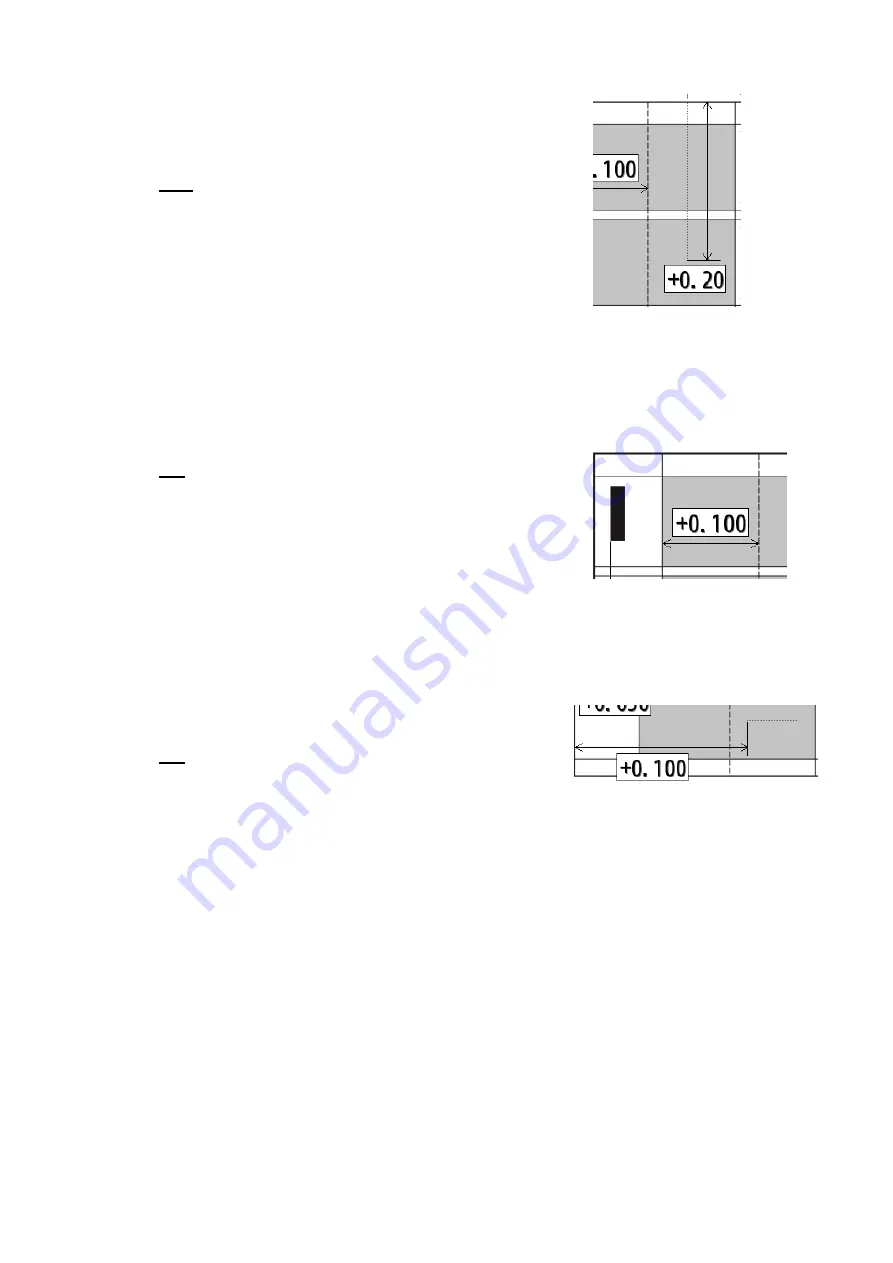
In case the length of X-Perforator is incorrect. 


Input  the  difference  between  inputted  value  and  actual 
length of X-Perforator into I. 

EX:   

In  case  input  value  is  5.900”  and  actual  perforation  is 
5.700” length, input +0.200 to I. 

You can input 

±

0.400”


  at the most


In case creasing position is incorrect 


Input  the  difference  between  inputted  value  and  actual 
creasing position into J. 

EX: 

In  case  input  value  is  2.000”  and  the  actual  creasing 
position is 1.900” length, input +0.100 to J. 

You can input 

±

0.400” at the most


In case the timing of Y-Perforation is incorrect. 


Input  the  difference  between  inputted  value  and  start 
position into K. 

EX: 

In  case  input  value  is  2.000”  and  the  actual  starting 
position of creasing is 1.900” length, input +0.100 to K. 

You can input 

±

0.400” at the most


I  

J  

K  

Summary of Contents for AeroCut X-Pro

Page 1: ...OPERATION MANUAL UCHIDA YOKO CO LTD 78 705 V1 00...

Page 2: ...or damage to property Definition of Symbols and Notes In this manual the following names and signs stand for possible dangers Caution This symbol stands for an endangering situation that may occur Dis...

Page 3: ...ance or inspection There is a danger of receiving an injury When you install a machine please install to a place with no dust and the place which is not influenced with a liquid It becomes the cause o...

Page 4: ...Adjuster settings 11 2 2 Turning the power on 11 2 3 Initial position 12 2 4 Input 12 2 5 Set 13 2 6 Paper setting 14 2 7 Waste box setting 15 2 8 Stacker and Card stacker wire settings 15 2 9 Start...

Page 5: ...37 5 1 3 Side suction adjustment 37 5 1 4 Air blow adjustment 38 5 1 5 PAPER FEED WORK TIME adjustment 38 5 1 6 Sensitivity of Double feed sensor 38 5 2 Change speed 39 5 2 1 Speed of delivery 39 5 2...

Page 6: ...No Name No Name 01 Safety cover 09 Touch panel 02 Skew adjustment dial 10 Barcode reader 03 Feed table 11 X perforator 04 Power switch 12 Y perforator 05 Inlet 13 Margin slitter unit 06 Caster 14 Gutt...

Page 7: ...ult in severe injury Don t touch any rotating part There is a danger of receiving an injury Don t open the cover of the equipment There is a danger of receiving an injury or electric shock Caution Don...

Page 8: ...ssories Operation manual Template Electric power cord Waste box Stacker end Business card partition Card stacker Card stacker wire Paper guide Small Paper guide Large Long paper feed guide Spanner Hex...

Page 9: ...Page 22 FLEX MODE Page 24 Setting Page 47 Counter Page 18 Initial position Page 12 Pause Page 16 Stop Page 18 Compensation Page 41 Barcode Page 34 Cut mark Page 13 Conveyor Page 35 MANU SET screen Rea...

Page 10: ...ave ink or toner not fused properly It may cause contaminating the work and the machine Papers that are too slippery It may cause miss feed or inaccurate results Prints that are shrank stretched or sk...

Page 11: ...AeroCut XPro OPERATION MANUAL 10 1 5Layout terminology...

Page 12: ...o connect the power cord to a grounded outlet If the ground is not securely connected it could lead to electric shock or fire AC 200 240V 50 60Hz Electric power cord Unlock Lock Lock nut Turn the Adju...

Page 13: ...button The slitters will move to their initial position automatically Then the button changes to SET 2 4 Input Enter the cut pattern Enter the number of sheets for operation When 0 is entered in the...

Page 14: ...ach set completed During the interval the machine stops feeding until the entered interval time is elapsed Touch the screen to have CUT MARK to activate cut mark registration When it is on the machine...

Page 15: ...on the feed table Use the paper guide Large and paper guides Small to fix the sheets Note Paper loading capacity is 4 0 Make sure that the paper stack does not exceed the MAX label It affects finishin...

Page 16: ...into the slot of the feed tray and tighten the screws 2 7 Waste box setting Place the Waste box under the Chute 2 8 Stacker and Card stacker wire settings Use the Card stacker when cutting papers to c...

Page 17: ...When cutting papers into Post cards When cutting papers into Business cards Press the PAUSE button before starting to process After pressing the Start button the machine will pause near the ejection o...

Page 18: ...due to momentum install the Card stacker wires 2 9 Start Press START to start an automatic operation The display will change to RUNNING After processing the entered number of sheets in quantity the ma...

Page 19: ...e number of finished sheets when the machine is stopped with STOP or END button Press to reset the counter to 0 The set counter indicates the number of finished sets when the machine is stopped with S...

Page 20: ...aste disposal Dispose the wastes in the waste box appropriately Overloading wastes causes errors or a breakdown 2 12 Power off Make sure that the machine is stopped Return to the Home screen Turn off...

Page 21: ...ady stored in the machine In MANUSET mode user programs can be created and stored into the machine In FLEX MODE you can generate user data with a lot of flexibility in layout And also these data can b...

Page 22: ...t pattern can be checked in detail and the measurements can be changed Refer to MANUSET for measurement setting procedures Copy the selected cutting pattern to FLEX MODE then move to FLEX MODE screen...

Page 23: ...number to change the value Measurement A R can be customized Measurement S T will be calculated automatically Move to User Program Selection Screen Copy the selected cutting pattern to FLEX MODE then...

Page 24: ...E Leading edge size It doesn t make the first cut if 0 is entered F Top margin size 0 or 0 125 2 25 G Cut mark Position Only smaller number than the front margin can be entered H Gutter size 0 08 Depe...

Page 25: ...r perforate per page This allows the machine to finish jobs which MANU SET cannot finish such as multiple sizes of cards from a page and pass through pages without any actions Move to User Program Sel...

Page 26: ...reen This screen allows you to input each pitch from No 1 to No 20 The adjacent switches are used for selecting no operation guillotine creaser or X perforator Every time the switch is pressed the sel...

Page 27: ...elected it perforates a page from the counter operation side edge to the input lengths firstly at A length and secondly at B length From the third perforation it keeps perforating at selected lengths...

Page 28: ...ODE user data can be stored SAVE READ procedures are same in each mode 3 5 1 Save Can store the contents of the MANUSET or FLEX MODE Press the SAVE Press the button in which you wish to make a registr...

Page 29: ...is message will be shown if SAVE was pressed Then press OK and save data Saved user data can be deleted with a press of CLEAR 3 5 2 Read Can store the contents of the MANUSET or FLEX MODE Press the RE...

Page 30: ...ils of the program for retrieval Data can be accessed with a press OK 3 5 3 Copy and Paste Job name After pressing NAME COPY select the job name you want to copy and it will be copied to the box below...

Page 31: ...ator unit is not set in the machine please attach the delivery guide instead in order to avoid paper jam Attach X Perforator unit Upper part Ensure to hold the perforator with both hands and attach it...

Page 32: ...n the drawing below to adjust the perfo depth Note The recommended paper weight for the perforator is 250 g or less 4 3Y perforator Remove the delivery guide Note In case Perforator unit is not set in...

Page 33: ...s and attach it as shown in the figure Fasten knobs to fix the position of the unit Put the connectors into sockets according to the numbers shown 4 4 How to adjust the location of Y perforation When...

Page 34: ...are not positioned to come into contact with the lower blades remove the perforator from the main body for adjustment Loosen the two knurled head screws to remove the perforator cartridge cover Loosen...

Page 35: ...arcode reading modes according to the purpose CHANGE SHEET Automatic job changeover 1 The machine reads the barcode and compares to the selected job 2 If the job number read is different from the job...

Page 36: ...d up Slow Fast 1 2 3 4 5 6 7 8 9 10 A4 Post card Business card Select the card stacking method When AeroCut XPro starts operation the conveyor also starts to drive automatically The conveyor drives fo...

Page 37: ...5 1 1 Upper suction adjustment Default 1 2 3 4 5 6 7 8 9 10 Reduce double feed Easier to feed Double paper feeds may occur in case of feeding thin or low density papers In such cases turn down the VAC...

Page 38: ...with statics may cause double paper feed In such cases turn up the blower 5 1 3 Side suction adjustment Default 1 2 3 4 5 6 7 8 9 10 Reduce skew Reduce double feed Easy to feed BLOWER will be turned...

Page 39: ...ng Paper fed work time can be adjusted with a fraction of 0 1s 5 1 6 Sensitivity of Double feed sensor Default High sensitive Low sensitive If the machine detects double feed even with a single sheet...

Page 40: ...nd inaccurate cut In such a case slow down the XP SPEED 5 3 Feed frequency Default 1 2 3 4 5 Reduce double feed High speed Feed frequency is the function to alter intervals between paper feeds As the...

Page 41: ...lever shown in the drawing below to adjust the crease depth If creasing pressure is not enough even the lever is adjusted pressing CREASE 1 button and changing creasing mode to CREASE 2 may help CREA...

Page 42: ...5 6 1 In cases cutting positions don t match to image positions Image shift compensation tab will pop up by pressing i button Select an Image shift compensation setting 4 patterns of Image shift comp...

Page 43: ...as it should be the images on the cards seem moved to the bottom Enter a correction value in B to cut the top margin wider If the top margin was printed narrower than as it should be the images on the...

Page 44: ...ios are changed all parameters such as card size and gutter size will be changed as well Must be from 80 to 120 EX If printing should be 4 000 width but actual printing is 4 080 input 102 0 into D Whe...

Page 45: ...will be added to each total measurements which are circled on the image below Then A B C and D will be reset to 0 000 You can change the measurement by 0 002 Each adjustment should be within 0 080 at...

Page 46: ...ou can input 0 400 at the most In case X perforation position in feeding direction is wrong In case the layout has X Perforation only Input the difference between inputted value and actual position of...

Page 47: ...g position is incorrect Input the difference between inputted value and actual creasing position into J EX In case input value is 2 000 and the actual creasing position is 1 900 length input 0 100 to...

Page 48: ...RATION MANUAL 47 6 Manual control 6 1 Settings screen Feed roller will rotate Inching Feed roller will rotate in reverse Inching Guillotine will move once Crease will move Feed table will move X perfo...

Page 49: ...on SLITTER button will appear 6 3 Paper jam Enter settings screen press buttons to inch the rollers forward backward and remove the jammed paper If paper is stuck around the guillotine section press C...

Page 50: ...sed 05 Cut Paper Jammed error 1 Paper remains inside the machine Remove the paper 06 Timeout error 1 Paper was not fed within a set time period Check the paper feeder 07 Timeout error 2 Paper did not...

Page 51: ...e trailing edge to fit in the value specified below 14 Cut mark error Cut mark was unable to be detected Check the cut mark Eject the paper inside the machine Note Cut mark sensor detects the black ma...

Page 52: ...Cut piece number error Correct the number of cut pieces to be in the value range below The maximum number of pieces is subject to change depending on the operation 21 Guillotine error The cutter blad...

Page 53: ...er has moved and staying at upper position Move the creaser to bottom dead center 29 Cutting measurement error Correct the cutting measurement to fit in the value range below The maximum value is subj...

Page 54: ...cted on Paper ejection table instead of waste box 42 Double feed error Check the paper or paper path 43 FLEX MODE input error 1 This error results when the three input values shown in the following fi...

Page 55: ...t error2 Overload error An overloading error occurred at the X Perforator 56 Option unit error3 The X perfo blade is not at the initial position Move X perfo to initial position Initial position is on...

Page 56: ...Over feed error Check the paper on the delivery tray 65 Copy to FLEX error The data cannot be processed in FLEX mode Correct the figures so that the number of actions will be 20 times or less or proce...

Page 57: ...ered paper size Leading edge and cut mark margin warning Correct the measurement so that the leading edge becomes larger than the cut mark margin Update message This error message appears as a warning...

Page 58: ...the sensitivity of the double feed detection sensor The detection sensor detects double feed by checking the edge of sheets It is recommended not to print on the sheet edge Cut skewing Make sure that...

Page 59: ...nate Depending on paper Paper feeding method Tri suction upper belt feeding mechanism Input tray capacity MAX 4 000 Speed 9 0 sheets per minute 21 business cards from SRA3 Machine dimensions inch W46...

Page 60: ...able whenever required If this Operation Manual is stained or lost make contact with the distributor or our salesman or customer service section to ask for a new operation manual after making sure of...

Reviews: