


2005 UCAN FASTENING PRODUCTS
9
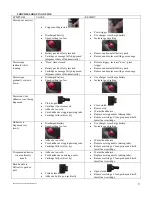
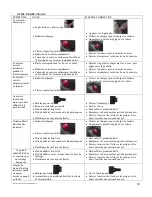
TROUBLESHOO
UIDE
TING G
CAUSE
SYMPTOM
REMEDY
Motor does not start.
•
Trigger not depressed
•
Discharged battery
•
Speed setting too low
•
Battery pack not fully inserted.
•
Cartridge or sausage fully dispensed
utomatically)
(dispenser shuts off a
•
Press trigger.
battery.
•
Use charger to recharge
•
Increase speed setting
•
Remove and reinstall battery pack.
•
Remove and replace cartridge or sausage.
Motor stops
suddenly while
running.
•
“Dose” time elapsed
•
Battery pack not fully inserted.
•
Cartridge or sausage fully dispensed
automatically)
(dispenser shuts off
•
Release trigger, increase “dose”, press
trigger.
•
Remove and reinstall battery pack.
•
Remove and replace cartridge or sausage.
Motor stops
gradually or slows
down.
•
Discharged battery
•
Speed setting too low
•
Use charger to recharg
•
Increase speed setting
e battery.
Motor runs, but
adhesive is not being
dispensed.
•
Clutch open
oved
•
Cartridge tip not rem
•
Adhesive too cold.
xing tube
•
Cured adhesive clogging mi
•
Cartridge failure (blow by)
•
Close clutch.
•
Remove tip.
•
Warm the adhesive.
•
Replace mixing nozzle (mixing tube).
•
Remove cartridge. Clean pistons and teeth.
Install new cartridge.
Adhesive is
dispensed very
slowly
•
Discharged Battery
•
Speed setting too low
•
Adhesive too cold.
xing tube
•
Cured adhesive clogging mi
•
Cartridge failure (blow by)
•
Use charger to recharg
•
Increase speed setting
e battery.
•
Warm the adhesive.
•
Replace mixing nozzle (mixing tube).
•
Remove cartridge. Clean pistons and teeth.
.
Install new cartridge
Dispensed adhesive
is not uniformly
mixed.
•
Adhesive too cold.
ozzle
•
Cured adhesive in mixing n
•
Cartridge failure (blow by)
•
Warm the adhesive.
•
Replace mixing nozzle (mixing tube).
•
Remove cartridge. Clean pistons and teeth.
Install new cartridge.
Rack handle is
difficult to push or
pull.
•
Clutch closed
•
Adhesive built up on rack teeth
•
Open clutch
•
Remove cartridge. Clean pistons and teeth.
Install new cartridge.


