background image

23

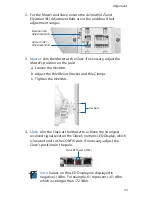
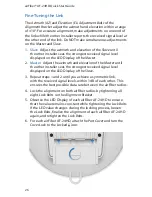
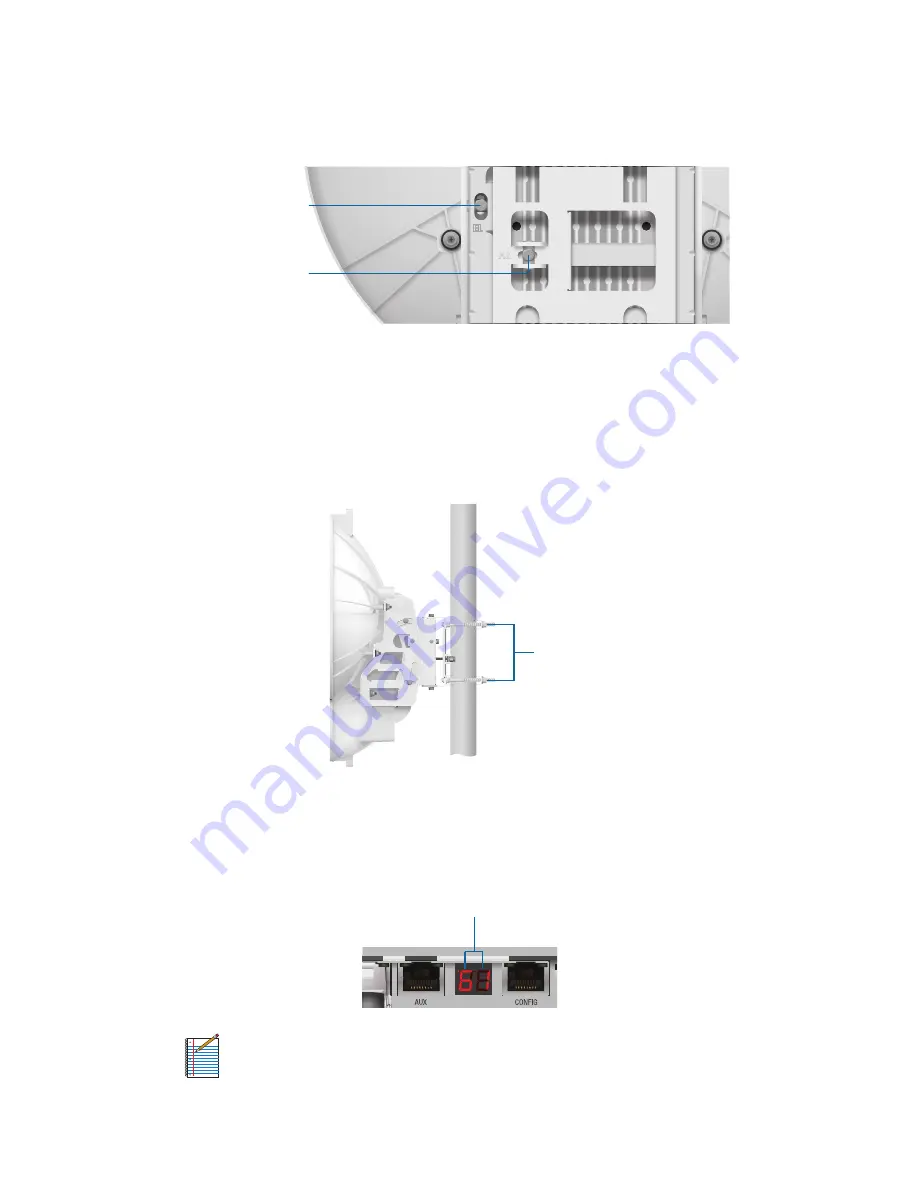
2.  For the Master and Slave, ensure the Azimuth (AZ) and 

Elevation (EL) Adjustment Bolts are in the middle of their 

adjustment ranges.

Elevation (EL) 

Adjustment Bolt

Azimuth (AZ) 

Adjustment Bolt

3. 

Master

  Aim the Master at the Slave. If necessary, adjust the 

Master's position on the pole:

a.  Loosen the Hex Nuts.
b.  Adjust the Pole Mount Bracket and Pole Clamps.
c.  Tighten the Hex Nuts.

0 5 10

5

10

Hex Nuts

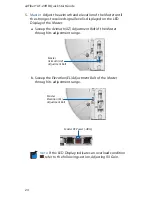
4. 

Slave

  Aim the Slave at the Master to achieve the strongest 

received signal level on the Slave's numeric LED Display, which 
is located next to the CONFIG port. If necessary, adjust the 
Slave's position on the pole.

Slave RF Power (-dBm)

Note:

 Values on the LED Display are displayed in 

negative (-) dBm. For example, 61 represents -61 dBm, 

which is stronger than -72 dBm. 

Alignment

Summary of Contents for airFiber AF-24HD

Page 1: ...24 GHz Full Duplex Point to Point 2 Gbps Radio Model AF 24HD ...

Page 2: ......

Page 3: ...arriage Bolts M10x150 Qty 4 Flat Washers M10 Qty 4 Split Lock Washers M10 Qty 4 Hex Nuts M10 Qty 4 Metal Strap 24 GHz Full Duplex Point to Point 2 Gbps Radio Model AF 24HD External GPS Antenna Cable Ties Qty 3 Gigabit PoE Adapter 50V 1 2A Power Cord Quick Start Guide TERMS OF USE Ubiquiti radio devices must be professionally installed Shielded Ethernet cable and earth grounding must be used as con...

Page 4: ...2 Hardware Overview Side 0 5 10 5 10 Alignment Bracket Elevation Adjustment Azimuth Adjustment Ground Bonding Point Lock Bolts Lock Bolts airFiber AF 24HD Quick Start Guide ...

Page 5: ...3 Back Lock Bolts Lock Bolts Lanyard Loop Lanyard Loop Azimuth Adjustment Lock Bolts Lock Bolts Cover Lock Port Cover Elevation Adjustment Hardware Overview ...

Page 6: ... unit is already powered on DATA 10 100 1000 Mbps port handles all user traffic AUX Port for audio tone aiming LED Display Digital display used for power status and mode information CONFIG 10 100 Mbps secured port for configuration By default this is the only port that can monitor configure and or update firmware LEDs Link Act Speed GPS Modulation Link Act Speed RX Power Master Slave RF Link Statu...

Page 7: ...O Long Flash 6x 64QAM MIMO On 8x 256QAM MIMO LED Display RX Power dBm Number Decodable RX Signal Flashing Number Undecodable RX Signal Overload Condition Master Slave Off Slave Mode On Master Mode RF Link Status Off RF Off Short Flash Syncing Normal Flash Beaconing Long Flash Registering On Operational CONFIG Speed Off 10 Mbps On 100 Mbps Link Act Off No Ethernet Link On Ethernet Link Established ...

Page 8: ...to properly ground your airFiber units will void your warranty Recommended 2 Outdoor Gigabit PoE surge protectors Ubiquiti Ethernet Surge Protector model ETH SP Note For guidelines about grounding and lightning protection follow your local electrical regulatory codes Outdoor shielded Category 5e or above cabling and shielded RJ 45 connectors should be used for all wired Ethernet connections Catego...

Page 9: ...t an Ethernet cable between your computer and the CONFIG port Configure device settings in the airFiber Configuration Interface Once configuration is complete disconnect the cables to move the airFiber radios Reconnect at the site After you have mounted the airFiber radios establish and optimize the RF link Connecting Power over Ethernet 1 Turn the Cover Lock to the Unlocked icon Slide the Port Co...

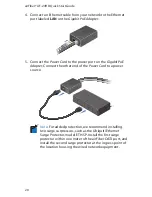
Page 10: ... end of the Ethernet cable from the DATA port to the Ethernet port labeled POE on the Gigabit PoE Adapter 4 Connect the Power Cord to the power port on the Gigabit PoE Adapter Connect the other end of the Power Cord to a power source airFiber AF 24HD Quick Start Guide ...

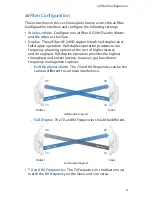
Page 11: ...ost of higher latency and throughput Full duplex operation provides the highest throughput and lowest latency however you have fewer frequency management options Half Duplex default The TX and RX Frequencies can be the same or different to suit local interference TX RX TX Slave Master Frequency A Frequency A RX Half Duplex Diagram Full Duplex The TX and RX Frequencies should be different TX RX TX ...

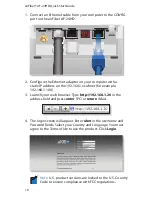
Page 12: ...0 3 Launch your web browser Type http 192 168 1 20 in the address field and press enter PC or return Mac 4 The login screen will appear Enter ubnt in the Username and Password fields Select your Country and Language You must agree to the Terms of Use to use the product Click Login Note U S product versions are locked to the U S Country Code to ensure compliance with FCC regulations airFiber AF 24H...

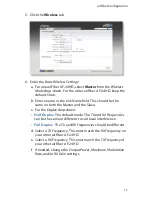
Page 13: ...lave c For the Duplex drop down Half Duplex The default mode The TX and RX Frequencies can be the same or different to suit local interference Full Duplex The TX and RX Frequencies should be different d Select a TX Frequency This must match the RX Frequency on your other airFiber AF 24HD e Select a RX Frequency This must match the TX Frequency of your other airFiber AF 24HD f If needed change the ...

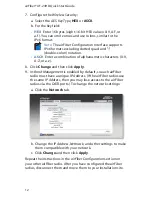
Page 14: ...Apply 9 In Band Management is enabled by default so each airFiber radio must have a unique IP Address If the airFiber radios use the same IP Address then you may lose access to the airFiber radios via the DATA ports To change the network settings a Click the Network tab b Change the IP Address Netmask and other settings to make them compatible with your network c Click Change and then click Apply ...

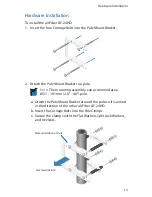
Page 15: ...e The mounting assembly can accommodate a Ø 51 101 mm 2 0 4 0 pole a Orient the Pole Mount Bracket around the pole so it is aimed in the direction of the other airFiber AF 24HD b Insert the Carriage Bolts into the Pole Clamps c Secure the clamps with the Flat Washers Split Lock Washers and Hex Nuts Note orientation of slots Aim towards link Hardware Installation ...

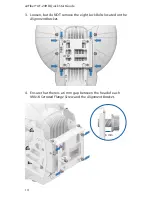
Page 16: ...remove the eight Lock Bolts located on the Alignment Bracket 4 Ensure that there is a 6 mm gap between the head of each M8x14 Serrated Flange Screw and the Alignment Bracket 0 5 10 5 10 6 mm airFiber AF 24HD Quick Start Guide ...

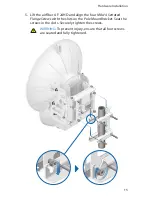
Page 17: ...ur M8x14 Serrated Flange Screws with the slots on the Pole Mount Bracket Seat the screws in the slots Securely tighten the screws WARNING To prevent injury ensure that all four screws are seated and fully tightened 0 5 10 5 10 Hardware Installation ...

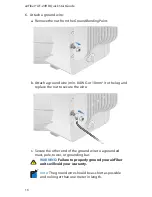
Page 18: ...d replace the nut to secure the wire c Secure the other end of the ground wire to a grounded mast pole tower or grounding bar WARNING Failure to properly ground your airFiber units will void your warranty Note The ground wire should be as short as possible and no longer than one meter in length airFiber AF 24HD Quick Start Guide ...

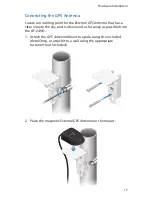
Page 19: ...clear view to the sky and is above and as far away as possible from the AF 24HD 1 Attach the GPS Antenna Mount to a pole using the included Metal Strap or attach it to a wall using the appropriate fasteners not included 2 Place the magnetic External GPS Antenna on the mount Hardware Installation ...

Page 20: ...l GPS Antenna to the mount with a Cable Tie 4 Turn the Cover Lock counterclockwise to the Unlocked icon Slide the Port Cover down to remove it 5 Connect the External GPS Antenna to the GPS SMA connector airFiber AF 24HD Quick Start Guide ...

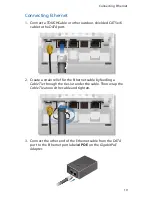
Page 21: ...2 Create a strain relief for the Ethernet cable by feeding a Cable Tie through the tie slot under the cable Then wrap the Cable Tie around the cable and tighten 3 Connect the other end of the Ethernet cable from the DATA port to the Ethernet port labeled POE on the Gigabit PoE Adapter Connecting Ethernet ...

Page 22: ...r end of the Power Cord to a power source Note For added protection we recommend installing two surge surpressors such as the Ubiquiti Ethernet Surge Protector model ETH SP Install the first surge protector within one meter of the airFiber DATA port and install the second surge protector at the ingress point of the location housing the wired network equipment airFiber AF 24HD Quick Start Guide ...

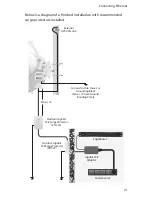
Page 23: ...tors installed 0 5 10 5 10 Ground to Pole Tower or Grounding Block Max 1 m from Ground Bonding Point External GPS Antenna Max 1 m Outdoor Gigabit PoE Surge Protector ETH SP Outdoor Gigabit PoE Surge Protector ETH SP EdgeRouter Gigabit PoE Adapter Power Source Connecting Ethernet ...

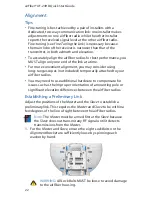
Page 24: ...ached to your airFiber radios You may need to use additional hardware to compensate for issues such as the improper orientation of a mounting pole or significant elevation differences between the airFiber radios Establishing a Preliminary Link Adjust the positions of the Master and the Slave to establish a preliminary link This requires the Master and Slave to be within a few degrees of the line o...

Page 25: ... a Loosen the Hex Nuts b Adjust the Pole Mount Bracket and Pole Clamps c Tighten the Hex Nuts 0 5 10 5 10 Hex Nuts 4 Slave Aim the Slave at the Master to achieve the strongest received signal level on the Slave s numeric LED Display which is located next to the CONFIG port If necessary adjust the Slave s position on the pole Slave RF Power dBm Note Values on the LED Display are displayed in negati...

Page 26: ...Adjustment Bolt of the Master through its adjustment range Master Azimuth AZ Adjustment Bolt b Sweep the Elevation EL Adjustment Bolt of the Master through its adjustment range Master Elevation EL Adjustment Bolt Master RF Power dBm Note If the LED Display indicates an overload condition refer to the following section Adjusting RX Gain airFiber AF 24HD Quick Start Guide ...

Page 27: ...28 ft and 800 m 2 625 ft Target 40 dBm Decrease RX Gain to overcome overload condition For short ranges or strong signal conditions adjust the power to be 3 5 dB below overload condition Decrease RX Gain first Never mitigate overload condition by misaligning antennas Link Distance RX Gain Setting Approximate TX Power Setting d 1 km d 3 281 ft High 25 dBm 0 5 km d 1 km 1 640 ft d 3 281 ft Low 19 25...

Page 28: ...ther installer sees the strongest received signal level displayed on the LED Display of the Slave 3 Repeat steps 1 and 2 until you achieve a symmetric link with the received signal levels within 1 dB of each other This ensures the best possible data rate between the airFiber radios 4 Lock the alignment on both airFiber radios by tightening all eight Lock Bolts on the Alignment Bracket 5 Observe th...

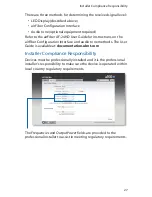
Page 29: ...terface and audio tone methods The User Guide is available at documentation ubnt com Installer Compliance Responsibility Devices must be professionally installed and it is the professional installer s responsibility to make sure the device is operated within local country regulatory requirements The Frequencies and Output Power fields are provided to the professional installer to assist in meeting...

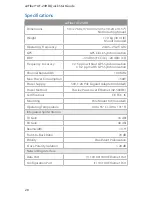
Page 30: ...ndwidth 100 MHz Max Power Consumption 50W Power Supply 50V 1 2A PoE Gigabit Adapter Included Power Method Passive Power over Ethernet 42 58VDC Certifications CE FCC IC Mounting Pole Mount Kit Included Operating Temperature 40 to 55 C 40 to 131 F Integrated Split Antenna TX Gain 33 dBi RX Gain 40 dBi Beamwidth 3 5 Front to Back Ratio 70 dB Polarity Dual Slant Polarization Cross Polarity Isolation 2...

Page 31: ...ed only by a qualified service technician 3 This equipment is provided with a detachable power cord which has an integral safety ground wire intended for connection to a grounded safety outlet a Do not substitute the power cord with one that is not the provided approved type Never use an adapter plug to connect to a 2 wire outlet as this will defeat the continuity of the grounding wire b The equip...

Page 32: ...ives or as approved by Ubiquiti Networks in writing II has been painted rebranded or physically modified in any way III has been damaged due to errors or defects in cabling IV has been subjected to misuse abuse negligence abnormal physical electromagnetic or electrical stress including lightning strikes or accident V has been damaged or impaired as a result of using third party firmware VI has no ...

Page 33: ...RPOSE AND NON INFRINGEMENT AND ANY WARRANTIES ARISING FROM ANY COURSE OF DEALING USAGE OR TRADE PRACTICE IN CONNECTION WITH SUCH PRODUCTS AND SERVICES BUYER ACKNOWLEDGES THAT NEITHER UBIQUITI NETWORKS NOR ITS THIRD PARTY PROVIDERS CONTROL BUYER S EQUIPMENT OR THE TRANSFER OF DATA OVER COMMUNICATIONS FACILITIES INCLUDING THE INTERNET AND THAT THE PRODUCTS AND SERVICES MAY BE SUBJECT TO LIMITATIONS ...

Page 34: ...THE PRODUCT TO YOU The United Nations Convention on Contracts for the International Sale of Goods shall not apply to any transactions regarding the sale of the Products Compliance FCC Changes or modifications not expressly approved by the party responsible for compliance could void the user s authority to operate the equipment This device complies with Part 15 of the FCC Rules Operation is subject...

Page 35: ...g interference that may cause undesired operation of the device CAN ICES 3 A NMB 3 A Cet appareil numérique de la classe A est conforme à la norme NMB 3 A Canada Pour réduire le risque d interférence aux autres utilisateurs le type d antenne et son gain doivent être choisies de façon que la puissance isotrope rayonnée équivalente PIRE ne dépasse pas ce qui est nécessaire pour une communication réu...

Page 36: ... séparation de toute personnes d au moins 107 cm et ne doivent pas être localisé ou utilisé en conflit avec tout autre antenne ou transmetteur excluant la liste de certification de ce produit CE Marking CE marking on this product represents the product is in compliance with all directives that are applicable to it This equipment is intended to be accessed only by service personnel and or trained p...

Page 37: ... vakuuttaa täten että UBIQUITI NETWORKS device tyyppinen laite on direktiivin 1999 5 EY oleellisten vaatimusten ja sitä koskevien direktiivin muiden ehtojen mukainen Français French Par la présente UBIQUITI NETWORKS déclare que l appareil UBIQUITI NETWORKS device est conforme aux exigences essentielles et aux autres dispositions pertinentes de la directive 1999 5 CE Deutsch German Hiermit erklärt ...

Page 38: ...ernice 1999 5 ES Svenska Swedish Härmed intygar UBIQUITI NETWORKS att denna UBIQUITI NETWORKS device står I överensstämmelse med de väsentliga egenskapskrav och övriga relevanta bestämmelser som framgår av direktiv 1999 5 EG Español Spanish Por medio de la presente UBIQUITI NETWORKS declara que el UBIQUITI NETWORKS device cumple con los requisitos esenciales y cualesquiera otras disposiciones apli...

Page 39: ......
Page 40: ...EdgeRouter and TOUGHCable are trademarks or registered trademarks of Ubiquiti Networks Inc in the United States and in other countries All other trademarks are the property of their respective owners Support support ubnt com Community community ubnt com Downloads downloads ubnt com w w w u b n t c o m 640 00152 03 640 00152 03 ...

Reviews: