


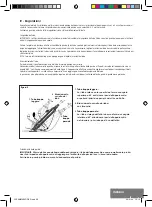

Step 4.
Fix the counterweights to the hose parts following the length of the pool (see table A)
and assemble the hose parts (see figures 5 and 6). You must use enough section
to reach the opposite end of your pool, plus one extra section. Also use the counterweights
to ensure a balanced floating of the hose in the water. The number of weights you need
is determined by the maximum depth of your pool. The more your pool is deep the more
you will need weights. The number of weights you need for your pool is explained in table A.
One of the hose ends has 2 female hose ends with a
hose protector. This part needs to be added last and
must be connected to the skimmer or the vacuum cleaning
system of the pool.
Once your hoover is assembled, it should look like the below:
III - Installation
This appliance was made to be used in various types of pools. For this reason, we have added
certain parts (such as a flapper connector and an automatic pressure regulator).
You may not need these, depending on the equipment of your pool. The basic installation
is done in the skimmer or on a vacuum cleaning system.
Check if all the parts fit the configuration of your pool and follow the instructions.
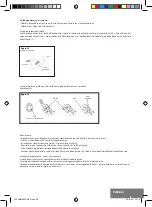
Basic Installation
For pools with a skimmer, using the automatic pressure regulator. The advantage of this
installation is that the automatic pressure regulator automatically balances the water flow
between the skimmer and the appliance. We recommend the use of the automatic pressure
regulator for safety reasons and an optimal functioning. The regulator automatically adapts
itself to provide the correct pressure to the appliance for a satisfying cleaning.
1. Switch off the pump of the pool.
2. Close all filters and draft mains except for the skimmer main
where the hoover is connected.
3. Remove the basket from the skimmer.
4. Assemble the automatic pressure regulator and the flapper connector
(see figure 8)
5. Connect the pressure regulator and the flapper connector to the back
end hole of the skimmer, as shown in figure 8.
6. Put it in the pool and let it go down to the bottom. Let the hose go down
to the bottom of the pool vertically until it is completely filled with water and free of air.
7. Pass the end of the hose in the opening of the skimmer and connect the hose directly to the pressure regulator that
is already connected to the skimmer.
Figure 5
Figure 6
Male hose end
Female end of a male / Female Section
10-30 cm
180 cm
305 cm
hose weights
Attach hose this end
Automatic regulator
valve
2“ Hose cone
Press into bottom
of skimmer
Top of skimmer
2“ Hose cone
Hose through
skimmer
opening
Automatic
regulator
valve
Attach hose
this end
NOTE: The hose length illustrated is not represen-
tative of actual size. You will need to use more
sections than shown
Female hose end
Figure 7
Figure 8
Female/Female section
to be added last
CLEANMAGIC-DEF.indd 23
26/01/10 10:12
Summary of Contents for PoolCleaner Auto
Page 1: ...CLEANMAGIC DEF indd 2 26 01 10 10 12...
Page 2: ...ASPIRATEUR AUTOMATIQUE CLEANMAGIC DEF indd 3 26 01 10 10 12...
Page 8: ...AUTOMATISCHER Poolsauger CLEANMAGIC DEF indd 9 26 01 10 10 12...
Page 14: ...AUTOMATISCHE ZWEMBADZUIGER CLEANMAGIC DEF indd 15 26 01 10 10 12...
Page 20: ...AUTOMATIC HOOVER CLEANMAGIC DEF indd 21 26 01 10 10 12...
Page 26: ...ASPIRADOR AUTOM TICO CLEANMAGIC DEF indd 27 26 01 10 10 12...
Page 32: ...ASPIRATORE AUTOMATICO CLEANMAGIC DEF indd 33 26 01 10 10 12...


