Step 3)
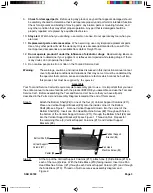
Set the Horizontal Brace (#7) against the inside of the rear Vertical Support
Columns (#11), making certain to line up the two holes in the Horizontal Brace (#7)
with the holes in the Vertical Support Columns (#11). Insert Pan Head Machine
Screws (#1) through the Horizontal Brace (#7) and into the Vertical Support
Columns (#11). Thread on Nuts to secure in place-see Figure 2.
Step 4)
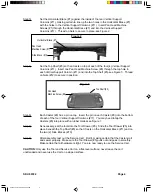
Set the Top Shelf (#3) so that it rests on top of each of the four (4) Vertical Support
Columns (#11). Insert one Pan Head Machine Screw (#8) through the top hole in
each Vertical Support Column (#11) and into the Top Shelf (#3)-see Figure 3. Thread
on Nuts (#12) to secure in position.
Top Shelf (#3)
Step 6)
Each Caster (#9) has a pin on top. Insert the pin on each Caster (#9) into the bottom
of each of the four Vertical Support Columns (#11). You may need to tap the
Casters (#9) into place with a rubber mallet-see Figure 1.
Step 7)
As necessary, set the tools into the Tool Drawer (#5). Slide the Tool Drawer (#5) into
place beneath the Top Shelf (#3) so that it rests on the Horizontal Brace (#11) and on
the two (2) Side Braces (#10).
Step 8)
After assembly, test out the Service Cart. Roll it, making certain that the Casters roll
and swivel properly. Make sure the Tool Drawer (#5) pulls out and goes in smoothly.
Make certain that all hardware is tight. You are now ready to use the Service Cart.
CAUTION:
Only use the Tool and Service Cart on a flat, level surface; never leave the cart
unattended and never use the Cart on a sloped surface.
SKU 90722
Page 4
Figure 2
Horizontal Brace (#7)
Pan Head
Machine Screw (#1)
Side Brace (#10)
Figure 3
Pan Head
Machine Screw (#8)
90722 Tool and Service Cart.p65
9/30/03, 11:22 AM
4

