background image

U-Line 2000 Series Cleaning

19

Condensor Cleaning

Interval - Every Six Months

To maintain operational efficiency, keep the front grille free of dust 
and lint, and clean the condenser every three months. Depending 
on environmental conditions, more or less frequent cleaning may 
be necessary.

WARNING

Disconnect electric power to the unit before cleaning 
the condenser.

WARNING

DO NOT touch the condenser fins. The condenser fins 
are SHARP and can be easily damaged.

IMPORTANT

IMPORTANT

DO NOT use any type of cleaner on the condenser unit.

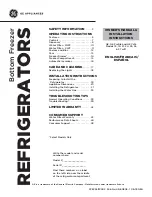
1. Remove the grill. (See MAINTENANCE)

2. Clean the condenser coil (4) using a using a soft brush with a 

“combing” action or vacuum cleaner. Do not touch the 
condenser coil.

3. Install the grill. (See MAINTENANCE)

Storage, Vacation and Moving

If not using the unit for an extended period, or otherwise stored, 
follow these steps completely:

WARNING

Electrical Shock Hazard. Disconnect power before 
servicing. Before operating, replace all panels. Failure 
to do so may result in death or electrical shock.

IMPORTANT

IMPORTANT

If the ambient temperature is expected to drop below 
50°F, turn off and unplug unit, and drain all water from the 
unit to prevent freezing damage not covered by the 
warranty.

1. Remove all consumable contents from the unit.

2. Disconnect the power cord from its outlet, and leave it 

disconnected until the unit is returned to service.

3. Clean and dry the interior of the cabinet.

4. During periods of nonuse, the cabinet must remain open to 

prevent formation of mold and mildew. Open door a minimum 
of 2 in. (5 cm) to provide the necessary ventilation.

4

1

2

5

Product Disposal

If the unit is being removed from service for disposal, check and 
obey all Federal, State and or Local regulations regarding the 
disposal and recycling of refrigeration appliances, and follow these 
steps completely:

1. Remove all consumable contents from the unit.

2. Disconnect power to the unit and unplug the power cord from 

its outlet.

DANGER

RISK OF CHILD ENTRAPEMENT. Before you throw away 
your old refrigerator or freezer, take off the doors and leave 
shelves in place so children may not easily climb inside.

3. Remove the cabinet door.

Typical Model Shown

Summary of Contents for WINE CAPTAIN 2115RS

Page 1: ...2000 SERIES WINE CAPTAIN MODELS BEVERAGE CENTERS REFRIGERATORS 2175RC 2115RS 2175WCC 2175BEVC USE AND CARE GUIDE The Built In Undercounter Leader Since 1962 U LINE COM...

Page 2: ...ild on the company s numerous patents and world firsts to guide the under counter industry in realizing its unlimited potential Read and save this Use and Care Guide IMPORTANT IMPORTANT READ all instr...

Page 3: ...ls 8 6 U Line Wine Guide 9 Looking Behind the Label 9 Wine Selections Suggestions 9 Ideal Wine Storage Considerations 10 Wine Stocking Recommendation 11 Wine Rack Removal and Installation 11 Wood Trim...

Page 4: ...2 U Line Use and Care Guide...

Page 5: ...cal Grounding Required Never attempt to repair or perform maintenance on the unit until the electricity has been disconnected Never remove the round grounding prong from the plug and never use a two p...

Page 6: ...atures Capacity 15 Wine Captain Model up to 24 Bottles 24 Wine Captain Model up to 48 Bottles Multiple temperature zones Maintains wine at their proper serving temperature Top Approximately 55 F Red M...

Page 7: ...T Adjust the set point temperature in single increments and wait 24 hours for the temperature to stabilize before rechecking To adjust the set point temperature 1 Press and release either the WARMER 2...

Page 8: ...e cabinet to illuminate Use the LIGHT icon 5 on the control panel to change the lighting functions Timed Lighting For Wine Captain Models and Beverage Centers the interior of the cabinet is illuminate...

Page 9: ...models will scroll top mid bottom temps Change F C Hold or Blackout Mode Hold 10 seconds Display and cabinet light will not operate in Blackout Mode Blackout will end in 36 hours or hold again to ter...

Page 10: ...crisper open the bottom drawer fully Grasp the handle to either side of the crisper and slide just enough to access the contents To remove crisper support both ends and slide out completely To remove...

Page 11: ...Frency Hungary Beerenauslese Sauternes Tokay Medium Bodied Semi Sweet California Germany Gewurtztraminer Liebfraumilch Light Bodied Off Dry Germany Rhine Mosel Riesling Matching Food and Wine Althoug...

Page 12: ...overpowered with an oaky taste Tannin Tannins are extracted from the grape skins and stems and are necessary for a well balanced red wine Tannins are easily identified in wine tasting as the drying se...

Page 13: ...oval and Installation To remove a rack from the cabinet 1 Remove any bottles stored on the rack 2 Grasp the end of the rack and gently slide it out until it stops 3 Press the left rack release lever d...

Page 14: ...ush or a foam applicator Allow stain to penetrate about three minutes Before the stain is dry take a stain dampened rag and remove any excess stain remaining Wipe towards the grain with medium pressur...

Page 15: ...base Swing the grille up into position 3 Align cabinet and grill holes and secure but do not overtighten grille screws 1 4 Install control knob 6 if equipped 5 Reconnect power to the unit IMPORTANT I...

Page 16: ...rt shelf at an angle approximately 15 20 over the rib in the side of the unit where you want to place the shelf Place the shelf into the unit at an angle to clear the door 2 Continue to slide the shel...

Page 17: ...U Line Use and Care Guide 15...

Page 18: ...sets 3 Turn the door upside down and inspect the hinge plate mounting holes The plate has slotted mounting holes Loosen but do not remove the two hinge plate screws 1 4 If door edge opposite the hinge...

Page 19: ...r inserts as shown on the new bottom hinge 4 Remove existing bottom hinge Remove the existing bottom hinge three screws 2 Reinstall hinge to top opposite Install the hinge just removed from the bottom...

Page 20: ...ome blurred Rust not cleaned up promptly can penetrate the surface of the stainless steel and complete removal of the rust may not be possible 9 Cleaning Interior Cleaning Disconnect power to the unit...

Page 21: ...y result in death or electrical shock IMPORTANT IMPORTANT If the ambient temperature is expected to drop below 50 F turn off and unplug unit and drain all water from the unit to prevent freezing damag...

Page 22: ...ur U Line product is malfunctioning read the OPERATION section of this guide to understand clearly the function of the control If the problem persists read the NORMAL OPERATING SOUNDS and TROUBLESHOOT...

Page 23: ...Line Product Catalog U Line s website and or on the serial tag located inside the product Exposure to temperatures below freezing may cause damage to the product Damage resulting to the product and o...

Page 24: ...forward U Line will continue offering best in class products that build on the company s numerous pat ents and world firsts to guide the undercounter industry in realizing its unlimited potential PRO...

Reviews: