background image

QUICK START GUIDE

12

u-line.com

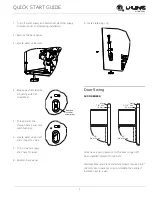
1. Remove top hinge screw pin 

with Phillips head screwdriver. 
Remove door by tilting forward 
and lifting off bottom hinge pin.

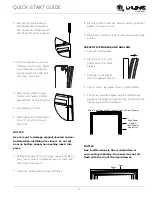
2. Pull door gasket out of groove 

(top edge of door only). Start in 
the middle and pull outward, 
moving toward the edge. This 
may take some force.

3. Remove two outside screws 

holding door handle. Slightly 
separate door handle from door.

4. Pull handle up and off.

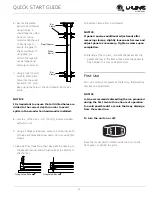
5. Slide custom door panel insert 

into 1/4" (6 mm) channel in 
door front.

NOTICE

Use care not to damage magnet, located on door 
bottom when installing door insert. Do not set 
door on bottom edge when pushing insert into 
place.

6. Holding door gasket out of the way, replace handle on 

door, making sure it is seated properly on insert and 
that screw holes line up.

7. Install two small screws removed in Step 3.

8. Starting at the corners and working inward, push door 

gasket into place on door.

9. Place door on bottom hinge pin and install upper hinge 

screw.

CRECENT ICE MAKERS AND ADA15IM

1. Fully open door/drawer.

2. Starting at corner, pull 

gasket away from door/
drawer.

3. Continue to pull gasket 

free from gasket channel.

4. Upon removal, lay gasket down on a flat surface.

5. The panel should be aligned with the outside edge 

(opposite the hinge) and high enough to align with the 
highest point in the door/drawer. 

NOTICE

Due to differences in floor construction or 
surrounding cabinetry, the panel may not sit 
flush with the top of the door/drawer.

Align Panel

Against

Door/Drawer

Edge First

Align Top Of Panel With Highest Point Of Door/Drawer

Door

Panel

Summary of Contents for U-BI1215B-00A

Page 1: ...QUICK START GUIDE Ice Makers 115 V 60 Hz 220 240 V 50 Hz...

Page 2: ...to you PRODUCT INFORMATION Looking for additional information on your product User Guides Quick Reference Guides CAD Drawings Compliance Documentation and Product Warranty information are all availab...

Page 3: ...DE u line com Contents 1 Model List 3 Safety and Warning 4 Environmental Requirements 5 Electrical 6 Water Hookup 9 Door Swing 10 General Installation 11 Integrated Panel Installation 13 First Use 14...

Page 4: ...oking for more information Visit u line com to view detailed User Guides for all U Line products Crescent Ice Makers U BI1215S 00A U BI1215INT 00A U BI1215B 00A U BI1215W 00A ADA Series U BI95B 00A U...

Page 5: ...3A ULN SS1095FC 20A ULN SS1095FD 03A ULN SS1095FD 20A ULN SS1095NF 03A ULN SS1095NF 20A ULN SP18FCS 03A ULN SP18FCS 20A ULN SP18FCB 03A ULN SP18FCB 20A ULN SP18FCW 03A ULN SP18FCW 20A ULN SS98NF 03A U...

Page 6: ...and follow these general precautions with those listed throughout this guide This appliance is not intended for use by persons including children with reduced physical sensory or mental capabilities o...

Page 7: ...U Line replacement parts Imitation parts can damage the unit affect its operation or performance and may void the warranty This appliance is intended to be used in household and similar applications...

Page 8: ...uce ice production on applicable models For best performance keep the unit out of direct sunlight and away from heat generating equipment In climates where high humidity and dew points are present con...

Page 9: ...installation must observe all state and local codes This unit requires connection to a grounded three prong polarized receptacle that has been placed by a qualified electrician The unit requires a gr...

Page 10: ...t Do not reuse old hose set CAUTION Turn off water supply and disconnect electrical supply to unit prior to installation Use caution when handling back panel The edges could be sharp 1 Turn off water...

Page 11: ...ould be between 20 and 120 psi 138 and 827 kPa The water line MUST have a shut off valve in the supply line The water line should be looped into 2 coils This will allow the unit to be removed for clea...

Page 12: ...with bushing 6 Locate water valve inlet and connect to valve 7 Turn on water supply and check for leaks 8 Reinstall back panel 9 Install retaining clip Door Swing 1200 SERIES Units have a zero clearan...

Page 13: ...a wall or similar type of structure General Installation MARINE AND BI SERIES LEVELING INFORMATION NOTICE Because these units do not have leveling legs it is extremely important that they sit on a lev...

Page 14: ...he unit to be gently tipped into the opening Readjust the front legs to level the unit after it is correctly positioned in the opening INSTALLATION 1 Plug in the power electrical cord 2 Gently push th...

Page 15: ...ace handle on door making sure it is seated properly on insert and that screw holes line up 7 Install two small screws removed in Step 3 8 Starting at the corners and working inward push door gasket i...

Page 16: ...screws 10 Be sure the screws force their way past the opening on the gasket channel and sit flush against the bottom of the channel 11 Remove clamps from door drawer NOTICE If panel requires additiona...

Page 17: ...fast freezing It is not caused by the health taste or chemical make up of the water It is the same air that is in every glass of water you drink Remove the ice bucket for emptying and cleaning To rem...

Page 18: ...therwise noted in the product manual Exposure to temperatures outside this range may cause degradation of performance and issues such as lower ice production or spoiled contents that are not covered u...

Page 19: ...mitted to U Line The 30 day warranty does not apply to cosmetic damages A proof of purchase may be required 4 The following conditions are excluded from this limited warranty damage caused by outdoor...

Page 20: ...OF FITNESS FOR A PARTICULAR PURPOSE ALL OF WHICH ARE DISCLAIMED U Line s sole liability and your exclusive remedy under this warranty are set forth in the paragraphs above U Line shall have no liabili...

Reviews: