background image

PAGE 4 OF 12 

0623 IH-9600

WALL BAG HOOK INSTALLATION

1.  Locate wall stud and measure 44" up from floor in 

the desired location. Mark the wall. 

NOTE: Position the bag hook so the top of  
the mounting plate is level with the 44" mark.

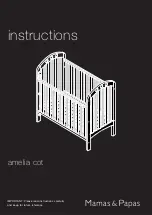
2.  Use the bag hook as a guide to mark and drill  

three pilot holes.

3.  Use the provided 9/32 x 7/8" Phillips flat head


screws 

to secure the bag hook in position. (See Figure 8)

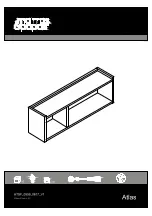
4.  Install the escutcheon plate and turn clockwise to 

cover the mounting screws. (See Figure 9) 

INSTALLATION CONTINUED

MAINTENANCE

1-800-295-5510

uline.com

Figure 9

Escutcheon 

Plate

Figure 8

Bag Hook

•  Clean surface of unit prior to disinfecting. 

•  Use a clean nylon brush or a rag to loosen and 

remove soil from the textured surfaces. 

•  Use disinfectants and detergents that do not contain 

overwhelming fragrances.

Summary of Contents for KOALA KARE H-9600

Page 1: ...ckle depressing the lever when the strap is tight Give the strap a tug in the horizontal direction away from the buckle checking that the strap remains in place beneath the buckle To loosen the strap...

Page 2: ...ce inside the wall for the toggles to turn This will vary depending on the toggles used FOR WOOD STUD WALL Locate studs in wall with stud finder Measure from the floor 37 on stud center and mark the w...

Page 3: ...cket See Figure 5 NOTE All six screws and four washers must be properly mounted to the chassis 8 To install liner dispenser unlock and open liner dispenser lid using key This will expose liner dispens...

Page 4: ...e provided 9 32 x 7 8 Phillips flat head screws to secure the bag hook in position See Figure 8 4 Install the escutcheon plate and turn clockwise to cover the mounting screws See Figure 9 INSTALLATION...

Page 5: ...i n para cambiar pa ales bien cuidada funciona de la siguiente manera Se abre y cierra f cilmente La correa y la hebilla funcionan La correa se mantiene bien en su lugar mientras la hebilla la oprime...

Page 6: ...clajes tipo mariposa que se usen PARA PARED DE VIGAS DE MADERA Mida desde el piso 37 al centro de la viga y marque la pared Los orificios de instalaci n est n dise ados para centros de viga de 16 Aseg...

Page 7: ...y el soporte de instalaci n Vea Diagrama 5 NOTA Se deben instalar adecuadamente los seis tornillos y las cuatro rondanas al armaz n 8 Para instalar el despachador de cubiertas use la llave para abrir...

Page 8: ...cho para bolsa como gu a para marcar y perforar tres orificios gu a 3 Use los tornillos de cabeza plana de cruz 9 32 x 7 8 para fijar el gancho para bolsa en su lugar Vea Diagrama 8 4 Instale la cubie...

Page 9: ...douceur Est quip e d une sangle et d une boucle fonctionnelle La sangle reste fermement en place lorsque la boucle est attach e Dispose d un distributeur d al ses approvisionn Procure un endroit prop...

Page 10: ...les Cet espace variera en fonction du type de cheville utilis e INSTALLATION SUR MUR MONTANTS EN BOIS Mesurez 37 po du sol et marquez l emplacement de montage au centre du montant mural Les trous de m...

Page 11: ...igure 5 REMARQUE Les six vis et les quatre rondelles doivent tre correctement mont es sur l embase 8 Pour installer le distributeur d al ses d verrouillez et ouvrez le couvercle du distributeur l aide...

Page 12: ...e pour marquer l emplacement du montage sur le mur et percez les trois trous pilotes 3 Utilisez les vis cruciformes t te plate fournies de 9 32 x 7 8 po pour fixer le crochet pour sac en place Voir Fi...

Reviews: