background image

®

INSTALLATION GUIDE

©2013 U-Line Corporation

Publication Number 30287 4/2013 Rev.H

The American Built-In Undercounter Leader Since 1962

U-LINE.COM

BUILDING ON THREE GENERATIONS OF INNOVATION

For over five decades and through three generations, U-Line continues to be the leader in innovation, quality and 
performance in the premium built-in undercounter ice making, refrigeration and wine preservation market. U-Line 
has captivated those with an appreciation for the finer things with exceptional functionality, style, inspired 
innovation and attention to even the smallest details. We are known and respected for our unwavering dedication 
to product design, quality and selection.

In 1962, Henry Uihlein founded U-Line Corporation as an outgrowth of Ben-Hur Freezer Company and was the first 
to develop and patent an automatic stand-alone undercounter residential ice maker. His foresight and determination 
to develop new ideas and to succeed when there were no clear guidelines or solutions are evident today. The newest 
Uihlein generation continues to build upon the family’s innovative legacy at the Milwaukee, Wisconsin based business 
by providing continuity and vision from which new designs and technology continue to be born.

Today the complete U-Line product collection includes Ice Makers, Ice Machines, Wine Captain

®

 Models, Combo

®


Models, Refrigerator / Freezers, Refrigerators, Drawer Models and Beverage Centers. The U-Line brand offers 
products in the 1000 Series, 2000 Series and the Modular 3000 Series. The 1000 Series offers a more targeted 
priced product with appropriate features, while the 2000 Series offers upscale features, advanced technology and 
specialized product families. Our Modular 3000 Series provides sleek design and versatile temperature settings with 
our U-Select

®

 control. U-Line’s approach to its breadth of products, multiple price points and features allows a 

choice and product that will fit any lifestyle.

PRODUCT INFORMATION

Complete Installation Guides, Use and Care Guides, Specifications & Features and Benefits, CAD Drawings, 
Overlay Panel/Frame and Toe-Kick Specifications and Instructions, Compliance Documentation and Applicable 
Energy Guides are available for reference and download at u-line.com. 

SERVICE INFORMATION

Please consult your Use and Care Guide for troubleshooting information. Answers to Customer Frequently Asked 
Questions are available at u-line.com under Customer Service. You may contact U-Line directly:

GENERAL INQUIRIES:

U-Line Corporation

P.O. Box 245040

Milwaukee, Wisconsin 53224-9540 U.S.A.

Phone 1-414-354-0300

FAX 1-414-354-7905

Email: [email protected]

u-line.com

SERVICE ASSISTANCE:

Phone 1-800-779-2547

FAX 1-414-354-5696

Email: [email protected]

u-lineservice.com

PARTS ASSISTANCE:

E-mail: [email protected]

DESIGNED, ENGINEERED AND ASSEMBLED IN WISCONSIN, USA

Summary of Contents for ICEMAKER Series

Page 1: ...115S 22 U BI2115W 20 ULN BI95B 00 ULN BI95B 20 ULN BI95BTP 03 ULN BI95BTP 20 ULN BI95WH 00 ULN BI95WH 20 BI95 U ADA15IMB 00 U ADA15IMS 00 U ADA15IMS 01 ULN BI98B 00 ULN BI98B 20 ULN BI98WH 00 ULN BI98...

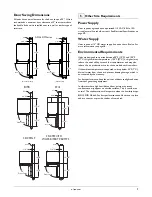
Page 2: ...BI95 BI95BTP BI98 BI2115 5 SS1095 SP18 BCM95 WH95 6 Door Swing Dimensions 7 5 Other Site Requirements Power Supply 7 Water Supply 7 Environmental Requirements 7 6 Door Reversal BI95 BI98 8 WH95TP BI95...

Page 3: ...place so children may not easily climb inside WARNING SHOCK HAZARD Electrical Grounding Required Never attempt to repair or perform maintenance on the unit until the electricity has been disconnected...

Page 4: ...TERHOOKUP Exterior Cleaning Black and White Models Black and White surfaces may be cleaned with a mild detergent and warm water solution Do not use solvent based or abrasive cleaners Use a soft sponge...

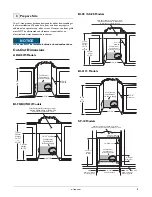
Page 5: ...t Height 25 1 16 Filler Panel Not Provided by U Line May Be Added Above or Below Unit to Enclose for a Built In Look 14 3 16 18 1 2 Minimum See Electrical Specifications for Power Supply 8 Typical Cou...

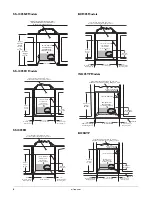
Page 6: ...4 1 4 Cut Out Width 3 4 Minimum Flange Mounting Area 3 4 Minimum Flange Mounting Area Cut Out Height 26 1 16 Filler Panel Not Provided by U Line Needed to Attach Mounting Flange on Unit 18 1 2 Minimum...

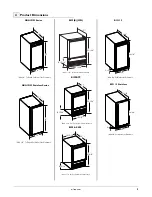
Page 7: ...ance 15 34 1 8 3 13 16 23 1 8 BI2115 Stainless Add 1 1 2 For Water Line Clearance 25 1 16 13 15 16 17 8 15 16 BI95BTP BI98 SS98 27 3 8 14 15 16 20 Add 1 1 2 For For Water Line Clearance 8 15 16 17 25...

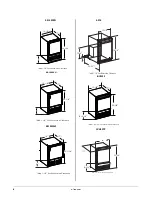
Page 8: ...arance 17 25 1 8 15 1 8 9 Add 1 1 2 For Water Line Clearance 25 1 16 14 17 9 15 1 8 24 1 2 18 7 8 7 9 16 1 2 Add 1 1 2 ForWater Line Clearance BCM95 WH95TP 17 25 1 8 14 8 15 16 Add 1 1 2 For For Water...

Page 9: ...e models with ice makers If the ambient temperature is expected to drop below 45 F 7 C drain all water from the unit to prevent freezing damage which is not covered by the warranty For best performanc...

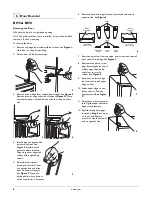
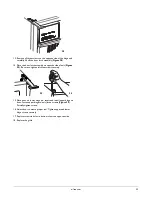
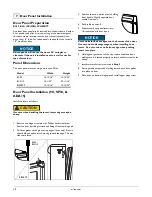
Page 10: ...door on bottom hinge pin See Figure 5 Clean out bushing hole in door bottom with a screwdriver if necessary 6 Remove plastic hole plug from door handle and relocate on opposite side See Figure 6 7 Rem...

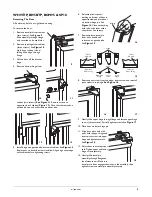
Page 11: ...or on bottom hinge pin See Figure 14 Clean out bushing hole in door bottom with a screwdriver if necessary 7 Remove plastic travel pin from door handle and relocate on opposite side See Figure 15 8 Re...

Page 12: ...from the original location and remove the handle Remove the two screws on the opposite side of the door Figure 25 Do not place handle on door until you have completed steps 9 10 9 Remove plastic hole...

Page 13: ...unit Figure 29 Be sure to tighten all three screws securely 15 Place door on lower hinge pin Invert and install upper hinge on door Fasten upper hinge to unit three screws Figure 30 Partially tighten...

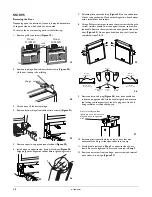
Page 14: ...om hinge pin 2 Pull door gasket out of groove top edge of door only Start in the middle and pull outward moving toward the edge This may take some force 3 Remove the two outside screws holding door ha...

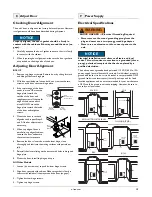
Page 15: ...oles in hinge and hinge plate 8 Mount the door install top hinge pivot pin All Other Models 1 Loosen do not remove top and bottom hinge screws 2 Align door squarely with cabinet Make sure gasket is fi...

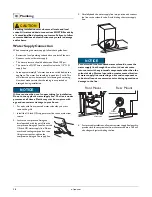
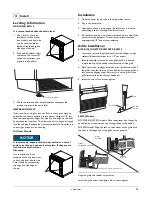
Page 16: ...upture with age and cause water damage to your home 1 For units with front mounted water solenoids you must remove the grille 1 Install the 1 4 inch OD copper water line to the main water source 2 Loc...

Page 17: ...main water source 5 Plug in the powercord 6 Gently push the unit into position Be careful not to kink the water supply line or entangle the electrical cord 7 Re check the leveling from front to back a...

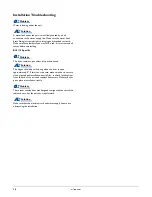
Page 18: ...ic Problem Q The door remains open unless it is pushed closed Solution A The hinges should be self closing when the door is open approximately 8 If this is not the case make sure the closers are clean...

Page 19: ...ne Captain Models Combo Models Refrigerator Freezers Refrigerators Drawer Models and Beverage Centers The U Line brand offers products in the 1000 Series 2000 Series and the Modular 3000 Series The 10...

Reviews: