PAGE 2 OF 8
0422 IH-9884
SAFETY
WARNING! Read all safety warnings before
installing, making connections or servicing this
scale. Failure to comply with these warnings
could result in personal injury and/or property
damage. Retain these instructions for future
reference.
• Verify that the AC adapters input voltage range
and plug type are compatible with the local AC
mains power supply.
• Position the instrument so that the AC adapter can
be easily disconnected from the wall socket.
• Position the power cord so that it does not pose a
potential obstacle or tripping hazard.
• Operate the unit only under ambient conditions
specified in these instructions.
• Scale is for indoor use only.
• Do not operate in hazardous or explosive
environments.
• Only use in dry locations.
• Only use approved accessories and peripherals.
• Disconnect from power supply when cleaning.
• Service should only be performed by authorized
personnel.
SETUP
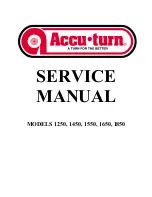
TRANSPORTATION LOCK
1. Rotate the
pointer on the
transportation lock
to the unlocked
position.
(See Figure 1)
NOTE:
Transportation
lock is located
on underside
of scale.
LOCATION
NOTE: Use on a firm, steady surface.
NOTE: Avoid locations with excessive air current,
vibrations, heat sources or rapid temperature
changes.
1. Adjust the leveling feet so level bubble is centered in
circle. (See Figure 2)
CONNECTING POWER
BATTERY
1. Remove battery cover and install four C batteries
using the polarity indications as shown in the battery
compartment. (See Figure 3)
AC ADAPTER
NOTE: The AC adapter is used to power the
balance when battery power is not needed.
2. Connect the AC adapter plug to the input jack.
(See Figure 3)
3. Connect AC adapter (supplied) to the proper AC
supply.
Figure 1
Pointer
Unlocked
Position
Locked
Position
Balanced
Unbalanced
Leveling
Feet
Level
Bubble
Figure 2
Battery
Cover
Input Jack
Figure 3


