PAGE 3 OF 21
0621 IH-8554
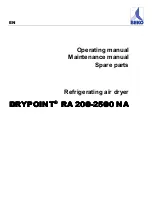
CONTROL PANEL
OPERATION
Power On
LED Indicator
Mirage
Display Button
Preset Mode
Button
Humidity Selection
Button
Filter
Button
Timer
Button
Fan Speed
Button
Clean Filter
LED Indicator
Fan Speed
LED Indicators
MyHome Mode
LED Indicators
Bucket Full
LED Indicator
Timer
LED Indicator
Child-Lock
LED Indicator
Digital Humidistat
Display
Power
Button
WARNING! Dehumidifier must be upright
for 24 hours prior to operating. This ensures
compressor will function as intended.
1. When first operating dehumidifier, run Continuous
mode for 24 hours.
2.
Power On and Off
– Press the power button once to
manually turn on unit. Press the power button once
more to turn off unit.
3.
Humidity Selection
– Press the
or
buttons to
choose desired humidity in the room. Each button
press will change desired room humidity by 5%.
The room humidity is selectable from 35-80% or
continuous. Unit will cycle on and off to maintain
chosen humidity level. If dehumidifier is to operate
continuously regardless of room humidity, press the
mode button until "
CO
" is displayed. This will enable
continuous operation and the continuous indicator
will light up on the control panel.
4.
Fan Speed Control
– Press the fan speed button
to cycle through different fan speeds: quiet, high
and low. Fan speed can be visually distinguished
by the fan speed indicators on control panel. For
fast dehumidification, choose high. For moderate
dehumidification, choose low. For quiet operation,
choose quiet.
5.
Timer Auto On
– To program unit to automatically
turn on, press the Timer button when unit is off.
Press
or
to increase or decrease the timer in
30-minute increments up to 10 hours. After 10 hours,
each press of the
or
buttons will increase timer
in one-hour increments up to 24 hours. Once desired
time is reached, unit will automatically turn on.
6.
Timer Auto Shut-Off
– To program unit to automatically
turn off, press the timer button when unit is on. Each
press of the
or
buttons will change the timer
setting in 30-minute increments up to 10 hours. After
10 hours, each press of the
or
buttons will
increase or decrease timer in one-hour increments
up to 24 hours. Once desired time is over, unit will
automatically power off.
7.
MyHome Modes
– Preset humidity level settings
allow user to easily move dehumidifier from room
to room and select the corresponding mode for
location in which dehumidifier is operating. Press
mode button to choose from sleeping space (55%),
living space (50%) or basement (45%).
8.
Child-Lock Mode
– To lock control panel, press and
hold the timer button for three seconds. Locking the
control panel prevents someone from accidentally
changing settings. When locked, the lock indicator
will light up. Press and hold the timer button for three
seconds to unlock control panel.