background image

PAGE 3 OF 18 

0317 IH-2304

NOTE: To minimize damage during shipping, 
tower is unhooked from the frame and is laying 

down. To stand the tower up, two people and 
9/16" wrench will be needed.

1.  Remove the 5 nuts and washers located on the 

tower end of the frame using a 9/16" wrench.  

(See Figure 2) The extra hole is to be used to lag the 

machine to the floor.

2.  Two people may now stand the tower up. Position 

the tower so the film carriage faces the turntable. 

Align the holes in the base of the tower with the 5 

threaded studs in the frame. (See Figure 3)

3.  Tighten the 5 bolts using the 9/16" wrench.

4.  Unwrap the machine and refer to the operations 

manual to use it.

5.  Place forks of the forklift through the tubes provided 

at the rear base of the module, remove the 

machine from these skids, and place it at the 

designated wrap area. 

If the OPTIONAL ramp (H-1071) is purchased:  

Select a ramp position. The ramp can be positioned 

anywhere in a 180° rotation around the front of 

the turntable. There should be a 1/4" gap between 

the turntable and the ramp. The ramp should be 

fully supported by the floor. Both the ramp and the 

machine should be lagged to the floor.

FILM LOADING

1.  Place the film on the film mandrel.

2.  Follow the film feed diagram and thread the 1.8m  

(6ft.) film tail all the way through the rollers.  

(See Figure 4)

3.  Attach the film securely to the pallet. Tying the end 

of the film in a knot often helps secure the film to the 

pallet.

OPERATING

Simply step on the foot pedal to start the turntable drive 

motor. The foot pedal is a maintained switch. Pressing 

the pedal again turns the turntable motor off. Apply film 

as desired by raising and lowering the carriage.

FILM FORCE

Film force is controlled by the knob on top of the large 

black mandrel. Turning the knob clockwise increases 

the Force-to-Load. This in turn increases the post-stretch 

of the film. 

TURNTABLE SPEED ADJUSTMENT

The turntable speed is adjusted by a built-in 

potentiometer dial on the AC frequency drive. 

Turn clockwise to increase, counter-clockwise to 

decrease. The maximum turntable speed is 12 RPM.

MACHINE SETUP

OPERATION

Figure 2

Figure 3

Figure 4

Summary of Contents for H-2304

Page 1: ...film gauge and film manufacturer CAUTION Motor control equipment and electronic controllers are connected to hazardous line voltages When servicing drive and controllers there may be exposed component...

Page 2: ...and that you do not stretch the wiring cable Remember you will need to provide electrical service to a 120 VAC 15 AMP outlet FLOOR WEIGHT BEARING TOLERANCE The floor must be able to bear the weight of...

Page 3: ...t of the turntable There should be a 1 4 gap between the turntable and the ramp The ramp should be fully supported by the floor Both the ramp and the machine should be lagged to the floor FILM LOADING...

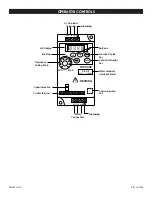
Page 4: ...Port MIN U T1 V T2 W T3 MAX R L1 S L2 T L3 Motor Capacity and Input Power Data Confirmation Key Grounding AC Line Input Terminals Function Display Key Up Down LED Display Run Stop Frequency Setting K...

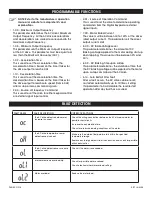
Page 5: ...t be between 30 to 120 of the drives rated output current This parameter sets the drive s output current limit 8 00 DC Brake Voltage Level This parameter determines the amount of DC Braking voltage ap...

Page 6: ...roperly Step on the foot switch and use a voltmeter to test for continuity of the foot switch Tighten wiring replace the foot switch if necessary The frequency drive is not functioning i e no faults d...

Page 7: ...i metro interno de 3 Largo de 1 000 2 000 dependiendo del calibre de la pel cula y el fabricante de la misma CUIDADO El equipo de control del motor y los controladores electr nicos est n conectados a...

Page 8: ...para cargar descargar la m quina y que no est estirando los cables Recuerde necesitar brindar electricidad desde a un enchufe de 120 VCA y 15 AMP TOLERANCIA DEL PISO AL PESO El piso deber de ser apto...

Page 9: ...4 entre la plataforma giratoria y la rampa La rampa deber estar completamente soportada por el piso La rampa tanto como la m quina deber n de estar sujetadas al piso CARGAR LA PEL CULA 1 Coloque la p...

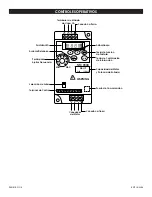
Page 10: ...d del Motor y Potencia de Entrada Tecla de Confirmaci n de Informaci n Conexi n a Tierra Terminales de Entrada de L nea CA Tecla de Funci n de Pantalla Arriba Abajo Pantalla LED Avanzar Detenerse Peri...

Page 11: ...e la corriente de salida nominal del variador Este par metro ajusta el l mite de corriente de salida del variador 8 00 Nivel de Paro de Voltaje CD Este par metro determina la cantidad de voltaje de pa...

Page 12: ...la velocidad No est funcionando apropiadamente Pise el interruptor de pedal y utilice un volt metro para probar la continuidad del interruptor de pedal Apriete el cableado y reemplace el interruptor d...

Page 13: ...000 pi 2 000 pi selon le calibre et le fabricant du film MISE EN GARDE La commande du moteur et les r gulateurs lectroniques sont branch s des tensions dangereuses Lors de l entretien du variateur et...

Page 14: ...et d charger la machine et que vous n tirez pas le c ble Vous devez brancher la machine une prise de 120 V c a 15 A CAPACIT PORTANTE DU PLANCHER Le plancher doit pouvoir supporter le poids de la machi...

Page 15: ...r un espace de 0 6 cm 1 4 po entre la plaque tournante et la rampe La rampe doit tre enti rement soutenue par le plancher La rampe et la machine doivent tre fix es au plancher CHARGEMENT DU FILM 1 Pla...

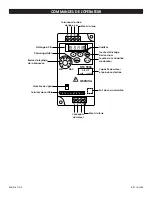
Page 16: ...u moteur et puissance d entr e Touche de confirmation de donn es Mise la terre Terminaux de saisie de ligne c a Touche d affichage des fonctions Haut Bas Affichage DEL D marrage Arr t Bouton de r glag...

Page 17: ...aleur doit tre comprise entre 30 et 120 du courant nominal de sortie des variateurs Ce param tre tablit la limite de courant de sortie du variateur 8 00 Niveau de tension du freinage c c Ce param tre...

Page 18: ...d et utilisez un voltm tre pour tester la continuit de l interrupteur au pied Serrez le c blage remplacez l interrupteur au pied au besoin Le variateur de fr quence ne fonctionne pas p ex aucun messag...

Reviews: