background image

Installation & Service Manual

NSSD

Page 5

October, 2002

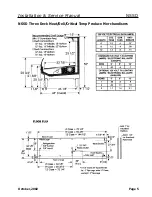
NSSD Three Deck Meat/Deli/Critical Temp Produce Merchandisers

Summary of Contents for NSSD

Page 1: ...erican National Standard Institute NSF International Health and Sanitation standard ANSI NSF 7 1999 PRINTED IN Specifications subject to REPLACES ISSUE PART IN U S A change without notice EDITION 3 02 DATE 10 02 NO 9037171 REV A Tyler Refrigeration Corporation Niles Michigan 49120 THREE DECK MEAT DELI CRITICAL TEMP PRODUCE MERCHANDISERS WITH CURVED FRONT GLASS Medium Temperature Self Serve Display...

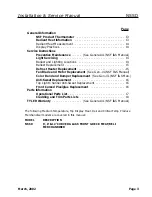
Page 2: ...I S Manual Refrigeration Procedures See General UL NSF I S Manual Electrical Procedures 6 Electrical Considerations 6 Defrost Information 7 Defrost Control Chart 7 Installation Procedure Check Lists See Gen UL NSF I S Manual Wiring Diagrams 7 NSSD Domestic Export 50Hz Case Circuits 8 Cleaning and Sanitation Component Removal and Installation Instructions for Cleaning 12 Shelves and Shelf Brackets ...

Page 3: ...t 15 Fan Blade and Motor Replacement See Gen UL NSF I S Manual Color Band and Bumper Replacement See Gen UL NSF I S Man Anti Sweat Replacement 16 Top Light Channel Anti Sweat Replacement 16 Front Curved Plexiglas Replacement 16 Parts Information Operational Parts List 17 Cladding and Trim Parts Lists 18 TYLER Warranty See General UL NSF I S Manual The following Medium Temperature Top Display Meat ...

Page 4: ...NSSD Tyler Refrigeration Page 4 October 2002 SPECIFICATIONS NSSD Three Deck Meat Deli Critical Temp Produce Merchandisers ...

Page 5: ...Installation Service Manual NSSD Page 5 October 2002 NSSD Three Deck Meat Deli Critical Temp Produce Merchandisers ...

Page 6: ...an house the electrical wiring components and terminal blocks All components and wiring can be located in either the lower front or the lower rear of the case Case Fan Circuit This circuit is to be supplied by an uninterrupt ed protected 120V circuit The case fan circuit is not cycled except when equipped for gas defrost On gas defrost cases the fan circuit is controlled by a 50 40 klixon NOTE Wit...

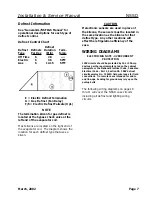
Page 7: ...ch defrost type that uses a klixon CAUTION If electronic sensors are used in place of the klixons the sensors must be located in the same location as the klixons for that defrost type Any other locations will effect the refrigeration efficiency of the case WIRING DIAGRAMS ELECTRICIAN NOTE OVERCURRENT PROTECTION 120V circuits should be protected by 15 or 20 Amp devices per the requirements noted on...

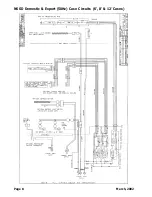
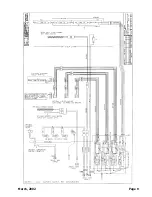
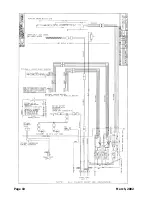
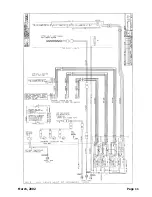
Page 8: ...Page 8 March 2002 NSSD Domestic Export 50Hz Case Circuits 6 8 12 Cases ...

Page 9: ...March 2002 Page 9 ...

Page 10: ...Page 10 March 2002 ...

Page 11: ...March 2002 Page 11 ...

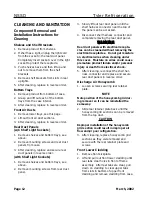
Page 12: ...anel until the shelf harness connector near the top of the panel can be accessed 4 Disconnect shelf harness connector and complete removing the rear duct panel W WA AR RN NI IN NG G Rear duct panels with electrical recepta cles can be cleaned without removing the electrical receptacles Do not get moisture on electrical wires when cleaning under this cover Moisture on wires could cause premature pr...

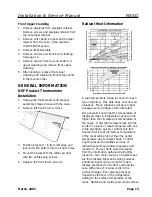
Page 13: ...sources come from bad display practices which either overload the case with product or allow voids in the product display Poor display practices impair the efficiency of the refrigeration adding to the surface temperature of the meat Bacteria and molds grow when surface Front Upper Cladding 1 Remove plexiglas from plexiglas retainer Remove screws and plexiglas retainer from top of bumper retainer ...

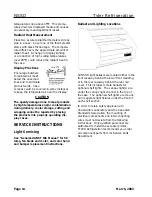
Page 14: ... and wrapping cannot be repaired by placing the products into properly operating dis play cases SERVICE INSTRUCTIONS Light Servicing See General UL NSF I S Manual for T 8 lamp fan blade and motor and color band and bumper replacement instructions Ballast and Lighting Locations All NSSD light ballasts are located either in the front raceway behind the lower front cladding or in the rear raceway beh...

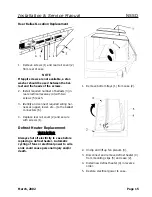
Page 15: ...OTE If tappit screws are not available a star washer should be used between the bal last and the heads of the screws 2 Install required number of ballasts 3 in rear electrical raceway 4 with two screws 5 each 3 Identify and connect required wiring har nesses upper lower etc to the ballast connectors 6 4 Replace rear rail cover 2 and secure with screws 1 Defrost Heater Replacement W WA AR RN NI IN ...

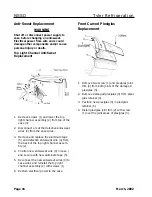
Page 16: ...nd replace the aluminum tape 5 and defective anti sweat wire 4 from the back of the top light channel assem bly 2 4 Position new anti sweat wire 4 in case and secure with new aluminum tape 5 5 Reconnect the new anti sweat wires 4 to case wires and reinstall the top light channel assembly 2 with screws 1 6 Restore electrical power to the case Front Curved Plexiglas Replacement 1 Remove two screw 1 ...

Page 17: ...s 9025005 9025005 9025005 Opt ECM Fan Blades 7 35 5B 9044934 9044934 9044934 T 8 Ballast canopy shelf canopy 1 row 5991029 5991029 5991030 opt shelf 2 row or 3 row 5991030 5991030 5991030 T 8 Lampholder canopy or shelf 9041897 9041897 9041897 Anti Sweat Heater Wire top light 9043426 9043427 9043428 Opt Elec Def Heater 5125153 5124521 5124522 Opt Elec Def Limit Klixon 5125211 5125211 5125211 Opt Ga...

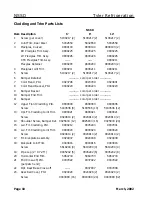
Page 18: ...mper End Trim color per order 11 Bumper color per order 12 Upper Front Cladding Ptd 9800000 9800003 9800006 Screw 5183536 8 5183536 10 5183536 12 13 Upr Frt Cladding Joint Trim 9800021 9800021 9800021 Screw 9024814 2 9024814 2 9024814 2 14 Shoulder Screw Bumper Ret 9025833 12 9025833 16 9025833 24 15 Lwr Frt Cladding Ptd 9800212 9045243 9037941 16 Lwr Frt Cladding Joint Trim 9800024 9800024 980002...

Page 19: ...Installation Service Manual NSSD March 2002 Page 19 ...

Reviews: